by Sarah Whitfield
A bad AC condenser shows up fast — warm air from the vents is the most obvious sign. Bad ac condenser symptoms also include refrigerant leaks, visible fin damage, unusual noises, and sometimes an overheating engine. Our team has diagnosed these problems across dozens of makes and models, and the good news is that a failing condenser is usually identifiable without expensive shop equipment.
The AC condenser sits at the very front of the vehicle, just ahead of the radiator. Its job is to release heat from the refrigerant (the pressurized fluid that cools the cabin) before that fluid cycles back through the system. When the condenser fails, the AC system loses efficiency — or stops working entirely. Most drivers notice something is wrong during peak summer heat, which is, of course, the worst time to be stuck without cold air.
Catching condenser problems early matters more than most people realize. A failed condenser that keeps running forces the AC compressor to work against an abnormal load, which eventually leads to compressor failure — a repair that can cost three to five times as much. Since both the condenser and the radiator share the same front-end location, it's also worth checking for a cracked coolant reservoir at the same time, since both problems can surface together.
Contents
The condenser is the unsung hero of the AC system. It handles the demanding work of cooling down hot, high-pressure refrigerant before it cycles back through the evaporator inside the cabin. When it starts to fail, the symptoms are rarely subtle. Here's what our team looks for first when bad ac condenser symptoms come in for diagnosis.
This is the most immediate and recognizable sign. The AC may blow cold for a few minutes after startup, then gradually shift to warm or ambient air as the system loses refrigerant pressure. In severe cases, the air is warm from the first second the AC is switched on.
The root cause is straightforward. A damaged condenser can't shed heat from the refrigerant properly. The refrigerant stays too hot, and the evaporator — the part inside the dashboard that actually chills the cabin air — can't do its job without properly cooled refrigerant flowing through it.
Short-cycling is worth calling out specifically. When the system pressure drops too low due to refrigerant loss, a low-pressure cutoff switch shuts the compressor down to protect it. The compressor kicks back on when pressure briefly recovers, then cuts off again almost immediately. That rapid cycling is a clear signal the system is low on refrigerant.
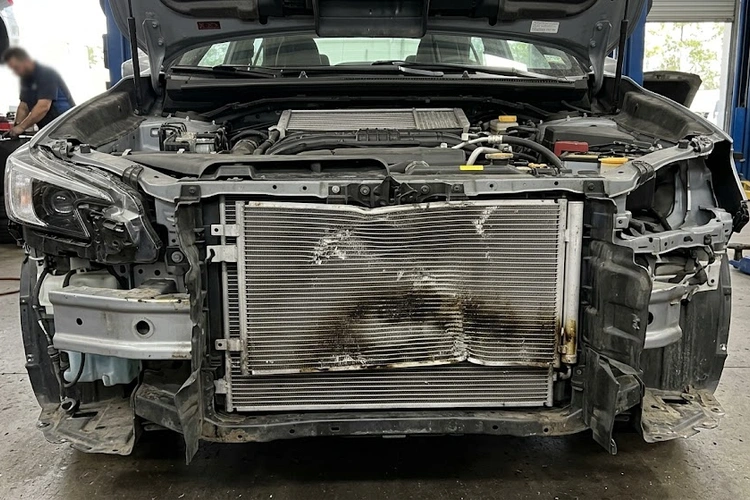
Refrigerant leaks are the second most common bad ac condenser symptom our team encounters. The condenser sits directly behind the front grille, making it the first component in line for rock strikes, road debris, and gravel impacts at highway speeds. Even a small puncture causes a slow refrigerant leak that eventually empties the system.
Refrigerant itself evaporates on contact with air — it's invisible. But the refrigerant oil that travels with it through the system leaves behind a greasy, often darkish residue on the condenser fins (the thin aluminum slats on the face of the unit). Our team frequently spots these oily stains during a visual inspection before touching any pressure gauges.
Pro tip: Shining a UV light on the condenser fins is one of the fastest ways to confirm a refrigerant oil leak — most AC systems are pre-loaded with UV dye at the factory that glows bright yellow-green under UV illumination.
The condenser is the front-most component in the engine bay on most vehicles. It faces every bug, rock, and road hazard head-on at speed. Some degree of fin bending is normal over time and doesn't necessarily mean the condenser is leaking. But cracks along the aluminum core, holes from debris strikes, or severely crushed fin sections are a different story — those require replacement.
A quick look behind the front grille takes about two minutes and can reveal obvious damage. Checking the condenser this way during routine oil changes is a habit that catches problems early, before refrigerant is lost and compressor damage begins.
This one surprises many drivers. The AC condenser sits directly in front of the radiator. If the condenser is severely clogged with debris or badly damaged, it restricts airflow to the radiator. Less airflow means the engine coolant can't shed heat fast enough, and engine temperature climbs — especially in slow traffic or during summer heat.
Not every overheating situation traces back to the condenser, but when engine temperature spikes appear alongside reduced AC performance, it's worth checking the front of the car carefully. Our team always performs a full front-end inspection when both symptoms arrive together. Other cooling system components are also worth reviewing during that inspection — it's a common area for multiple issues to compound.
Diagnosing bad ac condenser symptoms doesn't always require a full shop visit. A methodical, step-by-step inspection can identify most condenser problems within 30 minutes. Here's how our team approaches it when a vehicle comes in with AC complaints.
The inspection always starts with the eyes. Remove any lower grille splash guards or open the grille area and look directly at the condenser face. A healthy condenser has clean, flat, evenly spaced aluminum fins with no discoloration. Here's what a damaged one typically shows:
According to the U.S. Environmental Protection Agency, refrigerants used in vehicle AC systems are regulated substances — intentionally venting them into the atmosphere is illegal. Any condenser work that involves opening the refrigerant circuit must follow proper recovery procedures using certified equipment.
A set of AC manifold gauges reads both the high-side and low-side refrigerant pressures simultaneously. Those numbers tell a clear diagnostic story. Low pressure on both sides points toward a refrigerant leak somewhere in the system — and with a visual inspection already completed, isolating the condenser as the source becomes straightforward.
Many auto parts retailers rent manifold gauge sets. With a basic understanding of the normal pressure ranges for the specific refrigerant type — R-134a in most vehicles built before 2020, R-1234yf in newer models — most experienced DIYers can confirm a condenser leak without professional help. If the vehicle is also producing a whistling noise while driving, a refrigerant pressure leak at a fitting or crack in the condenser could be contributing to that sound, especially at highway speeds where wind amplifies it.
A professional recovery machine can pull the remaining refrigerant and measure exactly how much was lost — a useful data point when determining whether the condenser has been slowly leaking for weeks or suffered a more sudden failure.
After working through hundreds of AC system repairs, our team has noticed clear and repeating patterns in how condensers fail. Understanding those patterns helps narrow the diagnosis faster and prevents the same problem from recurring after the repair.
Road debris is the single leading cause of condenser damage in our experience. Gravel, rocks, and highway fragments hit the condenser at speed, directly through the front grille opening. Most of the time the damage is minor — some bent fins and slightly reduced efficiency that builds up over years. But a direct hit from a larger rock can punch a clean hole through the aluminum core, causing immediate, complete refrigerant loss.
Pickup trucks, SUVs, and vehicles driven frequently on unpaved or gravel roads see this type of damage most often. Aftermarket condenser guards exist for many popular truck and SUV platforms and are worth considering for vehicles regularly driven in those conditions. They mount behind the lower grille and deflect debris before it reaches the condenser fins.
The majority of condenser failures our team handles are not dramatic. A small crack or pinhole leak allows refrigerant to escape gradually over weeks or months. Drivers often notice reduced AC performance — "it's just not as cold as it used to be" — and attribute it to age rather than a specific problem. By the time the system stops cooling entirely, a significant fraction of the refrigerant charge has already been lost.
Sudden failures are less common but more obvious. They typically follow a front-end collision, a significant debris strike, or physical damage during routine service. The AC simply stops working immediately, and the cause is visible from a cursory glance at the condenser.
Our team also regularly encounters condenser failures related strictly to age and corrosion. Vehicles in coastal climates or regions that use road salt heavily through winter suffer from accelerated aluminum corrosion on the condenser. The corrosion slowly eats through the aluminum body from the outside, eventually causing small pinhole leaks that start as slow refrigerant loss and worsen over time.
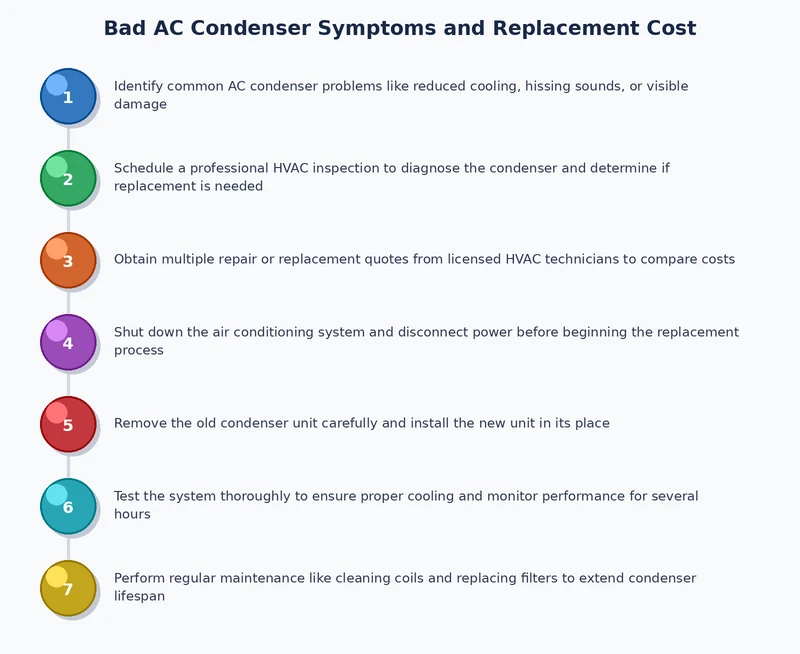
Replacing an AC condenser is a manageable DIY job on most passenger vehicles. The main challenge is the refrigerant recovery step — that part requires professional equipment and certification. The condenser swap itself, however, can be done at home to save significantly on shop labor.
Before touching any AC components, the refrigerant must be properly recovered by a certified technician or shop. This step is non-negotiable — it's required by law, and it's also necessary to prevent moisture contamination of the system when it's opened. Most shops charge $50–$100 for refrigerant recovery and later recharge, which is the only professional step most DIYers can't skip.
The general procedure applies to most front-wheel-drive and rear-wheel-drive vehicles, though exact disassembly steps vary by make and model. Our team always references the service manual for the specific vehicle before starting.
The condenser swap itself takes most experienced DIYers 1.5 to 2.5 hours. The refrigerant recovery and recharge at the shop adds time and cost, but it's the only way to properly complete the job.
Having every tool and part ready before starting is the difference between a smooth two-hour job and a frustrating all-day ordeal. Here's the full list our team uses on a standard condenser replacement.
| Tool / Part | Purpose | Estimated Cost |
|---|---|---|
| Replacement AC condenser | Core component being replaced | $80–$350 |
| AC O-ring kit (correct refrigerant type) | Seals on all refrigerant line fittings | $5–$15 |
| Refrigerant oil (PAG or POE, per spec) | Lubricates new O-rings during installation | $8–$20 |
| AC manifold gauge set | Check system pressure before and after | $50–$150 (rent or buy) |
| Spring-lock coupling tool set | Disconnect snap-lock AC line fittings | $10–$25 |
| Plastic trim panel removal tools | Remove grille, bumper cover, and clip panels | $10–$20 |
| Torque wrench (ft-lb and in-lb) | Correct torque on AC fittings and brackets | $30–$80 |
| UV leak detection kit | Confirm leak location on condenser fins | $15–$30 |
| Receiver-drier or accumulator | Replace if system was open to air | $20–$80 |
| Refrigerant recovery + recharge (shop) | Required legal step — professional equipment only | $50–$100 |
The condenser itself is the biggest cost variable. OEM (original equipment manufacturer) condensers from the dealership run toward the higher end of the range. Aftermarket condensers from reputable brands — Denso, UAC, and Four Seasons are brands our team has used successfully — typically cost significantly less and perform reliably across multiple seasons. For daily drivers, aftermarket is the practical choice. For vehicles with higher-end climate control systems or unusual condenser designs, OEM is worth considering.
AC condenser repairs fail in predictable ways. Our team has seen the same mistakes repeatedly over the years, and they all share one consequence: they turn a straightforward one-time repair into a return visit, often at full cost again.
When a condenser fails due to internal corrosion or a contamination event — such as a failed compressor that sent metal debris through the system — that debris doesn't stay neatly in the condenser. It travels through the refrigerant lines and into the expansion valve, evaporator, and compressor. Installing a brand-new condenser without flushing the lines first reintroduces that contamination into the new part immediately.
The result is a condenser that fails within one or two seasons, often much sooner. The flush procedure involves pushing a specialized solvent through the lines and components to remove debris, then thoroughly drying everything before reassembly. Not every condenser replacement requires it — a condenser that failed from a rock strike on a clean system doesn't need a flush. But any time the old condenser shows signs of internal corrosion, discoloration of the refrigerant oil, or if the compressor also failed alongside it, the flush is non-optional. It adds cost upfront and prevents a complete redo of the entire repair.
O-rings on AC line fittings cost almost nothing — usually under $15 for a complete kit. Reusing them costs a lot more. An old O-ring that seals perfectly on day one can begin weeping refrigerant within weeks once it's been disturbed, compressed, reinstalled, and subjected to the pressure cycles of normal AC operation. The result is another refrigerant recharge ($100 or more at a shop), and sometimes another full disassembly to find the leak. Our team replaces every single O-ring on every single condenser job. There's no good reason not to.
A closely related oversight is ignoring the receiver-drier (also called the accumulator on some vehicles). This small canister absorbs moisture from the refrigerant using a desiccant (drying agent) inside. Once the AC system has been opened to the atmosphere — even for a few hours during a condenser swap — the desiccant becomes saturated with moisture. A saturated drier allows water vapor to circulate with the refrigerant, which leads to ice formation at the expansion valve, reduced cooling performance, and long-term acid damage to the compressor.
Replacing the receiver-drier adds $20–$80 to the parts cost and very little labor time since the system is already apart. Skipping it on a vehicle where the system was open for an extended period is a mistake that shows up months later as mystery AC problems. Overlooking small but critical components during a repair is a pattern our team also covers in depth in the guide on oil pan gasket leak symptoms — the same principle applies wherever a seal or small part is disturbed during a larger job.
The total cost of addressing bad ac condenser symptoms depends on the vehicle, the extent of additional damage, whether any DIY work is done, and regional labor rates. Here's an honest breakdown of what to expect.
| Cost Component | DIY Cost | Shop Cost |
|---|---|---|
| Aftermarket AC condenser | $80–$200 | $80–$250 |
| OEM AC condenser | $150–$400 | $180–$500 |
| Refrigerant recovery + recharge | $50–$100 (shop required) | Included in labor estimate |
| Shop labor | $0 | $150–$400 |
| O-rings and misc hardware | $10–$30 | Usually included |
| Receiver-drier (if replacing) | $20–$80 | $30–$120 + minor labor |
| System flush (if needed) | $15–$40 (solvent kit) | $80–$150 |
| Total Estimate (no flush) | $140–$330 | $380–$900 |
Luxury vehicles, cars with complex front-end designs, and models where the condenser is deeply integrated with the bumper structure push the labor cost toward the top of the range. Some SUVs and body-on-frame trucks have more accessible condensers, which keeps labor lower. Dealer service departments consistently charge more than independent shops for the same repair — often 30–50% more — without a meaningful difference in outcome for a job like this.
The DIY-hybrid approach offers the best value for most people: handle the removal, installation, and reassembly at home, then take the car to a shop only for the required refrigerant recovery and recharge. That approach typically totals $150–$350 all-in, compared to $500–$900 at a full-service shop.
A new condenser is only part of the solution. Keeping the AC system performing well over years requires a few consistent habits that most people overlook until something breaks.
Most AC condensers last 10–15 years under normal driving conditions. Vehicles exposed to road salt, coastal air, extreme heat, or frequent debris impacts typically see shorter service lives. Catching and responding to bad ac condenser symptoms early — rather than waiting for total failure — is the most cost-effective approach available, and it protects the compressor, which is the most expensive component in the entire AC system.
For anyone noticing a faintly sweet smell inside the car alongside AC problems, it's worth investigating whether coolant is leaking near the heater core or front of the engine bay. Our guide on why a car smells like maple syrup covers this in detail — coolant leaks and condenser-area failures sometimes occur together and can be confused for each other during initial diagnosis.
Most AC condensers last between 10 and 15 years under normal driving conditions. Vehicles frequently exposed to road gravel, road salt, or coastal salt air tend to see shorter lifespans due to accelerated fin corrosion and debris impacts. A visual inspection each spring helps catch early damage before it becomes a refrigerant leak.
Yes, a vehicle with a damaged condenser is still drivable — the AC simply won't cool effectively or at all. However, continuing to run the AC while the system is losing refrigerant forces the compressor to operate under abnormal conditions, which accelerates compressor wear and failure. Our team recommends switching off the AC and scheduling a diagnosis promptly rather than running the system until it fails completely.
In most cases, yes. The condenser itself is a relatively affordable part, and replacing it restores full AC function without touching the more expensive compressor or evaporator. The decision depends on the overall condition of the vehicle — if the car has other major issues, the math may be different. But for an otherwise reliable older vehicle, a condenser replacement is a straightforward repair with a clear return on investment.
Bad ac condenser symptoms — from warm air at the vents to visible fin damage and refrigerant oil stains — are clear signals that shouldn't be ignored, and the earlier the problem is caught, the less it costs to fix. Our team strongly recommends a quick visual condenser check each spring before the AC season starts, since that one habit prevents the majority of the failures we see. Head over to our troubleshooting section for more guides on diagnosing common car problems — and if the AC is already struggling, schedule a pressure test now rather than waiting for the hottest week of summer when every shop has a full schedule.
 |
 |
 |
 |

About Sarah Whitfield
Sarah Whitfield is a diagnostics and troubleshooting specialist who spent ten years as an ASE-certified technician before joining the editorial team. She specializes in OBD-II analysis, electrical gremlins, and the kind of intermittent problems that make most owners give up.
Get some FREE car parts & gear.. Or check out the latest free automotive manuals and build guides here.
Disable your ad blocker to unlock all the hidden deals. Hit the button below 🚗
| | | |