by Joshua Thomas
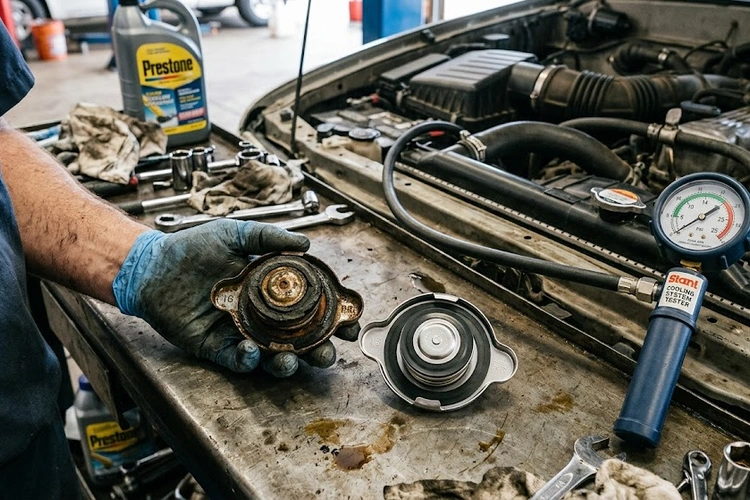
A while back, our team spent nearly two hours trying to trace a mysterious coolant odor on a client's four-door sedan — we pressure-tested every hose, inspected the water pump gasket, and even pulled the thermostat housing apart before finding the real culprit. The problem turned out to be a faulty radiator cap that was releasing pressure well below its rated threshold, venting coolant quietly through the overflow tube every time the engine reached operating temperature. That kind of diagnostic detour is exactly why recognizing bad radiator cap symptoms early saves time, money, and a considerable amount of frustration.
A failing radiator cap can closely mimic the signs of several more serious cooling system failures, and most people end up chasing the wrong component as a result. The radiator cap isn't simply a lid — it's a precision pressure-regulating valve that keeps the coolant sealed inside a pressurized circuit and prevents premature boiling. When it begins to fail, its effects ripple through the entire cooling system in ways that are easily mistaken for a cracked hose, a failing thermostat, or even a blown head gasket. Our team recommends pairing this guide with the broader car care and maintenance resources on this site for a fuller picture of cooling system health.
Contents
Most modern vehicles operate with a cooling system that maintains pressure at roughly 13–16 PSI above atmospheric levels, and according to how pressurized engine cooling systems work, that pressurization raises the effective boiling point of coolant well above what it would be in an open, unpressurized circuit. The radiator cap is the component responsible for holding and regulating that pressure, and when its spring tension weakens or its rubber seal degrades, the entire pressurized environment breaks down in ways that produce recognizable and repeatable symptoms.
One of the first bad radiator cap symptoms most mechanics encounter is unexplained coolant loss — the reservoir level drops gradually but there's no puddle forming under the car and no visible wet spots on hoses or the radiator core itself. A cap that vents prematurely releases coolant vapor and small amounts of liquid through the overflow tube, and most of it evaporates before reaching the ground. Our team always inspects the cap's rubber seal carefully before entertaining a head gasket diagnosis based purely on coolant loss alone.
A cap that fails to hold rated pressure effectively lowers the coolant's boiling point, and once coolant starts flashing to steam inside the passages, the engine's ability to shed heat drops sharply and cylinder temperatures climb. Most people notice this first on the dashboard — a temperature gauge that climbs higher than normal or fluctuates erratically during routine driving is a classic early warning. This symptom tends to worsen on hot days or under heavy load, and it's especially pronounced when the air conditioning is running and adding extra thermal load to the system.
The radiator cap also houses a small vacuum valve that allows coolant to flow back from the overflow reservoir as the engine cools down and the system contracts. When that valve sticks closed, a partial vacuum forms inside the cooling circuit during cooldown, and the upper or lower radiator hose gets pulled inward — sometimes visibly, sometimes only noticeable when the hose is squeezed by hand. Our team has seen this misdiagnosed as a deteriorating hose far more often than it should be, since the hose itself may be completely sound.
A collapsed radiator hose is frequently blamed on hose age alone — our team recommends pressure-testing the cap first, since a stuck vacuum valve creates that same symptom without any actual hose damage whatsoever.
Coolant that vents repeatedly through a failing cap leaves behind a white or greenish-white mineral crust around the radiator filler neck and the underside of the cap itself. This residue is one of the most reliable physical indicators that the cap has been releasing pressure prematurely and that the cooling system has been losing fluid over an extended period of time, even when the loss is too gradual to notice week to week.
A faint, sweet odor — similar to warm maple syrup — that's strongest near the front of the engine bay often signals that coolant is evaporating off hot engine surfaces after venting through the cap. This is meaningfully different from the sharper, acrid burning oil smell that originates from inside the cabin and points to a different kind of leak entirely, though both warrant prompt attention and systematic investigation.
Knowing when the cap is actually the problem — versus when something else is driving the symptoms — matters just as much as knowing the symptoms themselves. Our team has found that unnecessary cap replacements happen almost as frequently as missed ones, and both outcomes cost time and money.
There are situations where testing the cap first is actually a waste of diagnostic time, and our team has learned to recognize these patterns through repeated experience in the shop:
Testing a radiator cap is one of the more accessible diagnostic steps in cooling system work, and our team recommends it as an early move in any unexplained overheating investigation before pursuing more expensive diagnostics. There are two main approaches — a basic inspection that anyone can complete without tools, and a pressure test that delivers a definitive pass or fail result.
The simplest starting point is a hands-on inspection that costs nothing and takes about two minutes once the engine is fully cold:
A cap that passes the visual inspection isn't necessarily functional — a seal can look perfectly intact but still fail to hold rated pressure once heat and load are applied. That's where pressure testing becomes necessary for a conclusive answer.
A radiator cap pressure tester is a hand-pump tool with adapters that attach directly to the cap and apply controlled pressure to verify whether the cap holds, vents, and releases at its rated PSI value. Most caps are rated between 13 and 18 PSI, with the exact rating stamped on the top surface of the cap itself.
Radiator cap testers are available for under $30 at most auto parts stores, and our team considers them one of the highest-value diagnostic tools anyone can add to a home garage setup for the money spent.
A surprising number of persistent myths surround the radiator cap, and our team has encountered most of them at some point during diagnosis conversations with vehicle owners. Separating fact from common misconception helps avoid unnecessary repairs and wasted diagnostic time.
Radiator cap replacement is one of the most economical fixes in cooling system maintenance, but the total cost varies depending on the vehicle, where the work is done, and which type of replacement cap is selected. The table below reflects typical ranges our team sees across common repair scenarios.
| Replacement Scenario | Parts Cost | Labor Cost | Total Estimate |
|---|---|---|---|
| DIY — aftermarket cap | $8–$20 | $0 | $8–$20 |
| DIY — OEM cap | $20–$45 | $0 | $20–$45 |
| Independent shop — aftermarket | $10–$25 | $20–$40 | $30–$65 |
| Independent shop — OEM | $25–$50 | $20–$40 | $45–$90 |
| Dealer service with system pressure test | $30–$60 | $40–$75 | $70–$135 |
Replacing a radiator cap is genuinely a one-to-two minute job once the engine is fully cold — unscrew the old one, verify that the replacement carries the correct pressure rating, and thread the new one on until it seats and locks. Most people with basic mechanical comfort handle this without professional assistance, and the only meaningful risk is removing the cap on a warm or hot engine, which can cause serious burns from pressurized steam releasing suddenly.
For most daily drivers, a quality aftermarket cap from a reputable brand holds the correct rated pressure without issue and performs reliably over a normal service interval. Our team generally recommends OEM replacements for turbocharged or performance-oriented engines where the cooling system already operates near its thermal limits, since the pressure tolerances in those applications are tighter and an off-spec cap creates problems faster and more dramatically.
The decision to replace the cap immediately versus waiting for additional diagnostic confirmation is straightforward in most scenarios, but our team has seen both extremes handled poorly — either premature replacement before understanding the full picture, or prolonged delay that allows a simple problem to escalate.
Arguments for immediate replacement:
Arguments for testing before replacing:
Our team has documented several cases where a delayed cap diagnosis escalated into significantly more expensive repairs, and these patterns tend to repeat themselves across a wide range of vehicle makes and models in a way that makes them instructive.
Case 1 — The slow coolant mystery: A four-cylinder commuter sedan was losing roughly a quart of coolant every six weeks with no visible external leak anywhere on the system. The owner replaced the thermostat and performed two full coolant flushes over the course of eighteen months before our team identified a cap that was venting at just 9 PSI on a 16 PSI system. A $12 replacement cap solved the problem completely and immediately.
Case 2 — The collapsed hose misdiagnosis: A late-model SUV arrived with a repeatedly collapsing upper radiator hose that had been replaced twice over three years at two different shops. The vacuum valve failure inside the original-style cap was identified as the actual cause on the third visit — both new hoses had been collapsing for the exact same reason the originals had, since the cap was never part of the diagnostic conversation.
Case 3 — The escalation to head gasket failure: A turbocharged four-door experienced intermittent overheating events for several months before the owner brought it in for diagnosis. By the time our team identified the failing cap as the root cause, steam pockets had formed regularly enough in the cylinder head coolant passages that a section of the head gasket had begun to weep coolant internally. The total repair bill climbed from a potential $15 cap replacement to over $1,400 in head gasket labor and parts — a clear illustration of how critical early recognition of bad radiator cap symptoms truly is in preventing downstream damage.
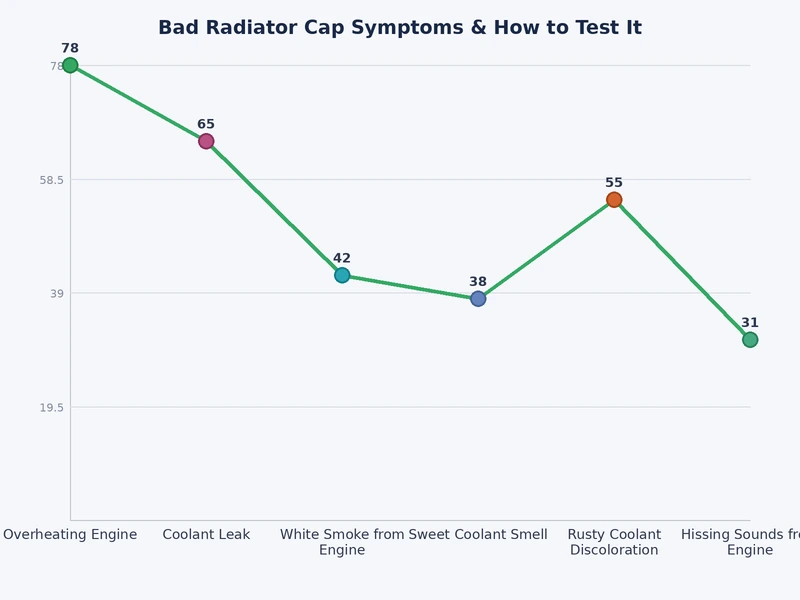
The most common indicators are unexplained coolant loss without any visible external leak, an engine that overheats more readily than it used to, a radiator hose that collapses after the engine cools, or visible white mineral deposits around the filler neck. A pressure test with an inexpensive cap tester kit delivers a definitive pass or fail result and is the diagnostic step our team recommends most highly before chasing other components.
Yes — a cap that fails to maintain correct system pressure allows the coolant to boil at a lower temperature, which leads to overheating events that can warp cylinder heads, compromise head gaskets, and in severe cases cause irreversible engine block damage. Our team has documented cases where what could have been a $15 cap replacement escalated well past $1,000 in repairs because the cap failure went undiagnosed for an extended period.
Most manufacturers recommend inspecting the cap every two years and replacing it every four to five years regardless of visible external condition. The rubber seal inside the cap degrades with repeated heat cycling over time, and a cap that looks intact and undamaged on the outside can still fail a pressure test due to internal seal compression loss that isn't detectable visually.
Short, low-load trips are generally manageable, but our team advises against extended driving until the cap has been inspected or replaced. The risk of a rapid coolant loss event or a sudden overheating episode increases meaningfully with driving distance and engine demand, and the downstream repair costs from even a single serious overheating event far outweigh the inconvenience of having the cap checked before continuing regular use.
The correct pressure rating is stamped directly on the top surface of the original cap and is also listed in the vehicle's owner manual or factory service documentation. Using a cap with a lower rating than specified causes premature venting and reproduces the same symptoms as a failing cap, while a significantly higher rating than designed can stress hoses, clamps, and the overflow reservoir beyond their intended tolerance. Our team always matches the OEM pressure specification exactly.
The radiator cap costs less than a takeout meal — but ignoring it when it fails can cost more than a month's paycheck.
 |
 |
 |
 |
About Joshua Thomas
Joshua Thomas just simply loves cars and willing to work on them whenever there's chance... sometimes for free.
He started CarCareTotal back in 2017 from the advices of total strangers who witnessed his amazing skills in car repairs here and there.
His goal with this creation is to help car owners better learn how to maintain and repair their cars; as such, the site would cover alot of areas: troubleshooting, product recommendations, tips & tricks.
Joshua received Bachelor of Science in Mechanical Engineering at San Diego State University.
Get some FREE car parts & gear.. Or check out the latest free automotive manuals and build guides here.
Disable your ad blocker to unlock all the hidden deals. Hit the button below 🚗
| | | |