by Sarah Whitfield
What is the most common reason a mechanically sound vehicle refuses to start on a cold morning? In our experience diagnosing hundreds of automotive electrical faults, battery terminal corrosion ranks among the top culprits — yet most drivers never inspect their terminals until a breakdown forces the issue. The answer is almost always simpler than assumed, and the fix is within reach of anyone with a wire brush and fifteen minutes.
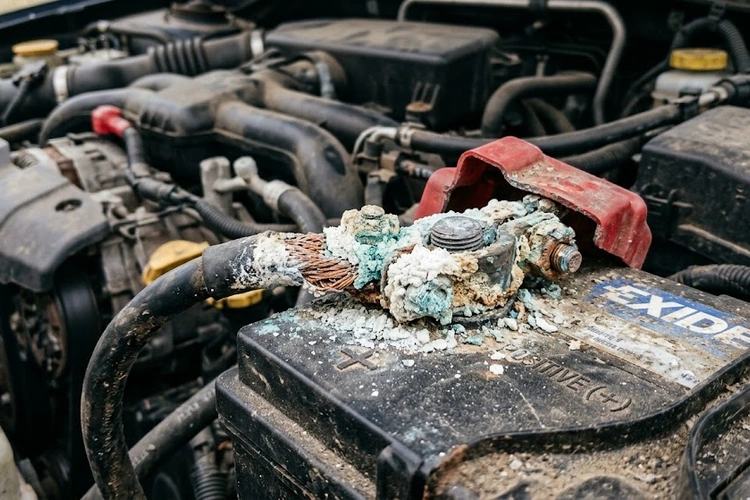
Battery terminal corrosion is the white, blue-green, or powdery buildup that accumulates on the metal contact posts of a car battery. This residue creates electrical resistance between the battery and the vehicle's charging and starting systems. Left unaddressed, even a thin layer of corrosion can prevent an engine from starting, trigger phantom warning lights, and accelerate battery failure years ahead of schedule. Completing the process of reconnecting a car battery correctly requires clean, corrosion-free terminals as a non-negotiable prerequisite — no amount of proper cable routing compensates for a degraded contact surface.
Our team has assembled this guide to cover every stage: identifying early warning signs, diagnosing root causes, cleaning terminals safely and effectively, and implementing prevention strategies that extend the interval between cleanings significantly.
Contents
Most cases of battery terminal corrosion follow a predictable progression. Early symptoms are subtle — a slightly sluggish engine crank, a dim instrument panel, an occasional hesitation from the starter motor. As corrosion thickens and resistance builds, these signals escalate into conditions that prevent the vehicle from operating normally. Identifying the warning signs early avoids the more serious and expensive consequences of full battery failure or alternator overwork.
The starter motor demands a high-current pulse from the battery each time the engine fires. When corrosion introduces resistance at the terminal interface, the starter receives less amperage than required. The result is a labored, drawn-out crank — the engine turns over slowly before catching, or, in severe cases, fails to fire entirely. Our team frequently observes this symptom alongside a grinding noise when starting the car, as the underpowered starter engages the flywheel imprecisely and intermittently.
Battery terminal corrosion affects the entire vehicle electrical system, not only the starter circuit. The alternator recharges the battery through the same corroded connection, impairing the charging cycle and causing voltage instability throughout the vehicle. Most drivers first notice dashboard lights flickering at idle — an early indicator of unstable battery voltage. In more advanced cases, the traction control warning light and other stability system indicators illuminate due to erratic power delivery to the control modules.
The most definitive symptom requires no instruments. Blue-green deposits typically indicate copper sulfate forming at a corroded copper clamp. White or gray powder points to lead sulfate accumulation on the battery post itself. Orange or brown discoloration suggests iron oxide from corroding steel hardware in contact with the terminal. Each color carries specific diagnostic information about which component is degrading, giving technicians and informed owners a clear starting point for targeted repair.
Battery terminal corrosion does not occur randomly. Specific electrochemical and mechanical conditions drive the process, and identifying the active cause in any given vehicle determines the most effective long-term solution. Addressing the surface deposits without eliminating the root cause guarantees recurrence within months.
Lead-acid batteries produce hydrogen gas as a natural byproduct of the charging reaction. This gas escapes through the battery vents and, upon contact with the metal terminals, reacts with atmospheric moisture and trace sulfuric acid vapor to form sulfate compounds — the primary source of white terminal deposits. According to battery safety guidelines published by the U.S. Environmental Protection Agency, lead-acid batteries vent measurable quantities of hydrogen and acidic mist during both charge and discharge cycles, making some degree of terminal oxidation inevitable across a battery's service life.
A malfunctioning alternator that overcharges the battery accelerates electrolyte evaporation and dramatically increases hydrogen output, compounding terminal buildup. Undercharging — caused by short urban drive cycles, persistent parasitic drains, or a weakening alternator — allows sulfation to accumulate on the internal plates, a condition that eventually manifests outward at the terminals. Vehicles prone to not starting after rain often have underlying charging irregularities that first become visible as accelerated terminal corrosion before progressing to complete electrical failure.
A loose terminal clamp generates micro-arcing at the contact surface. Each microscopic spark oxidizes a small quantity of metal, depositing resistive residue that worsens the connection in a self-reinforcing cycle. Vibration from road use compounds this problem by gradually loosening clamp hardware that was never fully torqued during installation or was disturbed during previous service. Our team has documented terminals destroyed within a single season in vehicles with persistently undertightened clamp hardware.
Blue-green deposits concentrated near the positive terminal almost always indicate copper oxidation from a corroded clamp — replacing the clamp entirely, not merely cleaning it, is the only measure that stops the cycle at its source.
Cleaning battery terminal corrosion is one of the most accessible DIY maintenance tasks in automotive care. The materials required cost under five dollars and are available at any hardware or auto parts store. The critical element is performing each step in the correct sequence to avoid accidental electrical shorts or exposure to corrosive residue. Rushing the process produces an incomplete cleaning that accelerates re-corrosion.
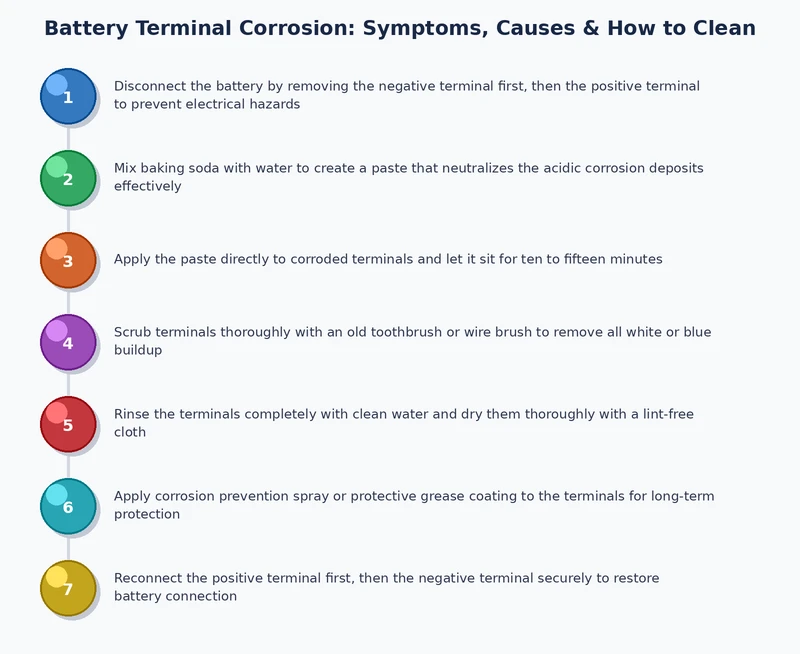
Before touching the battery, turn the engine off, remove the key from the ignition, and allow at least five minutes for hydrogen gas to dissipate from the battery area. Protective eyewear and chemical-resistant gloves are non-negotiable — the sulfuric acid residue within corrosion deposits is caustic on contact with skin and eyes. Working in a ventilated area is equally important. Keeping a baking soda and water solution close at hand allows immediate neutralization of any acid spills on the vehicle body or work surface.
Disconnect the negative terminal first (black cable), followed by the positive (red). This sequence eliminates the risk of shorting the circuit against the vehicle chassis. Apply the baking soda and water solution — one tablespoon per cup — directly to the corroded areas. The visible fizzing confirms active acid neutralization. Use a stiff wire brush or a dedicated battery terminal cleaning tool to scrub the posts and cable clamps thoroughly. A standard toothbrush reaches the interior of the clamp ring where dense deposits accumulate. Rinse with distilled water only — tap water introduces mineral deposits that accelerate future oxidation.
Once the terminals are clean and completely dry, reconnect the positive cable first, then the negative — the reverse of the removal order. Before seating each clamp, apply a thin coat of petroleum jelly, dielectric grease, or purpose-built anti-corrosion spray to the post. Place felt anti-corrosion washers at the base of each post before attaching the clamp; these washers are saturated in a zinc-based compound that neutralizes acid vapor before it contacts the metal surface. Our team recommends reviewing the complete procedure for reconnecting a car battery if any uncertainty exists regarding proper clamp torque or terminal polarity orientation.
Abstract explanations gain clarity when grounded in specific cases. The following scenarios represent patterns our team has encountered repeatedly across different vehicle types, climates, and maintenance histories — each illustrating how battery terminal corrosion escalates when deferred.
A common trajectory begins with a driver reporting occasional sluggish cranking over several weeks. A quick voltmeter check shows the battery holding 12.4 volts at rest, and the owner assumes gradual aging is the cause. Within weeks, the vehicle refuses to start entirely. Terminal inspection reveals dense white and blue-green deposits encasing both posts. After a thorough cleaning, the vehicle starts normally — with the original battery still holding full capacity. In these cases, a check engine light present alongside otherwise normal driving behavior is often the first electronic symptom, generated by brief voltage drops disrupting ECU sensor circuits during cranking attempts.
In coastal and high-humidity regions, battery terminal corrosion progresses significantly faster than in arid climates. Salt air combined with atmospheric moisture creates an aggressive oxidation environment that produces visible deposits within 60 days of a fresh cleaning. Our team has observed vehicles in these conditions requiring terminal maintenance every four to six months rather than annually. In extreme cases of neglect, cable insulation adjacent to a heavily corroded terminal runs warm from resistance-generated heat — a condition that occasionally produces smoke visible from under the hood well before the connection fails completely.
In our diagnostic experience, a battery that passes a load test but still causes hard-start conditions is almost always suffering from corroded or loose terminals — not internal cell failure. Testing the battery without first inspecting the terminal surfaces is an incomplete diagnostic process.
Misinformation about battery terminal corrosion leads drivers to replace serviceable batteries prematurely, or to dismiss visible corrosion as cosmetic when it is actively degrading vehicle reliability. Our team addresses the two most consequential misconceptions directly.
Surface corrosion on the terminals is not an indicator of internal battery failure. A battery's true health is determined by a load test and state-of-charge measurement — not by the appearance of its posts. Our team has cleaned terminals on batteries that subsequently performed reliably for an additional three to five years. The replacement decision should be driven by a failed load test or a resting voltage consistently below 12.4 volts after a full charge, not by the presence of corrosion deposits alone.
Corrosion color is actionable diagnostic information. White or gray deposits concentrated on the negative terminal typically indicate undercharging — the battery is not receiving adequate current from the alternator during typical drive cycles. Blue-green buildup near the positive terminal points to copper oxidation in the clamp itself. Recognizing these distinctions allows a technician to address the underlying electrical condition rather than simply cleaning the surface and reexposing the terminals to the same damaging environment. When the alternator is simultaneously suspect, it can contribute to a car overheating at idle by placing excessive electrical load on the engine's accessory drive under poor charging conditions.
Battery terminal corrosion is inexpensive to address early and progressively costlier to ignore. The financial stakes escalate with each downstream component affected — from the battery to the alternator, starter motor, and vehicle electronics.
The cost of a complete DIY terminal cleaning and protection treatment is negligible. Baking soda and distilled water total under two dollars. A wire brush or dedicated terminal cleaning tool runs three to six dollars. Anti-corrosion spray or felt washers add three to eight dollars more. The total investment for a thorough cleaning and preventive treatment rarely exceeds $15, with most materials reusable across multiple service intervals.
Professional terminal cleaning at an independent shop typically costs $20–$50 in labor. Cable replacement — required when corrosion has consumed the clamp or compromised the insulation — adds $30–$120 per cable. The real financial risk lies in indefinite deferral. The table below outlines the cost progression from routine maintenance through worst-case neglect scenarios.
| Service or Outcome | DIY Cost | Professional Cost |
|---|---|---|
| Terminal cleaning (routine) | $0–$5 | $20–$50 |
| Anti-corrosion treatment | $3–$8 | Included or $5–$15 extra |
| Terminal clamp replacement | $5–$15 per clamp | $30–$60 per cable |
| Battery replacement (neglect-driven) | $80–$200 (part only) | $150–$300 installed |
| Alternator replacement (worst case) | $150–$350 (part only) | $400–$800 installed |
The most effective approach to battery terminal corrosion combines a consistent inspection rhythm with physical barriers that slow the oxidation process between cleanings. Prevention costs a fraction of reactive repairs and eliminates the inconvenience and safety risk of unexpected no-start conditions in high-demand situations.
Our team recommends inspecting battery terminals every three months as part of standard underhood maintenance. A visual check takes under two minutes. Any vehicle showing unexplained electrical anomalies — including dashboard lights flickering during idle or under electrical load — should have the terminals inspected as the first diagnostic step before scheduling more complex testing. In coastal or high-humidity environments, monthly checks are appropriate during the warmest months when corrosion rates are highest. Documentation of each inspection date on a simple maintenance log prevents the three-month interval from being inadvertently extended.
Several products extend the interval between cleanings when applied correctly after each service:
Beyond product application, securing the battery firmly in its tray is an underappreciated preventive measure. Vibration from road use gradually loosens clamp hardware, and loose connections accelerate micro-arcing and oxidation. Vehicles used primarily for short urban trips also benefit from an occasional full charge from a quality battery maintainer, ensuring the battery reaches full state of charge and reducing the undercharge-driven corrosion that short-cycle driving consistently produces.
A corroded terminal is never a cosmetic issue — it is a resistance problem that silently taxes every electrical component in the vehicle, and five minutes with a wire brush is the most cost-effective preventive maintenance most drivers consistently overlook.
 |
 |
 |
 |

About Sarah Whitfield
Sarah Whitfield is a diagnostics and troubleshooting specialist who spent ten years as an ASE-certified technician before joining the editorial team. She specializes in OBD-II analysis, electrical gremlins, and the kind of intermittent problems that make most owners give up.
Get some FREE car parts & gear.. Or check out the latest free automotive manuals and build guides here.
Disable your ad blocker to unlock all the hidden deals. Hit the button below 🚗
| | | |