Brake Lights Not Working: 6 Causes & How to Fix

by Sarah Whitfield

Picture this: a driver pulls up to a red light and the car behind them lays on the horn. A stranger rolls down a window and shouts, "Your brake lights are out!" It is an embarrassing — and dangerous — moment that happens to more drivers than most would expect. The good news is that brake lights not working is one of the most fixable car problems out there.

This guide walks through the six most common causes, a step-by-step diagnostic process, and exactly what it takes to get things working again. According to the National Highway Traffic Safety Administration (NHTSA), brake lamps are classified as required safety equipment on all road-legal vehicles — so this is not a repair to put off.

Brake lights not working on a car viewed from behind at night
Figure 1 — Non-functional brake lights create a serious rear-end collision risk, especially in low-visibility conditions.
Chart showing the most common causes of brake lights not working and their relative frequency
Figure 2 — Burned-out bulbs and blown fuses account for the majority of brake light failures.

How Brake Lights Work

Brake lights run on a simple electrical circuit. Every component in that circuit is a potential failure point — which actually makes diagnosis straightforward.

Here is the sequence every time a driver presses the brake pedal:

  1. The pedal arm physically presses a small switch (the brake light switch) mounted just above it.
  2. That switch completes the electrical circuit and allows current to flow.
  3. Power passes through a dedicated fuse in the fuse box.
  4. Current reaches each brake light socket and illuminates the bulb.
  5. Electricity returns to the battery through the ground wire.

Break any link in that chain — the switch, fuse, bulb, socket, or ground — and one or all brake lights go dark.

Pro Tip: If only one light is out, the problem is almost always local — bulb or socket. If all lights are out at once, the issue is upstream in the circuit — fuse or brake light switch.

Many vehicles share brake light wiring with tail lights and turn signals. Understanding which functions still work helps narrow down the fault before touching a single tool. Electrical gremlins in cars are rarely random — they follow the circuit, and so should the diagnosis.

6 Common Causes of Brake Lights Not Working

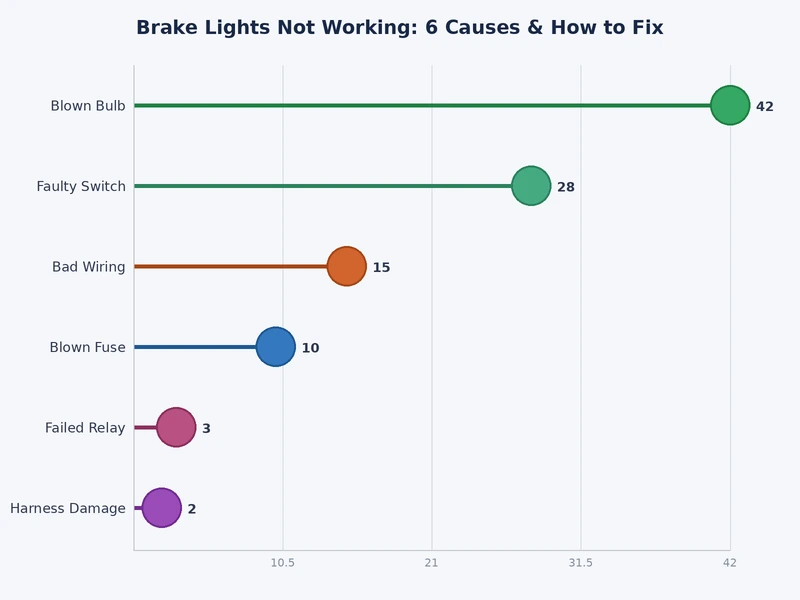
Below are the six most frequent reasons brake lights stop functioning, along with what drivers can expect to spend fixing each one.

# Cause Lights Affected DIY Parts Cost Difficulty
1 Burned-out bulb One light $5–$15 Easy
2 Blown fuse All lights $1–$5 Easy
3 Faulty brake light switch All lights $20–$50 Moderate
4 Corroded socket / damaged wiring One light $10–$30 Moderate
5 Bad body control module (BCM) All lights $300–$600+ Advanced
6 Trailer connector short All lights $0–$20 Easy

1. Burned-Out Bulb

This is the single most common cause. Incandescent bulbs have a finite lifespan and eventually burn out. One dead bulb means one brake light is dark while the others work fine.

  • Many vehicles use dual-filament bulbs — one filament for the tail light, one for the brake light. The brake filament can fail while the tail filament still glows, making the bulb appear fine at first glance.
  • Look for a visibly broken or sagged filament inside the glass.
  • Replacement bulbs are available at any auto parts store for $5–$15.

2. Blown Fuse

When all brake lights go dark at once, a blown fuse is a top suspect. The fuse protects the brake light circuit from electrical surges.

  • Fuse boxes are typically under the dashboard or in the engine bay.
  • The owner's manual identifies which fuse controls the brake lights.
  • A blown fuse has a visibly burned or broken metal strip inside the clear window.
  • Always replace with the exact same amperage. Installing a higher-rated fuse can allow dangerous current levels that damage wiring.

3. Faulty Brake Light Switch

The brake light switch sits just above the brake pedal arm. Pressing the pedal physically activates this switch, completing the circuit. A failed or misadjusted switch can prevent all brake lights from illuminating — or keep them on permanently.

  • Signs include: lights stay on with no pedal press, or lights never come on at all.
  • A bad switch can also disable cruise control and trigger ABS or transmission warnings on some vehicles.
  • A misaligned switch is sometimes adjustable without replacing it — check before ordering parts.

Warning: Brake lights stuck in the "on" position will drain the battery overnight and confuse other drivers. This needs immediate attention, not a repair that waits until the weekend.

4. Corroded Socket or Damaged Wiring

Moisture, road salt, and age corrode the metal contacts inside bulb sockets. Even a brand-new bulb will not work in a badly corroded socket because the electrical connection is broken.

  • Remove the bulb and look for green or white powdery buildup on the contacts.
  • Light corrosion cleans up with electrical contact cleaner and a small wire brush.
  • Heavily corroded or melted sockets need full replacement. Replacement pigtail sockets cost $10–$20.
  • Check nearby wiring for pinched, frayed, or bare sections — particularly where the harness bends or passes through metal grommets.

5. Bad Body Control Module (BCM)

The body control module (BCM) manages dozens of vehicle functions including exterior lighting. On newer vehicles, a failing BCM can cause complete brake light failure even when the bulbs, fuse, and switch are all in perfect condition.

  • BCM issues rarely occur in isolation. Other symptoms include erratic interior lights, power window problems, and multiple dash warning lights.
  • Accurate diagnosis requires a scan tool that can read BCM-specific fault codes — a standard OBD-II reader is often not enough.
  • BCM replacement usually requires dealer-level programming and is firmly in professional territory.

6. Trailer Connector Short

Vehicles with a hitch have a 4-pin or 7-pin trailer connector. Corrosion or a short in that connector can drag down the entire brake light circuit because it is wired in parallel with the vehicle's lights.

  • Disconnect the trailer connector completely and retest the brake lights.
  • If they come back on, the trailer wiring is the source of the problem.
  • Clean with electrical contact cleaner, or swap the connector — they cost $10–$20 and take minutes to replace.

How to Diagnose the Problem

Systematic diagnosis saves time and avoids unnecessary parts purchases. Work through these steps in order.

Step 1: Identify the Scope

  • One light out — Start with the bulb and socket.
  • All lights out — Start with the fuse and brake light switch.
  • Lights stuck on — Start with the brake light switch.
  • Lights flicker — Check for a loose socket or intermittent wiring connection.

Step 2: Check the Fuse

  1. Locate the fuse box using the owner's manual.
  2. Pull the brake light fuse and inspect it visually. A fuse tester costs about $5 and removes all guesswork.
  3. Replace if blown. If the new fuse immediately blows again, there is an active short circuit — stop here and pursue the wiring.

Step 3: Inspect and Swap the Bulb

  1. Access the brake light housing from inside the trunk or through the lens assembly.
  2. Twist and pull the socket out, then remove the bulb.
  3. Check for a broken or sagged filament, or dark discoloration inside the glass.
  4. Swap in a new bulb even if the filament looks okay — dual-filament failures are not always visible.

Step 4: Test the Brake Light Switch

  1. Locate the switch mounted just above the brake pedal.
  2. With the ignition on, use a multimeter set to DC voltage.
  3. Check for voltage on the switch's input terminal. Then press the brake pedal and check the output terminal.
  4. Voltage present on the input but absent on the output with the pedal pressed = faulty switch.

Step 5: Inspect the Socket and Harness

  • Look for corrosion, burn marks, or melted plastic around the socket contacts.
  • Gently tug the wiring near the housing to reveal loose or broken connections.
  • Confirm the socket receives voltage when the brake is pressed using a test light or multimeter.

Tracing an electrical fault is a lot like diagnosing a car door lock not working — the key is ruling out the easiest and cheapest causes first before assuming the worst.

DIY Fixes vs. Professional Repair

Most brake light repairs are beginner-friendly. A handful of situations genuinely require professional help.

Repairs Anyone Can Handle

  • Bulb replacement — 10–20 minutes, no special tools, costs $5–$15.
  • Fuse replacement — Under 5 minutes, costs $1–$5.
  • Trailer connector swap — Simple unplug-and-replace, costs $10–$20.
  • Brake light switch adjustment — Often just loosening a lock nut, repositioning, and retightening.
  • Socket cleaning — Electrical contact cleaner and a wire brush, takes under 15 minutes.

When to Call a Professional

  • Wiring harness damage — Splicing wires without proper technique causes shorts, failed inspections, and occasionally fires.
  • BCM failure — Requires dealer-level programming equipment on most modern vehicles.
  • Fuse that keeps blowing — A repeating blown fuse signals a live short circuit. Finding it through a wiring diagram takes experience.
  • Unfamiliar connector types — High-density connectors on newer vehicles can be damaged easily if removed incorrectly.

Repair Cost: DIY vs. Shop

  • Bulb replacement: $5–$15 DIY vs. $20–$50 at a shop.
  • Fuse replacement: $1–$5 DIY vs. $20–$40 at a shop.
  • Brake light switch: $20–$50 DIY vs. $80–$150 at a shop.
  • Socket replacement: $10–$30 DIY vs. $50–$100 at a shop.
  • BCM repair: $300–$600+ at a shop (not typically a home repair).

Understanding how multiple warning signs connect is also useful here. For instance, a failing BCM often triggers other dashboard alerts at the same time — see the guide on what the check gauges light means for more on how to interpret overlapping electrical symptoms.

Pro Tip: Before purchasing a brake light switch, search the vehicle's make and model for Technical Service Bulletins (TSBs). Some manufacturers cover faulty switches under extended warranty programs at no charge.

Keeping Brake Lights Working Long-Term

Most brake light failures are predictable. A simple maintenance routine prevents the majority of them.

Build a Regular Inspection Habit

  • Check all exterior lights every 3–6 months. Backing up toward a garage door or reflective wall makes it easy to do solo.
  • Quick-lube shops typically check lights during an oil change as part of a multi-point inspection — take advantage of that.
  • Replace bulbs in pairs when one fails. The second bulb in a matching set is usually close behind the first.

Consider Upgrading to LED Bulbs

  • LED brake bulbs last 25,000–50,000 hours compared to 1,000–2,000 hours for standard incandescent bulbs.
  • LEDs illuminate up to 200 milliseconds faster — a meaningful margin at highway speeds for following drivers.
  • Upfront cost is $15–$40 per pair, but replacements become rare events rather than annual chores.
  • Some vehicles require a small load resistor (a component that mimics the electrical draw of an incandescent bulb) to prevent hyper-flashing. Check compatibility before purchasing.

Protect Electrical Connections

  • Apply a small amount of dielectric grease (an insulating compound used to seal and protect electrical contacts) to bulb sockets during every replacement. It blocks moisture and extends socket life significantly.
  • Inspect trailer connectors before and after every tow. A few minutes with contact cleaner prevents the connector from becoming a circuit-killer later.
  • After washing the vehicle, quickly verify the brake lights still function — high-pressure water can force moisture into marginal connections.

Catch Warning Signs Early

  • Flickering before full failure almost always means a loose socket or a dying bulb — fix it before it causes an accident.
  • A brake warning light on the instrument cluster can sometimes indicate a circuit fault and not just low brake fluid.
  • Staying proactive about car maintenance and safety checks catches small issues before they become expensive repairs or legal problems.

Frequently Asked Questions

Why are all three brake lights out at the same time?

When all brake lights fail simultaneously, the problem is almost always upstream in the shared circuit. A blown fuse is the first thing to check — it takes less than five minutes and costs almost nothing. If the fuse is intact, test the brake light switch above the pedal. A failed switch cuts power to all brake lights at once. A bad body control module (BCM) is a less common but possible cause on modern vehicles.

Can a bad brake light switch affect anything else on the vehicle?

Yes, significantly. A faulty brake light switch can disable cruise control, trigger ABS and stability control warnings, prevent the vehicle from shifting out of park (shift interlock), and cause erratic transmission behavior on some models. Replacing a worn switch often resolves several unrelated-seeming symptoms in one repair.

How can drivers check their brake lights without another person?

Back the vehicle up close to a garage door, wall, or even a large piece of cardboard and press the brake pedal firmly. The lights will reflect clearly on the surface. Another option is to prop a heavy object against the pedal and walk around to the rear of the vehicle. Many quick-lube shops also check all exterior lights for free during routine oil change visits.

Is it legal to drive with a brake light not working?

In most places, driving with a non-functioning brake light is a moving traffic violation that can result in a fine or a fix-it citation. Beyond the legal issue, it creates a real rear-end collision hazard for other drivers — particularly in heavy traffic or at night. Most regulations require at least two working brake lights. The repair should happen before the vehicle goes back on the road.

Key Takeaways

  • Brake lights not working is most often caused by a burned-out bulb or blown fuse — both are inexpensive, beginner-friendly fixes that take under 20 minutes.
  • When all brake lights fail at once, the brake light switch or fuse is the most likely culprit, not individual bulbs.
  • Upgrading to LED bulbs dramatically extends lifespan and provides a measurable safety advantage for following drivers.
  • A quick exterior light check every 3–6 months and dielectric grease on sockets at every bulb change prevents most brake light failures before they happen.

About Sarah Whitfield

Sarah Whitfield is a diagnostics and troubleshooting specialist who spent ten years as an ASE-certified technician before joining the editorial team. She specializes in OBD-II analysis, electrical gremlins, and the kind of intermittent problems that make most owners give up.

Get some FREE car parts & gear.. Or check out the latest free automotive manuals and build guides here.

Disable your ad blocker to unlock all the hidden deals. Hit the button below 🚗