by Sarah Whitfield
According to data published by the National Highway Traffic Safety Administration, brake system defects contribute to roughly 22 percent of all crashes attributed to mechanical failure — and the master cylinder sits near the center of that figure. Brake master cylinder symptoms are frequently misread as worn pads or air in the lines, yet the master cylinder (the hydraulic pump that converts pedal force into line pressure throughout the entire brake circuit) is the true source of the problem far more often than most people realize. Our team has compiled this guide to help most drivers recognize the warning signs early, navigate the diagnostic process with confidence, and understand realistic replacement costs before committing to a repair.
Because brake hydraulic failures can escalate rapidly, early identification is essential. Even a single symptom described below warrants prompt inspection, and our team consistently advises addressing brake concerns before they develop into a situation where the brake pedal goes to the floor — a condition representing near-total loss of hydraulic pressure and one of the most dangerous brake failures a driver can experience.
Contents
The most consistently reported brake master cylinder symptom is a pedal that feels soft, spongy, or slowly descends toward the floor under steady pressure without the driver pushing harder. This behavior occurs because the internal seals within the master cylinder have begun to deteriorate, allowing hydraulic fluid to bypass the piston rather than build pressure in the brake lines. Most people first notice this during low-speed stops, where the reduced pressure is most apparent, and our team regards it as the earliest actionable warning the system provides. Critically, unlike air in the lines — which also produces a spongy feel — a failing master cylinder will not improve after repeated pumping of the pedal, and that distinction helps narrow the diagnosis considerably.
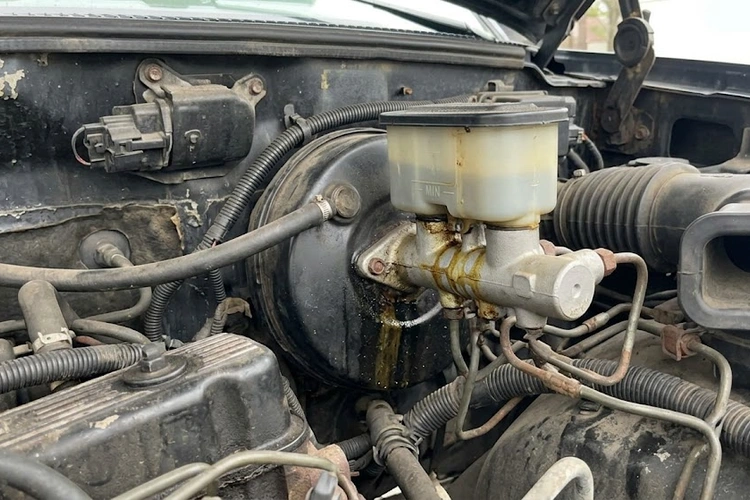
External leaks from the master cylinder typically appear at the rear of the unit, precisely where it interfaces with the brake booster (the large vacuum-assisted canister mounted behind it on the firewall). Brake fluid is clear to pale yellow with a faintly oily consistency, and finding it pooled or streaked in this area points reliably toward seal failure rather than a loose line fitting elsewhere. The brake warning light on the dashboard — which on most modern vehicles monitors both the parking brake status and the hydraulic fluid level — frequently illuminates alongside a visible leak, though our team cautions that the light alone is never a definitive diagnosis. Fluid loss from wheel cylinders in a drum brake system can trigger the same warning, and reviewing the common indicators discussed in our guide on drum brake noise and symptoms can help rule those components out before the master cylinder is condemned.
A master cylinder failing intermittently — which is common in the early stages of seal wear — can produce stopping performance that varies noticeably from one braking event to the next, a condition the industry refers to as brake fade (the progressive loss of stopping force during or between applications). Our team has documented cases where vehicles passed routine inspections only to exhibit sudden pedal sink under firm braking shortly afterward, which illustrates why intermittent brake master cylinder symptoms deserve the same urgency as consistent ones.
Pro Tip: If the pedal firms up after two or three rapid pumps but then sinks again on the following stop, the master cylinder is the most probable cause — not air trapped in the lines.
One of the most persistent misconceptions our team encounters is the assumption that restoring fluid to the reservoir corrects the underlying problem, when in reality it only delays a proper diagnosis and risks concealing continued seal deterioration. Brake fluid loss is always a symptom of leakage — either externally at the master cylinder or internally at a caliper or wheel cylinder — and adding fluid without locating the source allows the component to keep failing. In serious cases, fluid can be lost rapidly enough that complete hydraulic failure arrives before the driver notices any meaningful change in pedal feel.
Many drivers, and even some general service technicians, instinctively replace brake calipers (the hydraulically actuated clamps that grip the rotor to slow the wheel) when presented with a soft pedal, overlooking the master cylinder entirely as a probable root cause. Our team recommends completing the static pedal test described in the following section before purchasing any caliper, because misdiagnosis at this stage leads to repeat labor charges and continuing brake complaints even after the caliper has been replaced and bled.
A thorough visual inspection of the master cylinder requires approximately five minutes and nothing beyond a flashlight. Our team examines the fluid reservoir first — checking for proper level and noting fluid color, since dark brown or black fluid indicates heavy moisture contamination that warrants a complete flush regardless of cylinder condition — then traces along the rear of the unit at the booster interface for any wetness, staining, or residue. A dry master cylinder with adequate fluid and a firm pedal under static testing is rarely the source of a complaint, while visible fluid staining at the rear seal is close to diagnostic on its own.
The static pedal hold test is a straightforward procedure that most people can perform with a helper in under ten minutes: one person applies firm, steady pressure to the brake pedal and holds it for thirty seconds while the other watches for any gradual downward creep. A master cylinder with compromised internal seals will allow the pedal to sink under constant load even when no external leak is visible, because fluid is bypassing the piston internally through worn seals. Our team considers this the most reliable in-vehicle diagnostic step available before committing to parts replacement, and it pairs directly with the detailed failure scenarios discussed in our article on situations where the brake pedal goes to the floor.
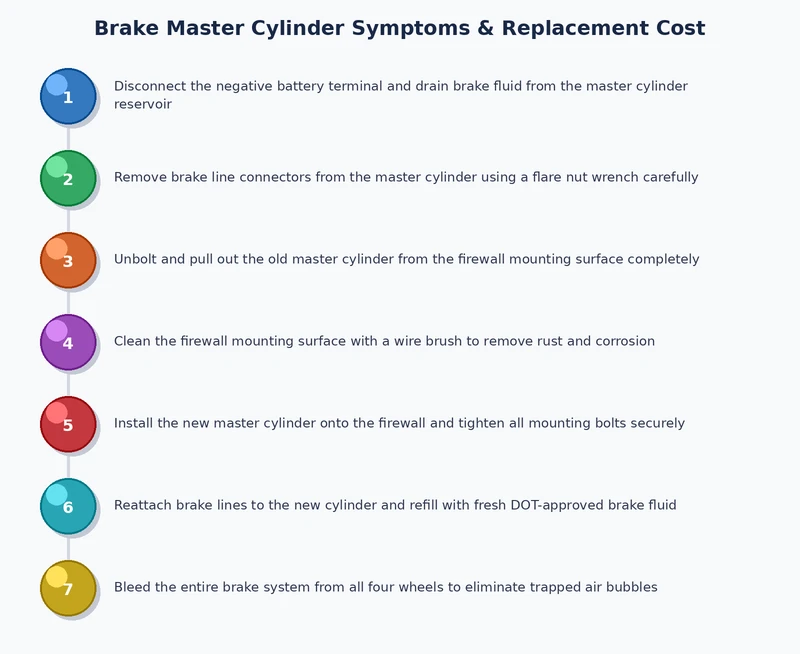
Replacing a brake master cylinder falls within the capability of most experienced home mechanics who have a working understanding of hydraulic systems and access to a quality brake bleeding kit. The procedure requires bench-bleeding the new unit before installation — a process of purging air from the cylinder off the vehicle using short hoses looped back into the reservoir — followed by correct torque on the mounting hardware and a thorough bleed of the entire brake circuit afterward. Our team recommends consulting the vehicle-specific service manual rather than relying on generic instructions, because booster mounting configurations and line fitting sizes vary considerably across platforms. After completing the swap, our team also advises following the bedding procedure outlined in our guide on how to break in new brake pads, since restored hydraulic pressure can alter pedal feel enough to warrant a brief conditioning cycle for the friction material.
Vehicles equipped with ABS (anti-lock braking system) modules or electronic brake distribution systems require specialized scan tools to bleed certain circuits, and attempting those bleeds without the proper equipment can leave air trapped in the modulator. Our team consistently recommends professional service for any vehicle with a congested engine bay that limits access to the master cylinder, or where brake line fittings show signs of corrosion, since forcing a corroded fitting almost always results in a broken line that substantially compounds the repair.
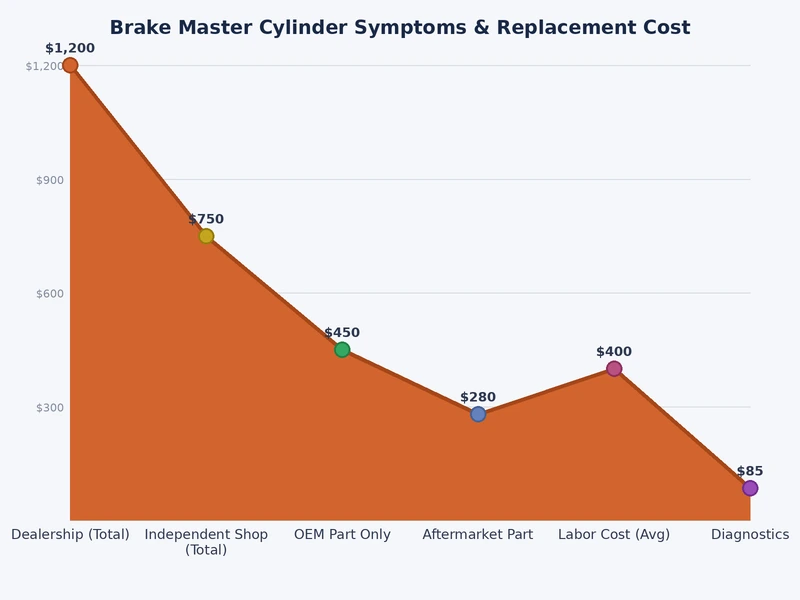
| Vehicle Type | Part Cost (DIY) | Shop Labor Estimate | Total (Professional) | DIY Difficulty |
|---|---|---|---|---|
| Economy Sedan | $35–$80 | $90–$130 | $125–$210 | Moderate |
| Pickup Truck / SUV | $55–$130 | $110–$160 | $165–$290 | Moderate |
| Performance / Sports Car | $80–$200 | $130–$200 | $210–$400 | Moderate–High |
| Luxury / European Import | $120–$350 | $150–$250 | $270–$600 | High |
| Heavy-Duty Truck | $70–$180 | $130–$180 | $200–$360 | Moderate–High |
Rebuild kits — which generally include replacement seals, O-rings, and sometimes a new piston assembly — typically cost between $10 and $40 and represent a viable option when the master cylinder housing is undamaged and the internal bore (the cylindrical channel the piston travels through) shows no scoring (fine scratches or grooves) under close inspection. Our team has observed rebuild kits performing reliably on well-maintained vehicles with clean, undamaged bores, and the cost savings over a full unit are real, though the margin narrows considerably when professional labor is included since the time required for a rebuild closely matches the time for a straightforward replacement.
Warning: Never attempt a seal rebuild on a master cylinder with a scored or corroded bore — even a minor surface imperfection will cause the new seals to fail within weeks of the repair.
A remanufactured (professionally rebuilt by a specialized facility) or new master cylinder eliminates any uncertainty about bore condition and typically carries a one-year or lifetime warranty through major parts retailers. Our team generally recommends full replacement for vehicles with high mileage, those more than eight years old, or any application where consistent, predictable braking is non-negotiable — including vehicles used for towing or regular mountain driving. The cost premium over a rebuild kit is modest in most vehicle classes, as the table above illustrates, and the reliability advantage generally favors the complete unit for all but the most budget-constrained situations.
Brake fluid is hygroscopic (meaning it absorbs atmospheric moisture over time), and elevated water content lowers its boiling point significantly, increasing the risk of vapor lock (the formation of compressible gas bubbles in the lines) during prolonged or aggressive braking. Most manufacturers recommend a complete fluid flush every two to three years regardless of mileage, and our team regards this interval as the single most effective preventive measure for extending master cylinder service life. Keeping fresh fluid in the system also protects the new internal seals from the corrosive effects of moisture-saturated fluid, which is one of the primary mechanisms behind premature seal deterioration in the first place.
After a master cylinder replacement, our team recommends performing the static pedal hold test once a month for the first three months to confirm the repair is holding, and periodically thereafter as part of routine brake inspections. Any return of pedal sink, fluid residue at the firewall, or an illuminated brake warning light warrants immediate re-examination of the new unit and its line connections, as overtorqued or undertorqued fittings are a common installation error that typically surfaces within the first few weeks of service. Maintaining a written record of all brake work performed — including the part number and supplier of the replacement cylinder — provides any future technician with the context needed to diagnose recurring issues efficiently and accurately.
 |
 |
 |
 |

About Sarah Whitfield
Sarah Whitfield is a diagnostics and troubleshooting specialist who spent ten years as an ASE-certified technician before joining the editorial team. She specializes in OBD-II analysis, electrical gremlins, and the kind of intermittent problems that make most owners give up.
Get some FREE car parts & gear.. Or check out the latest free automotive manuals and build guides here.
Disable your ad blocker to unlock all the hidden deals. Hit the button below 🚗
| | | |