by Sarah Whitfield
Ever walked out to the garage after a rainy weekend and spotted an orange ring coating the brake rotors? It looks alarming — but brake rotor surface rust is one of the most common and least dangerous things that can happen to a vehicle's stopping system. It clears up on its own within the first mile or two of normal driving, almost every single time. The real question is knowing when it doesn't.
Surface rust becomes a legitimate concern when it's deep, widespread, or accompanied by symptoms like vibration or grinding. This guide explains the difference, covers when to take action, and walks through both prevention and removal. For anyone already hearing odd sounds from the brakes, the resource on grinding noises when braking covers what those noises actually mean and when they signal something serious.
Contents
Cast iron — the material used in the vast majority of disc brake rotors — has almost no natural resistance to oxidation. Exposed to moisture without the protective chrome or paint coatings found on other metal components, cast iron begins oxidizing within hours. Rain, morning dew, high humidity, or even washing the car is enough to trigger it. The rotor's friction surface is bare metal by design, which means air and water have direct contact at all times.
This is a deliberate engineering trade-off, not a flaw. Coatings on the friction surface would compromise braking performance, so manufacturers leave it bare. The result is that brake rotor surface rust forms on essentially every cast iron rotor in normal use — it's simply a question of how quickly it clears.
A rotor left sitting overnight in damp conditions can develop a visible rust film in as little as 8–12 hours. After a rainy weekend — or on a car that hasn't moved in a week — the rust can look dramatic enough to suggest serious damage. It isn't. That thin orange film is purely cosmetic oxidation on the friction surface, and it abrades off within the first mile or two of braking. The brake pads act as abrasive erasers every time the driver slows down.
Not all rotor rust is the same. Surface rust and structural corrosion behave differently, require different responses, and pose entirely different risks. The table below breaks down the key distinctions at a glance.
| Factor | Surface Rust | Deep Corrosion |
|---|---|---|
| Appearance | Uniform orange or reddish-brown film, smooth texture | Pitting, cratering, flaking, uneven surface |
| Common Cause | Overnight moisture, rain, car wash, morning dew | Extended storage, road salt, long-term neglect |
| Risk Level | None — cosmetic only | Moderate to serious — affects stopping performance |
| Clears With Driving? | Yes — within 1–2 miles of normal braking | No — pitting and scoring are permanent |
| Action Required | None — drive normally | Inspection; likely rotor replacement |
The key visual clue is texture. Surface rust is a flat, uniform film. Deep corrosion creates pitting — small craters visible even in poor light — and often concentrates on the hat section (the raised center hub area of the rotor) rather than just the friction face. If pitting is present, the rotor has gone beyond surface-level oxidation.
Consistent driving is the single most effective way to prevent rotor rust from accumulating. Every braking event scrubs the friction surface clean. Vehicles that sit for extended periods — several weeks or more — are the ones most likely to develop rust thick enough to cause brake shudder on the first drive back. For daily drivers, brake rotor surface rust is rarely more than a brief cosmetic inconvenience that resolves before the end of the first commute.
For vehicles parked longer than two weeks, a short drive once every week or so — even just around the block with several firm stops — keeps the friction surface clear and prevents oxidation from taking hold. It's the simplest maintenance habit for brake health, and it costs nothing.
The type of brake pad installed affects how aggressively rust is scrubbed away during normal use. Ceramic pads are gentler on rotors but don't clear surface rust as efficiently as semi-metallic compounds, which are more abrasive by design. For vehicles parked in coastal or high-humidity environments, semi-metallic pads offer a practical advantage in keeping the rotor surface cleaner between drives.
After any rotor replacement, following the correct break-in procedure for new brake pads matters more than most drivers realize. Proper bedding creates an even transfer layer of pad material on the rotor face — which improves braking performance and makes the surface slightly more resistant to oxidation between uses.
For vehicles heading into long-term storage, applying a light coat of corrosion-inhibiting spray to the rotor edges (never the friction surface) and storing the car with the parking brake disengaged reduces moisture retention and prevents pad impressions from forming on the rotor face.
Most brake rotor surface rust clears after a short drive with no intervention required. But certain symptoms indicate something more serious is happening and shouldn't be ignored:
Persistent grinding combined with reduced stopping power is the clearest red flag. That combination suggests rust has etched into the rotor face or that the friction surface is no longer flat. Similar symptoms can develop in drum brake systems too — the guide on drum brake noise causes and fixes explains how to distinguish between the two when troubleshooting a braking complaint.
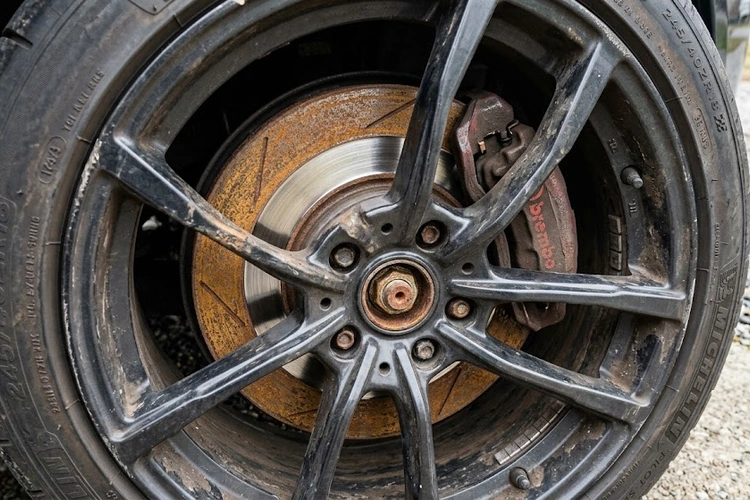
A basic visual inspection requires no tools. With the wheels still on, look through the spokes to examine as much rotor surface as possible. Healthy rotors show a machined, silver-gray friction surface with minimal scoring. Rust concentrated on the outer edge or hat section is normal and doesn't affect braking. Rust that covers the full friction face and doesn't clear after several miles of driving warrants a closer look with the wheel off.
For a proper measurement, a brake micrometer confirms whether the rotor has worn below its minimum thickness specification — a number stamped directly onto the rotor hat. Any rotor at or below minimum spec gets replaced regardless of rust condition. Rotor thickness is a structural safety specification, not a suggestion.
Parking a vehicle for an extended period without any preparation is the fastest route to serious rotor rust. Leaving the parking brake engaged during storage is a particularly common mistake — it presses the brake pads directly against the rotor face, trapping moisture and accelerating localized corrosion exactly where the pad contacts the rotor. When the vehicle is eventually driven, those contact patches leave rust rings that take significant braking effort to clear and sometimes develop into permanent scoring.
Correct storage protocol: chock the wheels mechanically instead, leave the parking brake disengaged, and ensure the storage space has reasonable airflow. A damp, unheated garage is the worst possible environment for rotor longevity. Even a simple breathable car cover helps reduce humidity at the rotor surface compared to leaving the vehicle fully exposed.
The outer edge and hat section of the rotor develop rust that never clears through normal braking — because brake pads never contact those areas. Most of the time, drivers correctly identify this as cosmetic and move on. But in severe cases, typically on vehicles that sit for months in wet or salt-heavy environments, deep corrosion on the hat can compromise rotor structural integrity over time. Annual cleaning of the hat area during routine pad changes catches this before it becomes a safety concern. A wire brush and rust converter applied during a pad swap takes about five minutes and extends rotor service life meaningfully.
Rotor pricing varies significantly by vehicle type. Economy car rotors are genuinely inexpensive. Trucks, SUVs, and performance vehicles use larger, heavier rotors that carry a proportionally higher price tag.
Budget rotors for compact cars run $25–$45 per rotor. Mid-range rotors — the most common replacement choice for everyday vehicles — cost $50–$90 each. Premium slotted or drilled rotors for performance applications or heavy-duty trucks run $100–$200 or more per unit. Replacing all four rotors at once is the recommended approach for even braking performance, which puts the total parts cost between $100 for economy platforms and $400 or more for larger vehicles.
Most shops charge 1.0–1.5 hours of labor per axle for a combined rotor and pad replacement. At typical shop rates of $100–$150 per hour, that works out to $100–$225 per axle in labor. A complete four-wheel brake service — pads and rotors on all corners — at an independent shop runs $400–$700 all-in for most vehicles. Dealerships typically land $600–$1,000 depending on make and model. DIY replacement on a standard vehicle with basic hand tools cuts that cost to parts only, typically $200–$400 for a full four-wheel job on a mid-size car or SUV.
For fresh brake rotor surface rust — anything that formed over a normal overnight or weekend period — no tools are needed. The brake pads naturally abrade the rust film during the first several braking events. A short drive with a dozen firm (but not panic) stops at speeds between 15 and 40 mph clears the friction surface efficiently. This approach works reliably for rust that's been sitting less than a week under typical conditions. Most drivers won't notice anything beyond a faint scraping sound on the very first stop, which disappears immediately.
Rotors that have sat for several weeks or longer may need manual attention before the first drive. The process is straightforward for anyone comfortable with basic vehicle maintenance:
If the rotor still shows pitting after cleaning — or if the friction surface feels uneven when running a finger across it — replacement is the correct next step. No amount of surface prep corrects a rotor that's warped, deeply scored, or worn below its minimum thickness spec. At that point, the visible rust is simply a symptom of a rotor that's already reached the end of its service life.
In the vast majority of cases, no. A thin film of surface rust on cast iron rotors is completely normal and clears within the first mile or two of driving. It becomes a safety concern only when the rust is deep enough to cause pitting, when it results in uneven rotor thickness, or when it's accompanied by persistent grinding or brake pull that doesn't resolve after the first few stops.
For rust that formed overnight or over a weekend, the friction surface is typically clean within 1–2 miles of normal braking. Several firm stops at 15–40 mph accelerate the process if the rust is heavier. Rust that doesn't clear after 5–10 miles of driving warrants a visual inspection of the rotor face for pitting or scoring.
A brief shudder on the very first stop after a vehicle has sat overnight is common and harmless — it's simply the pads scrubbing off the rust film. Persistent pedal vibration that continues through multiple stops suggests something more serious, such as rotor warping, uneven wear, or deep corrosion affecting the flatness of the rotor surface.
Not always — but it's the recommended approach in most situations. Installing new pads on worn or scored rotors prevents proper pad bedding and leads to uneven contact, reduced stopping power, and faster pad wear. Replacing both together ensures optimal performance. When rotors still have adequate thickness and a smooth, undamaged friction surface, replacing pads alone is entirely appropriate.
 |
 |
 |
 |

About Sarah Whitfield
Sarah Whitfield is a diagnostics and troubleshooting specialist who spent ten years as an ASE-certified technician before joining the editorial team. She specializes in OBD-II analysis, electrical gremlins, and the kind of intermittent problems that make most owners give up.
Get some FREE car parts & gear.. Or check out the latest free automotive manuals and build guides here.
Disable your ad blocker to unlock all the hidden deals. Hit the button below 🚗
| | | |