by Sarah Whitfield
When your brake warning light on the dashboard illuminates, it means one thing: your braking system is signaling a problem that needs your attention. It is not always a crisis, but it is never something you ignore. The good news is that most causes are diagnosable right in your driveway with a few basic checks.
Your brakes are the most safety-critical system in your vehicle. A single compromised component — low fluid, a worn pad, a leaking caliper — can cascade into a dangerous situation fast. Knowing the seven most common triggers and what to do about each one puts you back in control. For a broader overview of what activates this indicator, visit our dedicated guide on brake warning light causes.
Contents
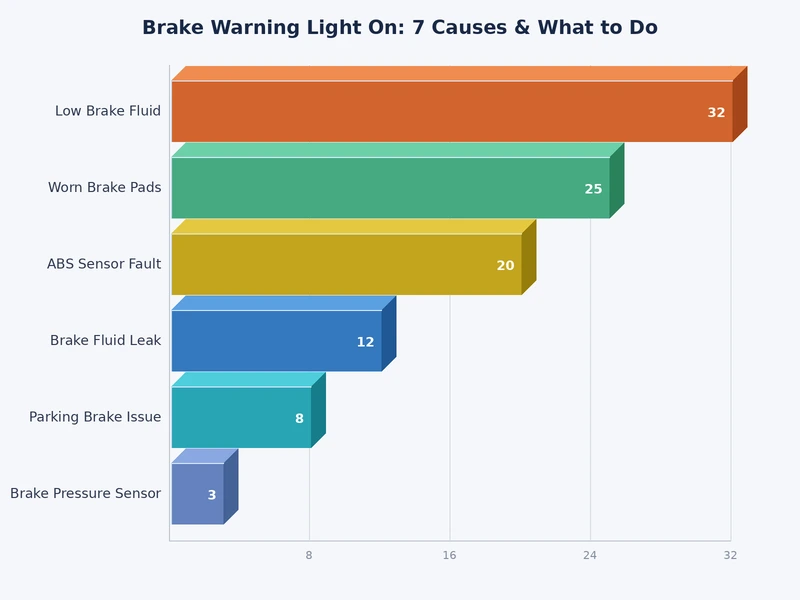
The brake warning light does not discriminate. It responds to everything from a simple oversight — like a partially engaged parking brake — to a serious hydraulic failure. Work through these seven causes in order. The most common ones come first, and most can be ruled out in under ten minutes.
Brake fluid is the hydraulic medium that transmits the force from your foot pedal all the way to your brake calipers. When the fluid level drops below the minimum mark on the reservoir, a float sensor inside the cap triggers the warning light. This reservoir sits near the firewall under the hood — it is a small translucent plastic container with MIN and MAX lines printed on the side.
If the level is low, top it off with the correct grade listed in your owner's manual — typically DOT 3, DOT 4, or DOT 5.1. But do not stop there. Brake fluid level does not drop on its own without a reason. A gradual drop usually means worn pads consuming more fluid as the caliper pistons extend further. A sudden drop points to a leak.
Most modern vehicles route the brake pad wear sensor signal through the same circuit as the brake warning light. When your pads wear down to their minimum safe thickness — typically around 2–3mm — the sensor grounds out and triggers the light. You will often hear a high-pitched squeal at the same time; that is the mechanical wear indicator scraping the rotor.
Do not delay on this one. Driving on pads worn past their limit damages your rotors, and rotor replacement costs significantly more than a simple pad swap. If you hear metal-on-metal grinding rather than squealing, the pads are gone and you are damaging the rotor with every stop.
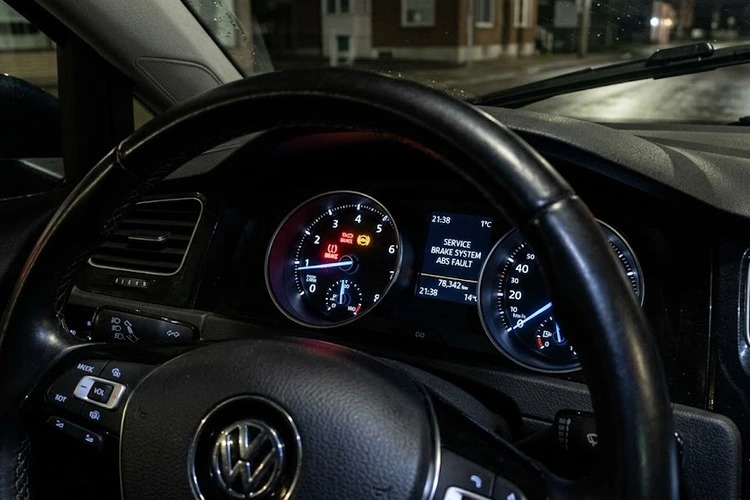
This is the most common cause — and the easiest to overlook. Many vehicles use the same red brake warning light for both the parking brake status and brake system faults. If you drove away with the parking brake partially on, the light stays lit the entire time. Release the parking brake fully and watch the dashboard. If the light goes off immediately, problem solved. If it stays on, you have a different issue to track down.
Some vehicles have a dedicated amber ABS warning light, but on many platforms an ABS fault illuminates the standard red brake warning light alongside it or instead of it. The Anti-lock Braking System uses wheel speed sensors to prevent wheel lockup during hard stops. When the ABS module detects a fault, it disables the anti-lock function and alerts you.
Your conventional braking still works with an ABS fault — but you lose the protection against skidding on wet or loose surfaces. Common culprits include a dirty or damaged wheel speed sensor, a corroded reluctor ring, or a failing ABS control module. You need a scan tool to read the specific fault code and pinpoint the problem.
A leak anywhere in the hydraulic circuit — brake lines, flexible hoses, caliper seals, or wheel cylinders — will drain your fluid level and reduce your stopping power. If you notice a small puddle of clear to light-yellow fluid near a wheel or under the engine bay, you are likely looking at brake fluid. It has a slightly oily texture and a faintly chemical smell.
A significant leak is a genuine safety emergency. Your pedal will feel soft and may sink toward the floor under sustained pressure. Do not drive the vehicle until the leak is located and repaired. Even a slow seep can turn catastrophic under hard braking.
The master cylinder converts your foot pressure into hydraulic pressure and distributes it to the front and rear brake circuits. When its internal seals fail, fluid bypasses them internally without leaking externally. The result is a pedal that feels spongy, sinks slowly to the floor when held, or requires multiple pumps to build firm pressure.
This is not a repair most drivers should attempt at home. Replacing a master cylinder requires bleeding the entire hydraulic system correctly. An air bubble left in the lines will give you a dangerously long pedal — or no pedal at all. A qualified technician is the right call here.
Sometimes the brake warning light comes on despite the brakes being mechanically sound. The low-fluid float sensor, the parking brake switch, and the pad wear sensors can all fail on their own due to corrosion, physical damage, or simple age. A frayed wire in the harness can do the same thing.
If you have checked the fluid level, confirmed the parking brake is off, inspected the pad thickness, and the brakes feel normal, plug in an OBD-II scanner and look for stored trouble codes. Wiggling the sensor harness while watching the dashboard can sometimes reproduce the fault and confirm you are dealing with a wiring issue rather than an actual system problem.
| Cause | Urgency Level | Safe to Drive? | Typical Fix Cost |
|---|---|---|---|
| Parking brake engaged | Low | Yes — after releasing | Free |
| Low brake fluid (pads worn) | Medium | Short distance only | $100–$250 (pads) |
| Worn brake pads (sensor) | Medium–High | Briefly — repair soon | $150–$300 (pads + rotors) |
| Faulty sensor or wiring | Low–Medium | Yes — if brakes feel normal | $50–$200 |
| ABS system fault | Medium | Yes — with extra caution | $100–$1,000 |
| Brake fluid leak | High | No | $150–$500+ |
| Failing master cylinder | Critical | No | $300–$700 (parts + labor) |
There is no shortage of misinformation about dashboard warning lights, and the brake light is no exception. Two myths in particular cause drivers to either panic unnecessarily or, more dangerously, shrug the light off entirely.
This is not true. In many cases, the brake warning light comes on because the parking brake was not fully released or the fluid is slightly below the minimum line. Both situations take minutes to address and do not indicate any brake system damage. The light is a monitoring system, not a death sentence. That said, you confirm the cause before deciding the light is harmless.
This one is far more dangerous. Drivers who ignore a persistent brake warning light sometimes rationalize it by saying the brakes "feel fine." The problem is that some causes — a slow fluid leak, a partially seized caliper — degrade gradually. What feels like a slight difference one day can become significantly reduced braking ability the next. The National Highway Traffic Safety Administration consistently identifies brake failures as one of the leading mechanical contributors to serious accidents.
Pro tip: If the brake warning light comes on while you are driving, pump the brake pedal twice. If it feels firm and normal, you likely have a sensor issue. If it feels soft or spongy, pull over safely and call for assistance immediately.
A systematic approach saves you time and money. Run through these checks before calling a shop or buying parts.
First, confirm the parking brake is fully released — pull it fully off if it is a lever, or press the button firmly if it is electronic. Then open the hood and check the brake fluid reservoir level. If it is below the MIN line, add the correct fluid type and see if the light goes out after a short drive. Next, visually inspect your brake pads through the wheel spokes if possible. If you can see less than a quarter inch of pad material, that is your answer.
Check whether your vehicle also has a separate ABS warning light. If both the ABS and brake lights are on simultaneously, start your diagnosis with the ABS system. A stuck brake caliper can also cause the light to appear alongside pulling to one side under braking — see our breakdown of stuck brake caliper symptoms for a detailed walkthrough of what to look for.
If the basic visual checks come up clean and the brakes feel normal under pressure, connect an OBD-II scanner to the diagnostic port under your dash. Most brake system faults store a specific trouble code — C-codes (chassis codes) indicate brake and suspension systems. A code like C0035 points to a specific wheel speed sensor. A code like C0267 indicates a pump motor circuit fault in the ABS module. These codes give you an exact starting point rather than guessing. Basic OBD-II scanners that read ABS and brake codes are available for under $100 and are worth every cent.
Not every brake warning light repair requires a mechanic, but some absolutely do. Knowing where that line falls saves you money on the easy jobs and keeps you safe on the complex ones. The symptoms of failing shock absorbers follow a similar logic — some checks are DIY-friendly, others cross into professional territory fast.
Topping off brake fluid is straightforward as long as you use the correct DOT rating and do not contaminate the reservoir. Replacing brake pads on most vehicles is a manageable DIY job with a basic set of tools — no specialized equipment is required for the pad swap itself. Cleaning a wheel speed sensor is also DIY-friendly; remove the sensor, clean off any debris or metal shavings with brake cleaner, and reinstall. Many ABS fault codes clear themselves after the sensor is cleaned.
Brake line repair and master cylinder replacement both require properly bleeding the hydraulic system afterward. Air in the lines creates a dangerous pedal. Unless you are experienced with brake bleeding procedures and have the right equipment, these jobs belong at a shop. Similarly, caliper replacement on a vehicle with electronic parking brake integration requires a scan tool to retract the piston — a standard C-clamp will damage the motor. These are not warnings to scare you off — they are honest assessments of where the risks lie.
The brake warning light comes on far less often on well-maintained vehicles. Consistent, simple habits make the difference between a system that runs reliably for years and one that surprises you at the worst possible moment.
Brake fluid is hygroscopic — it absorbs moisture from the air over time. As water content increases, the boiling point of the fluid drops, which can lead to vapor lock under hard repeated braking (brake fade). Most manufacturers recommend flushing the brake fluid every two years or 24,000 miles, regardless of how the fluid looks. Fresh fluid is clear to slightly golden. Dark brown or black fluid is overdue for a flush. This is an inexpensive service — typically $80–$150 — that protects every component in your hydraulic system.
You do not need to pull wheels to check your pads. Most modern wheels have openings that give you a direct view of the caliper and rotor. Look at the pad thickness through the spokes — if it is thinner than a pencil eraser, it is time to replace. Inspect rotors for deep grooves, heat cracks, or severe rust pitting at the same time. A rotor that looks more like a record album than a smooth disc needs replacing alongside the pads. Budget for a complete brake job every 40,000–70,000 miles depending on your driving habits and vehicle weight.
You do not need a professional shop setup to perform meaningful brake inspections. A few targeted tools let you diagnose the most common causes of the brake warning light without leaving your driveway.
A digital brake pad thickness gauge gives you an accurate measurement of remaining pad material — far more reliable than eyeballing it through the wheel. A flashlight with a magnetic base frees up both hands when peering into tight spaces around calipers and rotors. A set of mechanic's picks helps clean debris from sensor connectors without damaging the pins. Keep a small bottle of brake cleaner spray in your garage — it dissolves grease and debris from sensors, rotors, and caliper sliding pins without leaving residue.
An OBD-II scanner with ABS and SRS support is the single most valuable tool for diagnosing a brake warning light that will not go out after basic checks. Entry-level units that read generic codes cost around $30, but a scanner that reads manufacturer-specific ABS and chassis codes costs $80–$150 and is worth it. A brake bleeder kit — either a vacuum bleeder or a pressure bleeder — is essential if you plan to do your own fluid flushes or caliper replacements. A torque wrench rounds out the list; brake caliper bolts and wheel lug nuts have specific torque specs that matter for safety.
It depends on the cause. If the light came on because you forgot to release the parking brake or the fluid is slightly low, you can drive short distances carefully. If the pedal feels soft, spongy, or sinks toward the floor, stop driving immediately — you may have a serious hydraulic leak or master cylinder failure that can result in brake loss.
Most vehicles illuminate all warning lights briefly during the startup self-check sequence — this is normal. The light should go out within a few seconds as the system confirms normal operation. If it goes off and stays off, your brakes passed the self-check. If it lingers beyond 5–10 seconds, that is a genuine fault that needs investigation.
Yes. As brake pads wear down over time, the caliper pistons extend further to maintain contact with the rotor. This draws more fluid from the reservoir, gradually lowering the level. The float sensor then triggers the light. Topping off the fluid will extinguish the light, but inspect your pad thickness immediately — they may be nearing the end of their service life.
The red brake warning light indicates a problem with the primary hydraulic braking system — low fluid, worn pads, a leak, or the parking brake. The yellow ABS light specifically indicates a fault in the anti-lock braking system. Your conventional brakes still work with the ABS light on, but you lose anti-lock protection. If both lights are illuminated at the same time, treat it as a high-priority situation and have the vehicle inspected promptly.
A brake warning light on your dashboard is your vehicle telling you something specific — and it deserves a specific response, not a shrug. Start with the basic checks outlined above, work through them in order, and you will identify the cause in most cases without spending a dollar. If you find something beyond a simple top-off or sensor clean, get it to a qualified technician promptly. Your brakes keep you, your passengers, and everyone around you safe — treat that warning light with the seriousness it earns.
 |
 |
 |
 |

About Sarah Whitfield
Sarah Whitfield is a diagnostics and troubleshooting specialist who spent ten years as an ASE-certified technician before joining the editorial team. She specializes in OBD-II analysis, electrical gremlins, and the kind of intermittent problems that make most owners give up.
Get some FREE car parts & gear.. Or check out the latest free automotive manuals and build guides here.
Disable your ad blocker to unlock all the hidden deals. Hit the button below 🚗
| | | |