by Sarah Whitfield
Why does the driver's side vent push cold air while the passenger side delivers nothing but heat? When a car AC blows hot air on one side, the problem is almost never random chance — it points to a specific mechanical or electronic failure inside the HVAC (heating, ventilation, and air conditioning) system. The five causes behind this symptom are well understood, and most of them are diagnosable without a trip to the dealership.
This guide from the car care and maintenance team at CarCareTotal covers each cause in detail, explains how to distinguish one from another, and outlines both DIY and professional repair paths. Whether the vehicle has a basic single-zone system or a full dual-zone climate control setup, the same core components are responsible — and the same diagnostic approach applies.
Contents
A clear picture of the HVAC system's architecture is the foundation of an accurate diagnosis. The components responsible for one-sided heat problems are not obvious until the airflow path is understood.
In a single-zone climate system, one set of controls governs the temperature for the entire cabin. Both the driver and front passenger receive air at the same temperature — there is no independent adjustment between sides. Dual-zone systems, by contrast, route conditioned air through two separate channels inside the HVAC housing. Each channel has its own blend door and, in most designs, its own actuator motor. The driver can set 68°F while the passenger holds 74°F, and the system delivers both simultaneously.
Importantly, even vehicles without a formal dual-zone label can display one-sided temperature failures. Many single-zone systems physically split airflow between the driver and passenger duct paths after it leaves the central HVAC box. If the mechanism that controls that split malfunctions, the result looks identical to a dual-zone failure.
The blend door is a hinged flap inside the HVAC housing that sits between the heater core and the evaporator core. Its angle determines the ratio of hot to cold air entering the duct for that zone. When commanded to swing fully toward the heater core, the vent output is maximum heat. When it angles toward the evaporator core, the output is maximum cold. Any temperature between those extremes is achieved by positioning the door at an intermediate angle.
A malfunctioning blend door — whether stuck, physically broken, or incorrectly commanded by a failed actuator — is the single most common explanation for uneven cabin temperatures. It accounts for the majority of cases where a car AC blows hot air on one side while the other side operates normally.
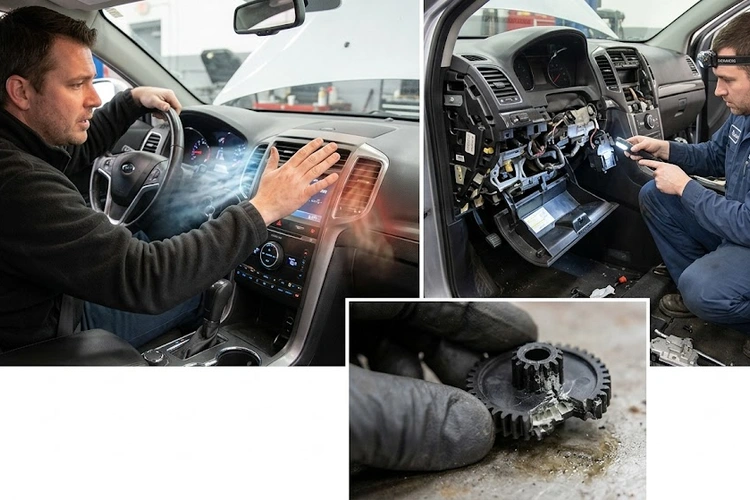
Pro Insight: Before disassembling the dashboard, cycle the temperature dial from maximum cold to maximum heat several times while listening for clicking or grinding sounds behind the instrument panel. That noise alone identifies a failing blend door actuator in most cases.
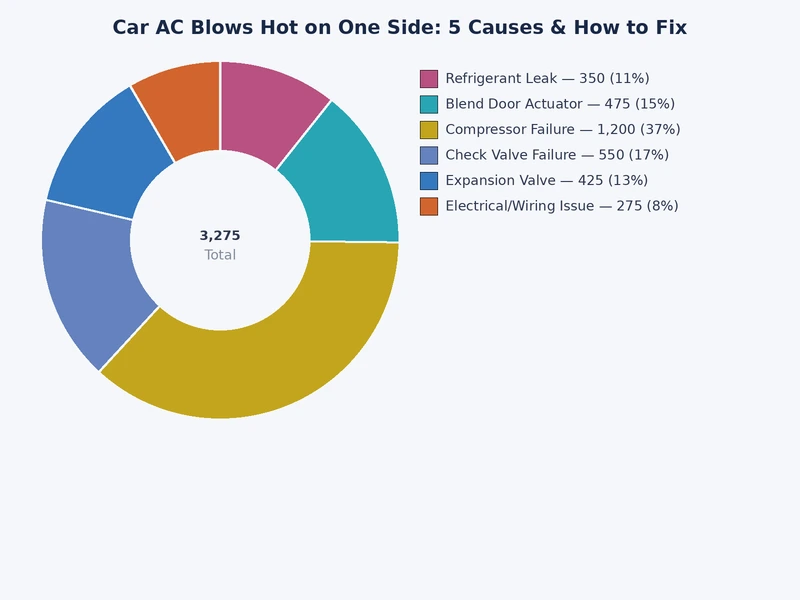
When car AC blows hot air on one side of the cabin, five mechanical or electronic failures account for the vast majority of cases. Each has a distinct symptom profile that makes isolation straightforward with a basic diagnostic process.
The blend door actuator is a small electric motor — typically the size of a large matchbox — that physically moves the blend door on command from the climate control module. In dual-zone vehicles, each zone has its own actuator, mounted behind the dashboard near the HVAC box. When the actuator's plastic gears strip or its motor fails, the blend door freezes in its last position. If that position is full-heat, the affected vent zone delivers warm air regardless of what temperature is dialed in.
The characteristic symptom of a failed actuator is a repetitive clicking or ticking noise from behind the dashboard when the temperature is adjusted. This sound is produced by the motor continuing to spin while the stripped gear teeth fail to turn the door. On vehicles where the actuator fails silently, the only indication is a vent that no longer responds to temperature changes on one side.
Even a fully functional actuator cannot move a physically jammed blend door. Foreign objects — a dropped pen, a small toy, or years of accumulated debris — can lodge inside the HVAC housing and prevent the door from swinging through its arc. In some cases, the door itself cracks, warps, or separates from its pivot pin, particularly in older vehicles subjected to extreme seasonal temperature cycles.
A jammed door typically produces no clicking sound, because the actuator either stalls silently or enters a fault state. The affected vent simply stays locked at whatever temperature the door was holding when the jam occurred.
Refrigerant — the chemical compound that absorbs heat and enables the cooling cycle — must be present at the correct pressure for the system to produce cold air. Microscopic leaks at fittings, hose connections, or the condenser can deplete refrigerant gradually over months or years. While low refrigerant typically causes both vent sides to underperform, it can produce asymmetric cooling in vehicles where independent evaporator circuits lose pressure at different rates, or where partial blockages redirect reduced refrigerant flow unevenly.
Drivers who also notice the engine temperature rising during AC use should consult the detailed breakdown of why a car overheats with the AC on, as refrigerant pressure problems and cooling system stress are often linked.
The temperature control module (TCM) is the electronic brain of the climate system. It reads inputs from temperature knobs or a touchscreen interface, transmits position commands to the blend door actuators, and monitors feedback sensors to confirm the doors are responding. A corrupted software state, a failed temperature sensor input, or a damaged control head can cause the module to send incorrect commands — holding one actuator at maximum heat while the other operates normally.
According to the U.S. Environmental Protection Agency's mobile air conditioning program, improper system maintenance and neglected refrigerant leaks are among the leading contributors to escalating HVAC component failures in passenger vehicles, including premature control module degradation.
The heater core is a small radiator mounted inside the dashboard that circulates hot engine coolant to warm cabin air. The evaporator core chills incoming air by passing it over refrigerant-cooled fins. Both can develop blockages or leaks. A partially clogged heater core on one zone of a split-duct system restricts hot coolant flow to that channel, producing a cold vent on the side where heat is actually wanted. A leaking heater core, meanwhile, introduces coolant vapor into the cabin — a sweet, syrupy odor that sometimes surfaces alongside other unusual smells in the car and should not be ignored.
| Cause | Primary Symptom | DIY Difficulty | Estimated Repair Cost |
|---|---|---|---|
| Blend Door Actuator Failure | Clicking noise; one side stuck at hot or cold | Moderate | $100–$350 |
| Jammed or Broken Blend Door | No temperature response on one side; no noise | Moderate–Advanced | $80–$250 |
| Low Refrigerant | Weak or warm air, often both sides affected | Not DIY (regulated) | $100–$350 |
| Faulty Temperature Control Module | Erratic or unresponsive temperature behavior | Advanced | $250–$900 |
| Clogged Heater or Evaporator Core | Sweet smell; inconsistent temps; coolant loss | Advanced | $400–$1,400 |
Not every HVAC repair demands a professional shop visit. Knowing which jobs are accessible and which require certified equipment or dealer-level tools prevents wasted effort and unnecessary expense.
Several of these repairs fall within reach of any driver comfortable with basic interior disassembly and a factory service manual.
The key prerequisite for any of these jobs is a vehicle-specific repair manual or a reliable factory service manual. Generic repair guides frequently omit critical details about trim panel clip locations and wiring harness routing, which can turn a two-hour job into a frustrating all-day project.
Three scenarios require a trained and certified technician:
Warning: Never attempt to recharge an AC system using consumer-grade refrigerant cans without first confirming there is no refrigerant leak. Adding refrigerant to a leaking system is a short-term fix at best and risks damaging the compressor if the charge pressure is incorrect.
Systematic diagnosis avoids the expensive mistake of replacing parts that are not responsible for the fault. The process moves from the simplest checks to the most involved, stopping as soon as the cause is confirmed.
Before opening the dashboard, assemble the following:
A logical five-step sequence isolates the cause in the majority of cases without unnecessary disassembly.
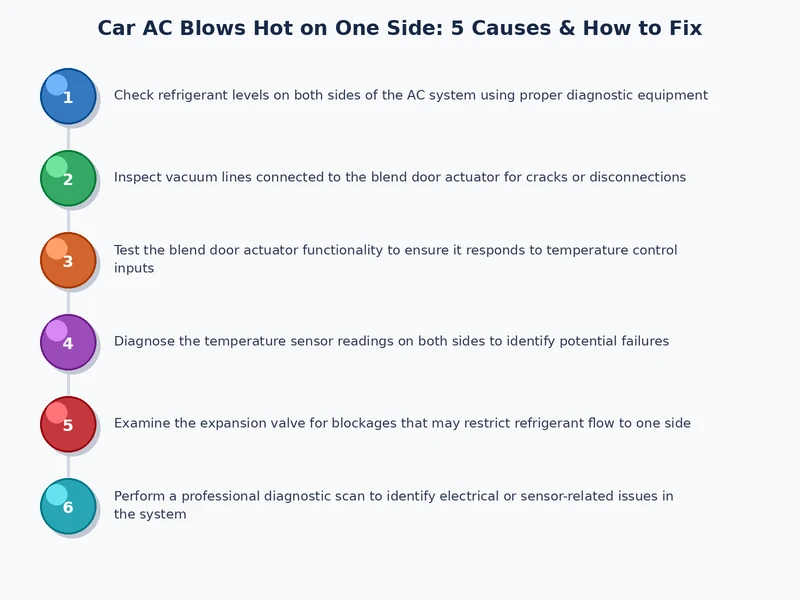
Step 1: Confirm the asymmetry. Set both climate zones to maximum cold and allow the system to run for five minutes. Insert a thermometer probe into vents on each side and record the temperature difference. A gap of more than 10°F between sides confirms an asymmetric failure rather than a general system weakness.
Step 2: Listen for mechanical noise. While the engine runs, slowly cycle the temperature control on the affected side from maximum cold to maximum heat several times. A clicking, ticking, or grinding sound from behind the dashboard during adjustment is a strong indicator of a failing blend door actuator.
Step 3: Read fault codes and live data. Connect an OBD-II scanner and navigate to HVAC-related diagnostic data. Check actuator position feedback values. A value stuck at maximum heat on one side while the other responds normally confirms an actuator or blend door fault. Record any stored HVAC trouble codes before clearing them.
Step 4: Check refrigerant pressure. If no fault codes are present and both actuators appear to be responding, have a shop perform a refrigerant pressure check using a manifold gauge set. Low pressure on the high side points to a refrigerant leak requiring professional recovery and recharge.
Step 5: Inspect for coolant involvement. If the sweet smell of coolant is present alongside the temperature imbalance, a heater core inspection is warranted. Drivers experiencing coolant loss alongside temperature irregularities should also review the guide on coolant temperature sensor symptoms, as a failing sensor can cause the engine management system to incorrectly modulate coolant flow through the heater core.
Once the cause is confirmed, the repair path is generally straightforward. Preventing a recurrence requires only a few consistent maintenance habits.
Blend door actuator replacement is one of the most accessible HVAC repairs available to a home mechanic. The general procedure follows these steps across most vehicle platforms:
OEM (original equipment manufacturer) actuators are strongly recommended over generic alternatives. Aftermarket units frequently use lower-grade plastic gears that replicate the original failure within a shorter service life, negating the cost savings of the cheaper part.
The following practices extend the service life of the entire HVAC system and reduce the likelihood of repeat failures:
The repair cost depends entirely on the root cause. A blend door actuator replacement typically costs $100–$350 all-in, including parts and labor. A refrigerant recharge runs $100–$350 at a shop. At the expensive end, heater core or evaporator core replacement can reach $400–$1,400 or more due to the labor involved in accessing components buried inside the dashboard.
Low refrigerant usually causes reduced cooling on both sides simultaneously, but asymmetric cooling is possible in vehicles with independent evaporator circuits or when a partial blockage redirects limited refrigerant flow unevenly. If one side is notably hotter than the other and no actuator noise is present, refrigerant pressure should be checked before pursuing other causes.
A failed blend door actuator does not affect vehicle safety or drivability — the engine, brakes, and steering are unaffected. However, if the stuck vent zone produces constant heat in warm weather, driver discomfort can become a distraction. The repair should be addressed within a reasonable timeframe but does not require immediate roadside attention.
 |
 |
 |
 |

About Sarah Whitfield
Sarah Whitfield is a diagnostics and troubleshooting specialist who spent ten years as an ASE-certified technician before joining the editorial team. She specializes in OBD-II analysis, electrical gremlins, and the kind of intermittent problems that make most owners give up.
Get some FREE car parts & gear.. Or check out the latest free automotive manuals and build guides here.
Disable your ad blocker to unlock all the hidden deals. Hit the button below 🚗
| | | |