by Sarah Whitfield
A humming noise while driving almost always comes down to one of eight rotating components — and you can narrow it down in your driveway before spending a dollar. Wheel bearings and tire wear account for roughly 80% of cases. The remaining 20% splits across CV joints, differentials, driveshafts, brake rotors, and the power steering pump.
The noise pattern is your diagnostic tool. A steady drone rising with vehicle speed points to a wheel bearing or tires. A hum that shifts louder on one side when you turn the steering wheel isolates it to a specific corner. Anything cycling in sync with driveshaft rotation — not wheel speed — points to CV joint or differential wear. Every mile you drive on a failing wheel bearing accelerates the damage. What hums today can seize next week and take the hub assembly with it.
Work through this guide in order. Road tests first. Physical inspection second. You'll have a confident diagnosis before you book a shop appointment.
Contents
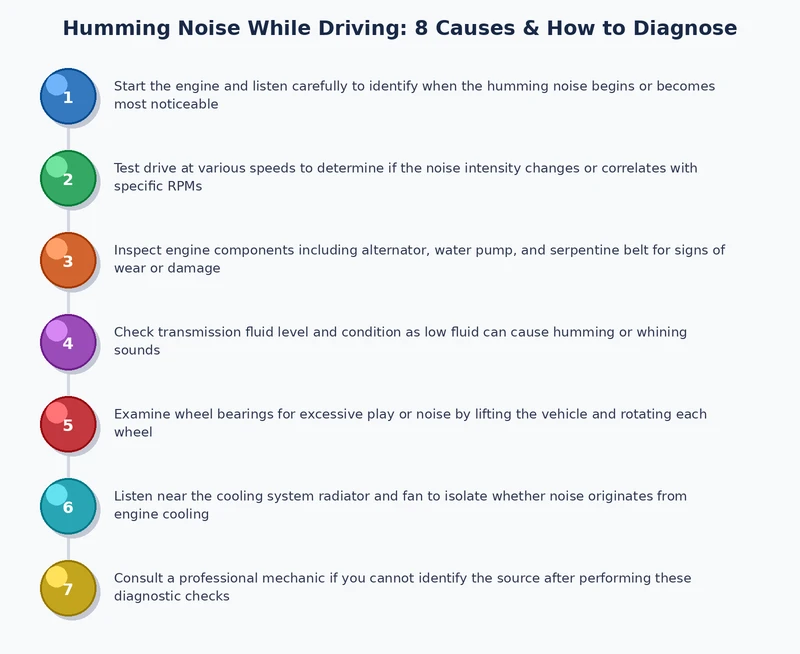
Diagnosis runs in three phases: a controlled road test at multiple speeds, a steering input test to isolate corners, and a physical inspection with the vehicle raised. Don't skip to the lift first. The road tests deliver 90% of the answer without a single tool.
Find an empty road and accelerate through 20, 40, 60, and 75 mph. Radio off. No passengers talking. Listen for how the hum behaves at each speed band and note exactly where it starts, where it peaks, and whether it persists when coasting.
Record the speed range precisely. That data alone eliminates half the causes on the list before you touch the car.
At 40–50 mph on a clear road, execute a slow, sustained swerve. Load the wheel gently left, hold two seconds, return to center, load right. Keep it subtle — you're shifting lateral bearing load, not cornering. Watch what happens to the hum on each side.
This test is the most reliable field method for isolating bearing failure. If your vehicle also pulls to one side while driving, bearing deterioration is advanced enough to affect wheel geometry — the repair window is closing fast.
Warning: If the hum is accompanied by steering wheel vibration above 50 mph, treat it as a same-day safety concern — a catastrophically failed bearing can seize mid-drive and trigger loss of control.
After the road tests, raise the vehicle on jackstands — not a floor jack alone. Work through this sequence in order:
Use the table to match your noise profile to the most likely cause. Multiple causes can overlap — a vehicle with worn shocks often develops both cupped tires and accelerated bearing wear at the same time.
| # | Cause | Sound Character | Speed Dependent | Steering Dependent | Primary Fix |
|---|---|---|---|---|---|
| 1 | Worn wheel bearing | Low drone, sometimes growl | Yes — rises steadily | Yes — shifts by corner | Bearing or hub assembly |
| 2 | Cupped tires | Rhythmic hum with road texture feel | Yes — matches tire rotation | Minimal | New tires + replace shocks |
| 3 | Low tire pressure | Broad, low-frequency drone | Yes | No | Inflate to placard spec |
| 4 | Worn CV joint | Hum combined with clicking on turns | Yes | Yes — worse at full lock | CV axle replacement |
| 5 | Differential wear | Gear whine under acceleration load | Yes — load sensitive | No | Fluid service or rebuild |
| 6 | Driveshaft / U-joint | Vibration-hum at specific speed | Yes — resonant band | No | Rebalance or replace U-joints |
| 7 | Warped brake rotor | Hum with pedal pulsation | Yes | Minimal | Resurface or replace rotors |
| 8 | Power steering pump | Whine tied to steering angle | No — RPM/angle linked | Yes — worse at full lock | Fluid flush or pump replacement |
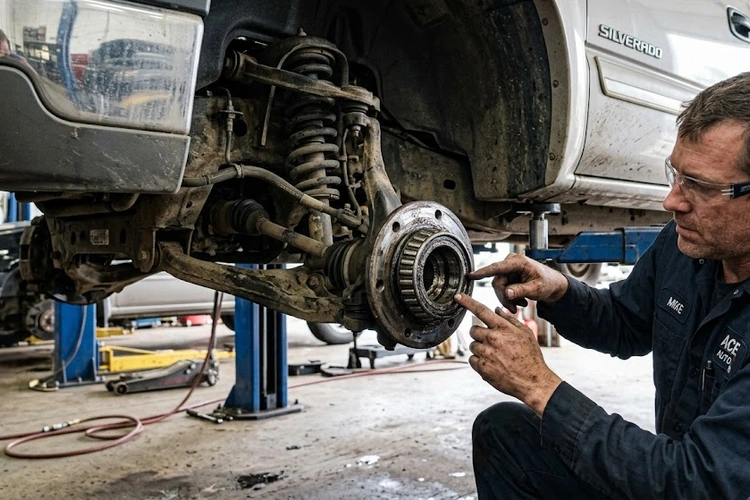
Worn wheel bearings are the default answer when a humming noise while driving changes with steering input. NHTSA identifies wheel-end failures among the leading mechanical causes of loss-of-control incidents — which tells you exactly why this is a safety issue, not an annoyance. When the bearing races wear, the rolling elements run on a degraded surface. The resulting drone rises with speed and shifts load-side under cornering. Most bearings fail gradually over 5,000–15,000 miles. For the full repair scope, see our guide on wheel bearing replacement cost.
Cupped tires are the second most common cause and the easiest to misdiagnose as a bearing because both hum louder with speed. Cupping happens when worn shocks or struts let the tire bounce instead of roll. Each impact scrubs a shallow depression into the tread compound. Collectively those depressions generate a rhythmic hum at highway speed. The fix always requires two steps: new tires and new dampers. Skip the shocks and the new tires will cup in under 15,000 miles.
Low tire pressure is the simplest item on this list. A tire 10 PSI below spec flexes excessively and hums on any textured road surface. Your TPMS light only triggers at 25% below spec — which is already causing sidewall fatigue and uneven wear. Check cold pressure monthly with a quality digital gauge. Use the door placard value, not the sidewall maximum, which is a structural limit, not a handling target.
CV joints on FWD and AWD vehicles announce failure with a hum that graduates into clicking on tight turns. The hum appears first as joint grease breaks down or as contamination enters through a cracked boot. Once you hear the click-hum combination, the joint is past any lubrication service — replace the full axle shaft. Half-shaft assemblies on FWD cars are inexpensive enough that rebuilding the individual joint makes no economic sense.
Differential wear produces a load-sensitive gear whine that intensifies under acceleration and softens on deceleration or coasting. RWD and AWD units are most vulnerable when fluid change intervals have been stretched. The first diagnostic step is always a fluid drain — pull the drain plug and inspect for metallic particles on the magnetic tip. Fluid that's dark, gritty, or smells burnt means the ring-and-pinion is past a fluid-only fix. Many differentials that whine under load recover completely with fresh fluid if caught early.
Driveshaft imbalance or worn U-joints create a vibration-hum combination that peaks within a specific speed band — typically 60–75 mph — before dropping off at higher speeds. The resonant character is the tell. Grab the driveshaft with the vehicle supported and torque it by hand. Worn U-joints show perceptible play. A shaft that's geometrically out of balance requires a balancing rig, but U-joint replacement is a straightforward press job.
Warped or scored brake rotors generate a hum combined with pedal pulsation. Apply the brakes lightly at 55 mph — if the hum changes character or the pedal throbs, the rotor surface is the source. If you're also dealing with a grinding noise when braking, pad material is already gone and rotor replacement is non-negotiable regardless of thickness.
Power steering pump noise differs from road-speed hum in one key way: it's tied to steering angle and engine load, not vehicle speed. Turn to full lock and hold it — sharp whine intensification means the pump is cavitating. Check fluid level first. If the level is correct but the fluid is dark, foamy, or smells burnt, do a full flush before condemning the pump. Neglecting a power steering fluid issue can escalate to complete power assist failure without warning.
Most overspend on this diagnosis comes from two places: parts-swapping before testing, and dismissing secondary symptoms that would have confirmed the cause immediately.
The most expensive misfire is buying four new tires when the actual problem is a wheel bearing. The second most expensive is replacing a bearing when cupped tires are the cause. These two get confused constantly because both produce a steady hum that rises with speed and both are loudest at highway cruise. The noise profiles overlap more than most guides admit.
The steering input test resolves it completely. If the hum shifts louder on one side as you steer, it's a bearing — buy zero tires. If the hum doesn't respond to steering input at all, raise the car and spin the wheels by hand. Notchy, rough rotation at one corner means a bearing. Consistent roughness across all four corners means tire wear or balance. A $60 inspection at an independent shop that runs both tests costs less than a single misidentified tire.
The same logic applies to differential noise versus CV joints. Both change with drivetrain load. The difference: differential whine softens when you lift the throttle; CV joint hum does not respond to throttle at all — it tracks with wheel speed only. Test before you order any part.
A humming noise rarely travels alone. These secondary signals confirm the cause and the urgency level:
Ranges below are for independent shop pricing in a mid-cost U.S. market. Dealer labor runs 30–50% higher. DIY is viable on most items here, but wheel bearing and hub assembly work requires a hydraulic press and the correct axle nut torque spec. Don't estimate that spec — it's in the factory service manual for a reason.
Vehicles that cycle through bearings and tires every 40,000 miles share one pattern: skipped maintenance. The ones that hit 120,000 miles without a single bearing replacement are running on a consistent rotation schedule with fluids changed on interval. Prevention here is discipline, not expensive upgrades.
Rotate every 5,000–7,000 miles — not every 10,000. That older recommendation was calibrated for bias-ply tires on live-axle suspensions. Modern low-profile radials on multi-link setups develop uneven wear patterns significantly faster. Frequent rotation keeps tread distribution even and eliminates the cupping conditions that generate road hum.
Check cold inflation monthly with a digital gauge. Gas station air pump gauges are notoriously inaccurate — some are off by 5 PSI. A 3 PSI deficit across both front tires creates enough asymmetric wear to generate audible road noise within 15,000 miles. Always match the door placard value, not the sidewall maximum pressure, which is a structural ceiling, not a performance target.
It depends on the cause and severity. A slight hum from cupped tires is a low-urgency issue — safe to drive but should be addressed within a few weeks. A humming wheel bearing is different. Once bearing noise is audible at normal road speeds, you're looking at a deteriorating component that can seize without warning. If the hum is loud, worsening rapidly, or accompanied by steering wheel vibration or an ABS warning light, stop driving the vehicle and get it inspected that day.
Do the steering input test at 45 mph. Make a slow, sustained swerve left and then right while listening carefully. If the hum gets louder on one side and quieter on the other, it's a wheel bearing — the noise shifts with lateral load across the axle. If the hum stays completely constant regardless of steering angle, it's tires. You can confirm by spinning each wheel by hand with the car raised; a worn bearing has a rough, gravelly feel through the rotation.
No. Wheel bearings are the most common cause, but tire cupping, low tire pressure, differential wear, CV joint failure, driveshaft imbalance, warped rotors, and power steering pump issues all produce hum. The diagnostic key is how the noise responds to speed, steering input, and throttle load. A hum that shifts with steering input is almost certainly a bearing. A hum that's completely indifferent to steering input requires a different diagnostic path.
There's no reliable answer to that question, which is exactly why you shouldn't try to find out. Some bearings hum for 10,000 miles before they deteriorate further; others seize within 500 miles. The rate of progression depends on vehicle weight, road conditions, and how much contamination is already inside the bearing. The moment you can hear a bearing at normal road speeds, it needs to be replaced — not monitored.
Because wheel bearing and tire noise are speed-proportional. Both generate noise through surface friction against the bearing races or road surface — the faster the rotation, the louder the output. At low city speeds the hum may drop below your ambient noise threshold. At highway speeds it becomes unmistakable. If the hum only appears above 50 mph and holds steady without shifting with steering input, check tire condition and balance before suspecting a bearing.
 |
 |
 |
 |

About Sarah Whitfield
Sarah Whitfield is a diagnostics and troubleshooting specialist who spent ten years as an ASE-certified technician before joining the editorial team. She specializes in OBD-II analysis, electrical gremlins, and the kind of intermittent problems that make most owners give up.
Get some FREE car parts & gear.. Or check out the latest free automotive manuals and build guides here.
Disable your ad blocker to unlock all the hidden deals. Hit the button below 🚗
| | | |