by Sarah Whitfield
If your car is losing antifreeze but the temperature gauge stays perfectly calm, does that mean you can ignore the problem? The answer is no — and the reasoning matters. A car leaking antifreeze but not overheating is not a vehicle that has escaped serious trouble. It is a vehicle where the leak is still small enough that the cooling system compensates, but the reservoir is slowly draining, and a full overheating event is only a matter of time. Understanding why the two symptoms do not always appear together is the first step toward fixing the problem before it becomes catastrophic engine damage. For a complete overview of this issue, visit our resource on car leaking antifreeze but not overheating.
Contents
Your engine generates enormous heat during combustion, and the cooling system exists to remove that heat before it damages internal components. Antifreeze — also called coolant — circulates through the engine block and cylinder head, absorbs heat, and then travels to the radiator where the heat dissipates into the surrounding air. The system is pressurized, which raises the boiling point of the coolant and improves its efficiency at high temperatures. According to the U.S. Environmental Protection Agency, used antifreeze is a hazardous waste that must be handled carefully, which underscores how seriously you should treat any leak. When you notice that your coolant level keeps dropping without any visible reason, a slow leak is almost always the culprit.
The cooling system holds a reserve of coolant in an overflow reservoir (a translucent plastic tank near the radiator), and your engine can operate normally until that reserve depletes beyond a critical threshold. A pinhole leak in a hose, a weeping radiator seam, or a slow drip from a gasket can lose fluid gradually over many days without the coolant level falling low enough to trigger overheating. The temperature gauge reads normal because enough fluid remains in circulation to carry heat away from the engine. The danger is that most drivers interpret a steady temperature gauge as a sign that everything is fine, when in reality the system is quietly losing its margin for error. If you live in a hot climate, this margin vanishes faster — our guide on how to maintain your car in hot weather explains exactly why ambient temperature accelerates cooling system stress.
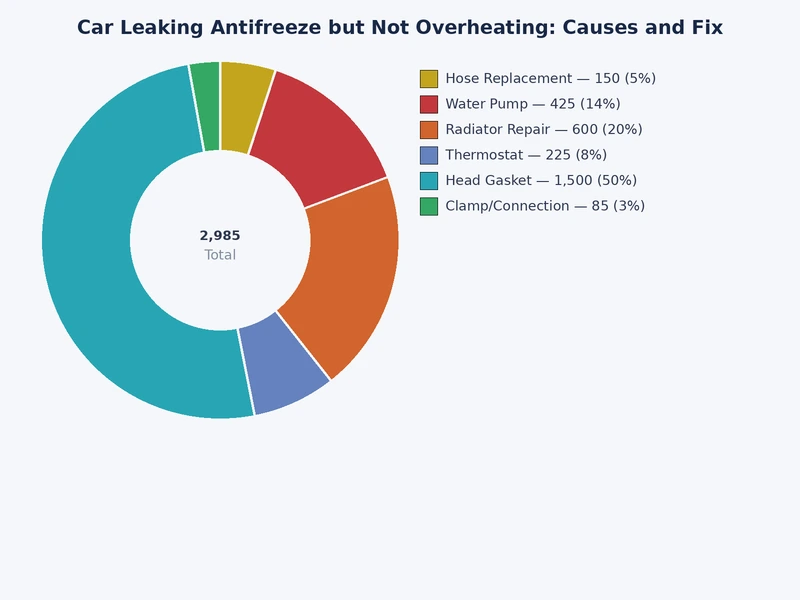
The most common causes of a slow antifreeze leak include a deteriorating radiator hose, a damaged radiator (aluminum or plastic-tank radiators are especially vulnerable to cracks), a failing water pump seal, a corroded heater core (the small heat exchanger inside your dashboard), a loose or cracked coolant reservoir, and a compromised head gasket (the seal between the engine block and the cylinder head). Each source has its own repair complexity and cost.
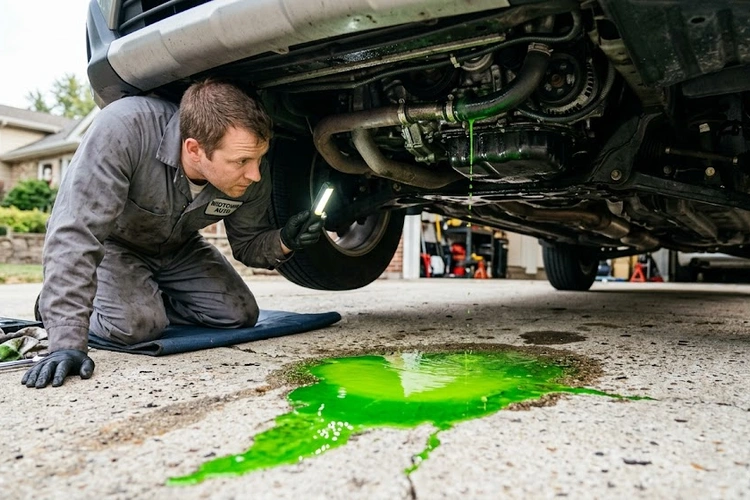
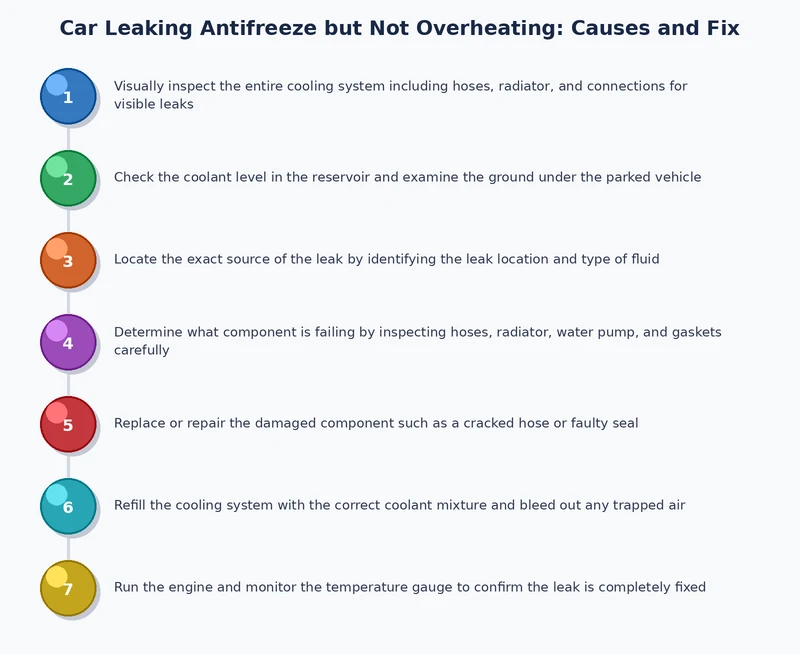
Begin your inspection with the engine completely cold, because pressurized hot coolant poses a serious burn risk. Open the hood and look for dried, crusty deposits — they are often orange, green, or pink depending on your coolant type — around hose connections, the radiator, the water pump, and the coolant reservoir cap. Place a clean white piece of cardboard under the engine overnight and examine it in the morning to identify the drip location. Trace the drip upward, because fluid travels along components before falling to the ground and the source is almost always higher than where the puddle forms. If you notice any warning lights alongside the leak, such as a check engine indicator, our article on check engine light on but car runs fine can help you interpret what the vehicle's computer is detecting.
A visual inspection finds obvious leaks, but a pressure test finds everything else. You attach a hand-pump pressure tester to the coolant reservoir opening and pump the system to the pressure rating printed on the radiator cap — typically 13 to 16 PSI (pounds per square inch). Then you watch the gauge for two minutes. If the pressure drops, the system has a leak. Walk around the engine slowly and look for fluid weeping from any joint or surface. A pressure test is the only reliable method for finding internal leaks, such as a failing head gasket that allows coolant to enter the combustion chamber without leaving an external puddle. If you suspect a head gasket issue, you may also want to check your engine oil level — coolant contamination turns oil a milky tan color that is immediately visible on the dipstick.
The repair cost depends almost entirely on which component is leaking. A hose replacement is a straightforward job that most mechanically inclined owners can complete in under an hour with basic tools, while a heater core replacement can require removing most of the dashboard and represents one of the more labor-intensive repairs in automotive service. If you want to avoid a situation like a car that overheats at idle — which is the natural endpoint of an ignored antifreeze leak — investing in prompt repair is always the correct decision. Do not use stop-leak additives as a permanent solution. They plug small leaks temporarily but can clog the narrow passages in the heater core and radiator, creating larger problems later.
| Leaking Component | DIY Parts Cost | Shop Total (Parts + Labor) | Difficulty Level |
|---|---|---|---|
| Radiator hose | $15 – $40 | $100 – $200 | Easy |
| Coolant reservoir / overflow tank | $20 – $60 | $120 – $250 | Easy |
| Radiator | $80 – $300 | $400 – $900 | Moderate |
| Water pump | $40 – $120 | $300 – $750 | Moderate |
| Heater core | $80 – $200 | $700 – $1,800 | Difficult |
| Head gasket | $50 – $150 | $1,200 – $2,500 | Very Difficult |
Before you begin any cooling system repair, assemble the right equipment. You need a cooling system pressure tester (available at most auto parts stores for rent or purchase), a drain pan with at least a two-gallon capacity for catching old coolant, a set of hose clamp pliers, a basic socket set, and a funnel for adding new coolant without spilling. A UV dye kit and UV flashlight are optional but extremely useful for tracing leaks that are too slow to locate otherwise — you add the dye to the system, drive for a day, and then shine the UV light to find the glowing leak point.
You must use the coolant type specified in your owner's manual — mixing incompatible formulas degrades corrosion inhibitors and accelerates component damage. Most modern vehicles use OAT (Organic Acid Technology) coolant, which is typically orange or red, while older vehicles often use IAT (Inorganic Additive Technology) coolant, which is green. Never top off with plain water as a long-term solution, because water does not provide freeze protection or corrosion resistance, and it dilutes the inhibitors already in the system. Use a pre-mixed 50/50 formula for convenience, or mix full-strength concentrate with distilled water — never tap water, which contains minerals that promote scaling inside the system.
You can drive short distances to reach a repair shop, but you should not treat this as an acceptable long-term condition. The cooling system is losing fluid, and once the level drops below a critical point, the engine will overheat rapidly, potentially warping the cylinder head or destroying the head gasket. Check the coolant level before every trip and stop driving if the temperature gauge rises above its normal position.
A sweet, syrupy smell without a visible external puddle often points to an internal leak, most commonly a failing heater core, which leaks coolant into the ventilation system rather than onto the ground. You may also notice a greasy film forming on the inside of your windshield, or your passengers may complain of headaches caused by coolant vapor entering the cabin. A pressure test will confirm this diagnosis.
There is no reliable answer, because the rate of coolant loss varies by the severity and location of the leak, your driving conditions, and ambient temperature. A very slow seep from a reservoir might give you several weeks of low-risk driving if you monitor the level daily. A moderately weeping hose connection could deplete your system within a single long highway trip. Diagnose and repair the source as soon as possible — the cost of ignoring it is always higher than the cost of fixing it now.
 |
 |
 |
 |

About Sarah Whitfield
Sarah Whitfield is a diagnostics and troubleshooting specialist who spent ten years as an ASE-certified technician before joining the editorial team. She specializes in OBD-II analysis, electrical gremlins, and the kind of intermittent problems that make most owners give up.
Get some FREE car parts & gear.. Or check out the latest free automotive manuals and build guides here.
Disable your ad blocker to unlock all the hidden deals. Hit the button below 🚗
| | | |