Car Smells Like Exhaust Inside: Causes & What to Do
by Sarah Whitfield
When a car smells like exhaust inside the cabin, the source is almost always a breach in the exhaust system, a compromised body seal, or a contaminated HVAC fresh air intake. This is a safety-critical condition. Exhaust gases carry carbon monoxide alongside detectable combustion byproducts, and prolonged exposure — even at sub-symptomatic concentrations — poses serious health risks. Diagnosis should begin immediately.
Exhaust intrusion is not a problem that resolves on its own. Every heat cycle enlarges a hairline manifold crack. Every drive worsens a deteriorated door seal. The failure mode is progressive, and the safety margin narrows with each ignored episode.
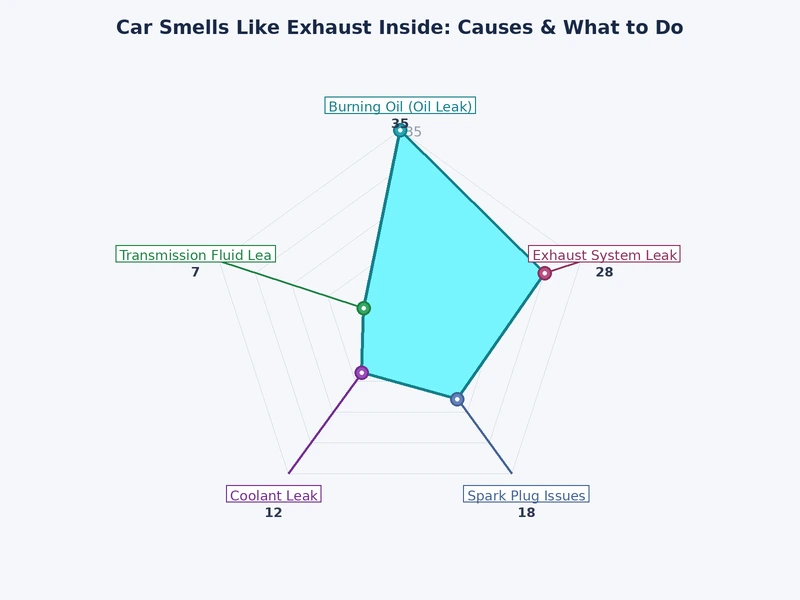
Figure 2 — Common causes of exhaust odor intrusion into the passenger cabin, ranked by diagnostic frequency across repair records.
Primary Causes When a Car Smells Like Exhaust Inside
The exhaust system spans from the cylinder head outlet to the tailpipe, crossing more than a dozen gasket interfaces, flex sections, hangers, and pipe joints. A failure at any point can release combustion gases before they exit safely at the rear of the vehicle. The location of the breach determines how concentrated the intrusion becomes.
Exhaust Manifold Cracks and Leaks
The exhaust manifold collects combustion gases directly from the cylinder head. It is the highest-temperature component in the exhaust path and the most vulnerable to thermal fatigue. Common failure modes include:
Hairline cracks in cast iron or stainless steel manifold bodies, typically near port collector junctions
Warped mating surfaces from repeated overheating, causing gasket blowout under load
Broken manifold studs that allow separation between the manifold flange and cylinder head
Corroded flex sections on tubular headers that develop pinhole leaks
Manifold leaks are particularly hazardous because the breach sits immediately adjacent to the firewall. Gases have minimal distance to travel before reaching the engine bay, where they can enter the cabin through any available gap. A detailed breakdown of confirmation criteria and repair costs appears in the guide to exhaust manifold leak symptoms.
Failed Gaskets and Drivetrain Seals
Multiple gasket interfaces throughout the drivetrain contribute to exhaust odor when they fail:
Valve cover gasket: A breached valve cover gasket allows oil to drip onto hot exhaust components, producing a sharp, burning oil odor layered with exhaust smell. The valve cover gasket leak symptoms guide covers identification and replacement costs in detail.
Collector and downpipe gaskets: High-stress junction points between manifold sections and the downpipe experience repeated thermal expansion. Graphite gaskets at these joints deteriorate within 100,000–150,000 miles on most vehicles.
Catalytic converter inlet gasket: Converter housing gaskets are under high backpressure. A deteriorated seal here allows pre-conversion exhaust — with higher concentrations of hydrocarbons and CO — to escape into the engine bay.
Compromised Body Seals and HVAC Intake Path
Exhaust odor inside the cabin does not require a mechanical exhaust fault. External combustion gases can enter through structural and ventilation path failures:
Worn or hardened door, trunk lid, and hatch weatherstripping that no longer forms an airtight perimeter
Corroded floor pan sections — particularly near rocker panels, rear seat areas, and spare tire wells — that develop rust perforations over time
The HVAC fresh air intake, located at the base of the windshield in the cowl area, which draws in ambient air from directly behind the engine bay
Firewall grommets around wiring harnesses, hydraulic lines, and HVAC penetrations that shrink and crack with age
Sunroof drain channels that become blocked and redirect water — and with it, any carried odors — into the cabin structure
A key diagnostic indicator for HVAC intake contamination: the exhaust odor is strongest immediately after switching from recirculated to fresh air mode. This pattern isolates the intake path as the entry point without requiring undercarriage access.
Heater Core and Coolant System Involvement
A failing heater core adds a sweet antifreeze odor beneath the exhaust smell. This combination signals coolant entering the combustion chamber or burning on exhaust components. Review the heater core failure symptoms guide for confirmation criteria specific to coolant-related fume intrusion.
A bubbling or gurgling coolant reservoir alongside cabin exhaust odor indicates head gasket compromise — combustion gases entering the coolant circuit under pressure. The coolant reservoir bubbling article covers the six underlying causes in detail. These symptoms together warrant immediate engine shutdown; continued operation accelerates head gasket failure progression.
Troubleshooting Exhaust Odors: A Step-by-Step Approach
Systematic diagnosis eliminates guesswork and prevents repeat repairs caused by misidentified entry points. The process starts with occupant safety, then moves to source isolation.
Initial Safety Assessment
Address occupant safety before any mechanical investigation:
Open all windows immediately when exhaust odor is detected while driving.
Switch the HVAC system to recirculate mode to block external air intake temporarily.
Park in an open, ventilated area — never in an enclosed garage, even with the door open.
Turn off the engine and allow the cabin to air out for a minimum of five minutes.
Use a portable CO detector inside the cabin before re-entering for extended periods.
If headache, dizziness, or nausea accompany the odor, exit the vehicle immediately and move to fresh air.
Warning: Carbon monoxide is colorless and odorless — the detectable smell comes from other combustion byproducts such as hydrocarbons and nitrogen oxides; CO exposure can reach dangerous levels before any warning odor is apparent.
Isolating the Cabin Entry Point
Odor behavior under different driving conditions narrows the fault location significantly:
Strongest at idle, diminishes at speed: Points to a manifold or upstream gasket leak. At idle, exhaust gases have low velocity and spread into the engine bay rather than exiting efficiently at the tailpipe.
Strongest at highway speed: Suggests rear body seal failure. High-speed negative pressure in the rear of the cabin draws exhaust forward from the tailpipe area through any available gap.
Only on fresh air mode: Isolates the HVAC cowl intake as the entry point. The tailpipe or a nearby idling vehicle is introducing exhaust at the intake location.
Strongest in rear seats only: Indicates trunk seal failure, rear floor pan perforation, or a compromised rear body panel.
Present only under acceleration: Suggests an exhaust leak that opens under pressure — collector gaskets and flex sections are the primary suspects.
Smoke Test and Visual Inspection
Professional smoke machines inject inert smoke into the exhaust system at low pressure. Any breach becomes immediately visible as smoke emerges from the leak point. For a preliminary DIY inspection without specialized equipment:
Start the engine cold and listen for ticking or sharp popping during the first 60 seconds — the classic acoustic signature of a manifold leak before thermal expansion partially closes the gap.
With the engine fully warmed and idling, run a gloved hand slowly along exhaust piping without direct contact, feeling for heat pulses or pressure variation at joints.
Inspect all exhaust joint mating surfaces and collector connections for soot streaking — black carbon deposits around a joint confirm exhaust escaping at that point.
Check for EVAP fault codes alongside exhaust odor; overlapping symptoms complicate diagnosis. The guide on EVAP leak symptoms clarifies how P0440, P0441, and P0442 codes relate to fuel vapor odor versus exhaust intrusion.
Common Mistakes That Allow Exhaust Intrusion to Persist
Several misdiagnosis and deferral errors allow exhaust odor problems to escalate. Recognizing these patterns prevents unnecessary repeat repairs and wasted diagnostic effort.
Dismissing Intermittent Odors
Intermittent exhaust odor is frequently attributed to external sources — a nearby vehicle, construction equipment, or temporary ventilation conditions. In practice, the intermittent pattern is the earliest warning stage of an internal breach:
Hairline manifold cracks close partially when the metal is cold, masking the fault until the engine reaches operating temperature.
Gaskets that weep under load seal again at idle — a pattern that makes the fault appear intermittent while it progressively worsens.
Body seal deterioration is slow and cumulative; the odor threshold is crossed gradually, making the onset feel sudden when it finally becomes obvious.
The consistent pattern across exhaust intrusion cases is intermittent onset followed by continuous presence. Investigating at the intermittent stage costs significantly less than post-failure diagnosis.
Relying on Cabin Filter Replacement
Replacing the cabin air filter does not address exhaust gas intrusion. A contaminated filter can trap some odor molecules, giving the temporary impression that the problem has resolved. However, cabin filters do not block CO or other combustion gases in meaningful concentrations. The dirty cabin air filter symptoms guide clarifies the functional limitations of cabin filtration — it addresses particulate matter and some organic odors, not combustion gas infiltration. Cabin filter replacement is a maintenance item; it is not a diagnostic response to exhaust odor.
Deferring Exhaust System Repairs
Deferred exhaust repairs compound costs through a predictable escalation chain:
Thermal expansion at the leak point enlarges the breach with every heat cycle, converting a small gasket seep into a major manifold split.
Exhaust leaks upstream of the front oxygen sensor distort voltage readings, triggering incorrect fuel trims that increase fuel consumption and stress the catalytic converter.
An oxygen sensor operating on corrupted data may trigger catalyst overload conditions, accelerating substrate breakdown and adding an unplanned catalytic converter replacement to the repair bill.
Extended CO exposure at sub-symptomatic levels creates cumulative health effects for regular occupants — particularly children and elderly passengers, who are more sensitive to lower concentrations.
Diagnostic Tips and Tricks for Faster Results
Experienced exhaust technicians use several non-obvious methods that accelerate source identification without relying solely on expensive shop equipment.
Reading Exhaust Smoke Characteristics
Tailpipe smoke color provides diagnostic data independent of the cabin odor pattern:
White or steam-colored smoke: Coolant entering the combustion chamber — head gasket failure or a cracked block is the primary candidate.
Blue-tinted smoke: Oil combustion — valve seals, piston rings, or turbocharger seal failure, often accompanied by a burning oil odor layered beneath exhaust smell.
Black smoke: Overly rich fuel mixture — typically unrelated to physical exhaust intrusion but may accompany oxygen sensor damage caused by an upstream exhaust leak.
No visible smoke with strong cabin odor: Pre-catalytic converter leak with partial combustion — the converter processes enough exhaust to eliminate visible smoke while gas still escapes upstream through the breach.
Under-Hood Component Checks
Several under-hood checks require no specialized tooling and can be completed in under 20 minutes:
Inspect the firewall for deteriorated or missing rubber grommets around wiring harnesses, brake line penetrations, and HVAC ducts — any open gap provides a direct cabin entry path.
Check the radiator and cooling system for external leaks or low coolant level, which may indicate a head gasket compromise alongside the exhaust odor. The radiator leaking guide covers the full symptom profile for cooling system failure modes that overlap with exhaust intrusion.
Examine accessible floor pan sections from inside the cabin — lifted carpeting and sound deadening often reveals rust perforation before it becomes visible from underneath.
Check the air intake tract from the air box to the throttle body for cracks — a compromised intake draws recirculated underhood air into the HVAC system on vehicles with poorly isolated fresh air pathways.
Beginner Checks vs. Advanced Exhaust Diagnostics
Not all exhaust odor investigations require professional tooling. The appropriate response tier depends on the suspected fault location, the driver's mechanical competence, and available workspace. Matching the diagnostic approach to the likely cause prevents unnecessary shop visits for problems with straightforward DIY solutions — and prevents dangerous DIY attempts on faults that require precision equipment.
What Beginners Can Inspect Independently
Visual inspection of door, trunk, and sunroof weatherstripping for compression failure, tearing, or visible gaps
Tailpipe smoke color observation at cold start, idle, and under light acceleration
Soot streak inspection at all visible exhaust joints and collector connections using a flashlight
Listening for manifold tick or hissing with the hood open during the first 90 seconds after cold start
HVAC mode switching — noting whether the odor intensifies on fresh air vs. recirculate mode
Under-carpet inspection for floor pan rust or moisture that indicates perforation
When Specialized Tools Become Necessary
Smoke machine testing for leak point identification in complex or transverse-mounted exhaust configurations
Calibrated CO detector readings inside the cabin to quantify exposure risk and confirm intrusion versus external odor pickup
Borescope inspection of manifold ports and flex sections without full disassembly
Combustion gas analyzer testing of coolant for exhaust gas presence — definitive head gasket diagnosis
Diagnostic Check
Skill Level
Tools Required
Diagnostic Value
Weatherstrip visual inspection
Beginner
None
Medium
Tailpipe smoke color observation
Beginner
None
High
Soot streak inspection at joints
Beginner
Flashlight
High
HVAC fresh/recirculate mode test
Beginner
None
Medium
OBD-II scan for O2 sensor codes
Intermediate
OBD-II scanner
High
Cabin CO concentration measurement
Intermediate
CO detector
Very High
Smoke machine exhaust leak test
Advanced / Professional
Smoke machine
Very High
Coolant combustion gas test
Professional
Block tester kit
Definitive (head gasket)
Professional Repair vs. DIY: Weighing the Trade-offs
The decision between professional repair and DIY depends on the component involved, workspace availability, and the severity of the safety risk. Given the CO exposure implications of exhaust intrusion, the margin for diagnostic error is narrow.
Advantages of Professional Diagnosis and Repair
Smoke machine access: Identifies leak points in minutes that DIY visual inspection cannot locate reliably on complex routed systems.
Lift access: Full undercarriage inspection is dramatically more thorough and safer on a lift than on jack stands, particularly for floor pan and rear seal assessment.
Warranty on parts and labor: Most shops provide 12-month or 12,000-mile guarantees on exhaust system work, providing recourse if the repair fails prematurely.
Comprehensive fault scope: A technician inspecting a manifold leak will assess the entire exhaust path simultaneously — secondary issues are identified before they become primary complaints.
DIY Feasibility by Component Type
High DIY feasibility: Weatherstrip replacement, muffler clamp tightening, exhaust pipe joint resealing, cabin air intake screen cleaning, grommet replacement on accessible firewall locations
Moderate DIY feasibility: Manifold gasket replacement on accessible inline four-cylinder engines with standard torque sequences, floor pan rust treatment and epoxy patch repair
Low DIY feasibility: Head gasket replacement, catalytic converter swap requiring O2 sensor removal and heat shield work, firewall grommet replacement in tightly packaged transverse V6 installations
For drivers evaluating a full exhaust system overhaul as part of a broader repair strategy, the guide on straight pipe exhaust systems covers system-level routing decisions that affect cabin intrusion risk in modified configurations.
Routine Maintenance and Long-Term Prevention
Preventing the recurrence of exhaust odor inside the cabin requires a multi-point strategy spanning the exhaust system, body seals, and HVAC path. No single maintenance item addresses all three entry vectors — effective prevention requires coverage across all three categories.
Scheduled Exhaust System Inspections
Annual undercarriage inspections are the most cost-effective prevention measure. Conducting them during oil changes adds minimal time and catches early-stage failures before they escalate. Key checkpoints include:
All exhaust gasket mating surfaces — look for soot streaking or heat discoloration as early leak indicators
Flex pipe sections for fatigue cracking, collapse, or contact wear against adjacent components
Hanger rubber mounts for deterioration that allows exhaust piping to contact body panels and transmit vibration or heat
Catalytic converter substrate condition — internal rattling indicates substrate breakdown, which increases backpressure and forces gas through any available breach
Oxygen sensor thread seals — these small seals are often overlooked and represent a minor but real exhaust leak point when corroded
Seal and Weatherstrip Maintenance
Body seal maintenance is absent from most manufacturer service schedules, yet rubber weatherstripping has a finite service life regardless of vehicle mileage:
Inspect door, trunk, sunroof, and hatch weatherstripping annually — rubber hardens and loses compression within 7–10 years on most vehicles in temperate climates; sooner in UV-intensive or cold environments.
Apply silicone-based rubber conditioner to all weatherstrip seals twice per year to retard brittleness and preserve compression recovery.
Check firewall grommets during every timing belt or major drivetrain service, when engine bay access is already established and the inspection adds no additional labor time.
Inspect the HVAC fresh air intake screen in the cowl annually — accumulated leaves, debris, and standing water trap exhaust odors and introduce moisture into the HVAC plenum.
Treat exposed floor pan surfaces with rubberized undercoating during any undercarriage paint or rust work — prevention is substantially less expensive than floor pan patch repair.
Long-Term Monitoring Strategies
Long-term protection from exhaust intrusion requires continuous monitoring rather than periodic inspection alone:
Install a permanent CO detector inside the passenger compartment. Battery-powered automotive CO detectors are available for under $30 and provide continuous monitoring, alerting occupants to sub-threshold exposure before symptoms develop.
Monitor OBD-II live data periodically for oxygen sensor voltage anomalies — erratic upstream O2 voltage is an early-warning indicator of an exhaust leak that has not yet produced audible or olfactory symptoms.
Address surface rust on floor pans and rocker panels proactively on high-mileage vehicles. Perforation is a slow, incremental process — early intervention with rust converter and seam sealer costs a fraction of structural panel replacement.
After any exhaust system repair, conduct a brief five-minute idle test in open air with a CO detector present before resuming normal cabin use. This confirms the repair is complete and no secondary leak points were missed during the primary repair.
Log the date and mileage of every exhaust system repair. Most gaskets and flex sections have predictable service intervals; tracking repair history allows proactive replacement before failure rather than reactive diagnosis after cabin odor returns.
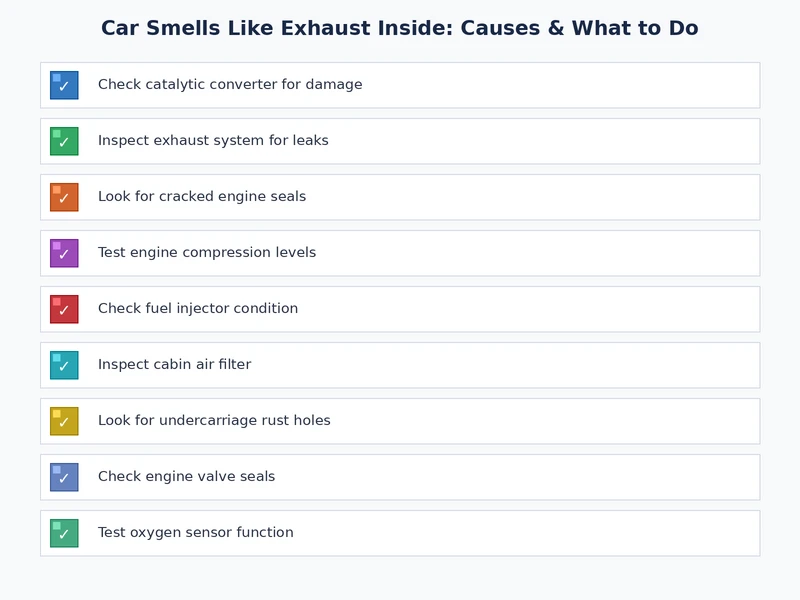
Figure 3 — Systematic diagnostic checklist for identifying the entry path when a car smells like exhaust inside the passenger compartment.
Frequently Asked Questions
Is it safe to drive when the car smells like exhaust inside?
No. Exhaust fumes carry carbon monoxide, which displaces oxygen in the bloodstream at concentrations too low to detect by smell alone. Even a brief commute with a confirmed exhaust leak introduces measurable CO accumulation. The vehicle should not be operated until the intrusion source is identified and repaired.
Why does the exhaust smell only appear at idle and disappear at higher speeds?
At idle, exhaust gas has low velocity and disperses into the engine bay rather than exiting efficiently at the tailpipe. A manifold or upstream gasket leak near the firewall produces the highest cabin concentration at idle. At higher speeds, increased exhaust velocity and forward airflow dilute the gases before they can accumulate inside the vehicle.
Can a clogged catalytic converter cause exhaust smell inside the cabin?
Yes. A clogged catalytic converter creates upstream backpressure that forces exhaust gases through any available breach — loose gasket joints, deteriorated seals, or pipe connections under flex load. The odor in this case often includes a sulfurous component from unprocessed hydrocarbons in addition to the standard combustion smell.
How much does it cost to repair exhaust intrusion into the cabin?
Repair cost depends on the fault location. Weatherstrip replacement ranges from $50 to $300. Exhaust manifold gasket replacement typically costs $200 to $600 in labor on a standard four-cylinder engine. Head gasket failure is the most expensive scenario, ranging from $1,200 to $2,500 or more depending on engine architecture and vehicle make.
Does exhaust smell inside the car always indicate a serious mechanical failure?
Not always. External exhaust odor entering through a deteriorated door seal or contaminated HVAC cowl intake is a common and relatively inexpensive cause. However, the presence of any cabin exhaust odor warrants investigation, as the underlying cause cannot be determined without diagnosis — and even minor faults carry CO exposure risk during extended driving.
A car that smells like exhaust inside is not a nuisance to be tolerated — it is a fault to be repaired before the next drive.
Sarah Whitfield is a diagnostics and troubleshooting specialist who spent ten years as an ASE-certified technician before joining the editorial team. She specializes in OBD-II analysis, electrical gremlins, and the kind of intermittent problems that make most owners give up.