by Sarah Whitfield
When your car is stuck in 4WD and won't shift back to 2WD, try reversing slowly on flat pavement — it usually releases the drivetrain binding and frees the transfer case within seconds. If that doesn't work, you're most likely dealing with a vacuum actuator failure, a faulty electronic shift motor, or a worn transfer case linkage that needs a closer look. Driving with your car stuck in 4WD on dry roads creates serious stress on your transfer case, front axle, and differentials, because those components aren't designed for the torque binding that results when all four wheels are forced to spin at identical speeds. If your 4WD indicator light is also illuminated, our 4WD service light guide covers that related symptom, since both issues often share the same root cause.
Contents
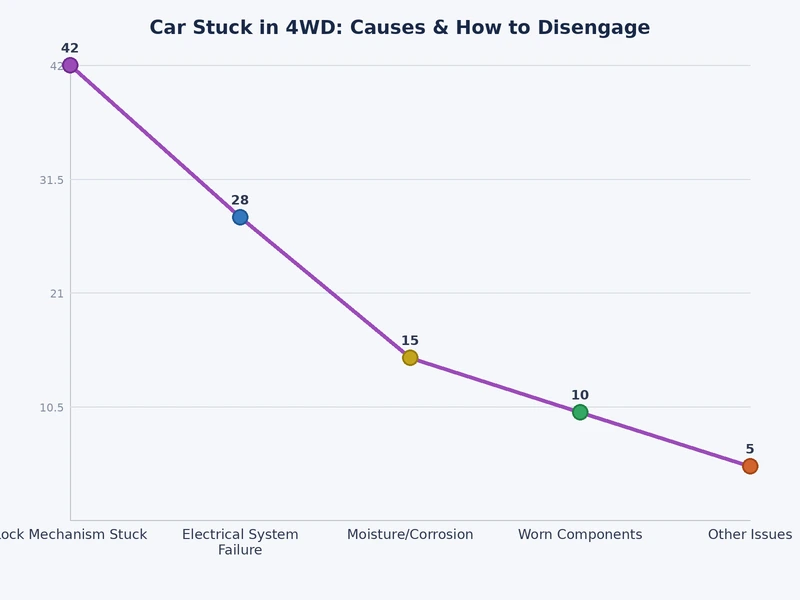
Most cases where a car is stuck in 4WD fall into one of three categories: mechanical binding, vacuum system failure, or an electronic fault. Knowing which category applies to your situation narrows down the fix fast and saves you from chasing the wrong diagnosis.
The transfer case is where the gear change actually happens, and its internal components — shift forks, detent springs, and synchronizers — can stick with heavy use or age. A bent or corroded shift linkage rod is another common culprit, since it can prevent the lever from completing its full travel into the 2WD position. Keeping your differential and transfer case fluid fresh is one of the most effective preventive measures for this type of failure, since contaminated fluid accelerates wear on internal shift components over time.
Many trucks and SUVs from the late 1980s through the early 2000s use a vacuum-actuated front axle disconnect system. Engine vacuum physically moves the front axle in and out of engagement, so when a hose cracks or disconnects, the axle can stay engaged even after you shift back to 2WD. You can often trace the problem visually — cracked or collapsed rubber hoses near the front differential or firewall are usually visible once you know what you're looking for.
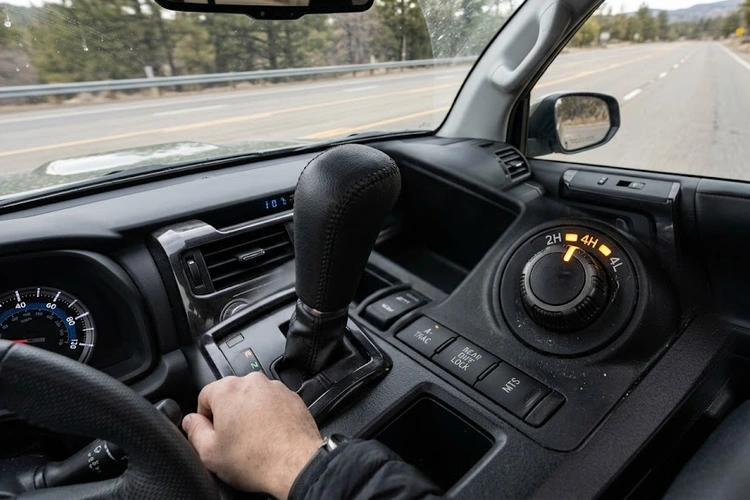
Newer trucks and SUVs use an electric shift motor bolted onto the transfer case to handle engagement and disengagement. A faulty motor, a blown fuse, or a corroded wiring connector can all prevent the system from receiving the command to exit 4WD. A failed position sensor can also confuse the control module, causing it to lock up and refuse any shift input. Scanning for fault codes with an OBD-II reader is the logical first step when an electronic 4WD system won't respond to your inputs.
Before you reach for tools or call a shop, try this sequence first — it resolves the problem in a surprising number of cases because the real issue is drivetrain binding rather than a broken part. Binding occurs when the drivetrain is under tension from forward momentum, and reversing briefly releases that pressure so the transfer case can shift freely.
Warning: Never force the transfer case lever or yank it hard. Forcing a stuck shift can snap the linkage rod or crack a shift fork, turning a straightforward bind into a costly mechanical repair.
If reversing doesn't free the system, your next steps depend on the type of 4WD your vehicle uses. Your owner's manual is a valuable first reference, since some manufacturers have specific electronic reset procedures that aren't obvious from the outside.
If you hear grinding or clunking, or notice a burning odor while the vehicle is stuck in 4WD, stop driving immediately. Those symptoms can indicate overheating drivetrain components. A burning smell specifically is worth cross-referencing with our guide on diagnosing strange car smells, since it can also signal problems elsewhere in the drivetrain.
Most diagnostic work on a car stuck in 4WD is accessible with tools you may already own. The table below lists what each tool does in this context, so you can decide which ones to pick up before you start.
| Tool | Purpose in 4WD Diagnosis | Approximate Cost |
|---|---|---|
| OBD-II Scanner | Read fault codes from the 4WD control module | $25–$150 |
| Hand Vacuum Pump | Test vacuum lines and actuator integrity on older trucks | $20–$50 |
| Socket Set (metric + SAE) | Remove shift linkage components, actuator, or transfer case covers | $40–$120 |
| Multimeter | Check voltage and continuity at shift motor wiring connectors | $15–$60 |
| Penetrating Oil (PB Blaster, etc.) | Free corroded linkage rods and stuck shift lever pivots | $8–$15 |
| Torque Wrench | Reinstall transfer case fasteners to spec after internal work | $30–$100 |
Once you've pinpointed the problem, you'll need one or more of the following to complete the repair. Buying the correct specification matters more than buying cheap here, especially for fluid and actuator components.
After resolving the 4WD issue, pay attention to how the vehicle tracks on the road. Binding stress can sometimes affect steering geometry, so our guide on checking wheel alignment at home is a useful follow-up step before your next highway drive.
Manual 4WD uses a floor-mounted lever connected directly to the transfer case through a mechanical linkage rod. It's the simpler design — fewer components, nothing that needs electrical power, and failures that tend to be visible and physically accessible. The most common issues are corrosion on the linkage rod, worn shift fork teeth inside the case, and a collapsed bushing at the pivot point of the lever itself.
Electronic 4WD replaces the floor lever with a dash switch or dial, adding real convenience but also introducing more potential failure points. Sensors, wiring connectors, the shift motor, and the control module can each cause a car to stay stuck in 4WD, and diagnosing them requires a scanner rather than a wrench. Vacuum systems occupy a middle ground — mechanically operated but dependent on sealed rubber hose networks that degrade predictably with age and heat cycling.
If your 4WD sticks only occasionally but seems fine most of the time, you're almost certainly dealing with an electronic issue — a loose connector, a failing position sensor, or a shift motor that's on its way out but hasn't fully quit yet.
The Wikipedia article on four-wheel drive systems provides a solid technical foundation for understanding how transfer cases distribute torque, which helps explain why each failure mode behaves differently under load. Vehicles that sit unused for long stretches are especially prone to vacuum line cracking and connector corrosion — if yours has been parked for months, our guide on maintaining a car that sits unused covers the preventive steps worth taking before your next drive.
If the basic techniques haven't freed your car from 4WD and a shop visit is the next step, understanding the cost landscape helps you make an informed decision about what you're authorizing. Costs vary considerably depending on which component is at fault, so the ranges below reflect real-world variation across vehicle makes and shop types.
When internal transfer case components are worn or damaged, the repair bill climbs considerably. These jobs generally require a lift and specialized tooling that put them beyond most DIY skill levels.
Getting two or three quotes for any repair beyond a vacuum line or fuse fix is genuinely worth the effort, since transfer case labor rates vary noticeably between dealerships and independent shops. A shop that specializes in 4WD systems will often diagnose the problem more accurately and charge less than a general service center. While your vehicle is already being inspected, use the visit as an opportunity to address any other drivetrain noise you've been putting off — if a belt squeal has been on your radar, our guide on fixing a squeaky belt explains what those sounds typically signal and how urgent they usually are.
A car stuck in 4WD is almost always fixable — the real cost comes from driving on it anyway, not from taking the time to diagnose it properly.
 |
 |
 |
 |

About Sarah Whitfield
Sarah Whitfield is a diagnostics and troubleshooting specialist who spent ten years as an ASE-certified technician before joining the editorial team. She specializes in OBD-II analysis, electrical gremlins, and the kind of intermittent problems that make most owners give up.
Get some FREE car parts & gear.. Or check out the latest free automotive manuals and build guides here.
Disable your ad blocker to unlock all the hidden deals. Hit the button below 🚗
| | | |