by Sarah Whitfield
Has a freshly filled gas tank ever triggered a check engine light — and left most people wondering what went wrong at the pump? It happens more often than many drivers expect, and the good news is that the check engine light on after a gas fill up almost always traces back to a handful of well-understood causes. Our team has diagnosed this exact scenario more times than we can count, and in many cases the fix requires nothing more than tightening the gas cap.
Still, assuming it is always the cap is a mistake our team has seen cost people real money in unnecessary parts. A solid diagnosis is the only reliable path forward. The check engine light reset process is straightforward once the root cause is confirmed — but rushing to clear the code before the underlying issue is fixed just invites the light to return within a day or two.
Contents
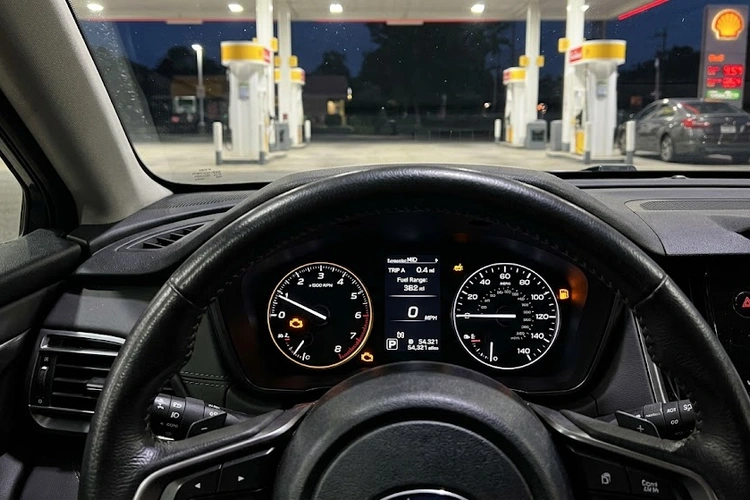
The check engine light — also called the Malfunction Indicator Lamp, or MIL — is the car's onboard computer flagging that at least one sensor has reported a reading outside its acceptable range. When it appears right after a refueling stop, the likely culprit is the fuel vapor containment system rather than any internal engine component. That distinction matters because it shapes where to look first.
Every vehicle built after 1996 in the United States uses an OBD-II (On-Board Diagnostics, second generation) system — a network of sensors and control modules that runs continuous self-checks. The EVAP readiness monitor (the self-test for the fuel vapor system) typically triggers shortly after engine start-up. That is exactly when a freshly fueled car is most likely to surface a problem that was already present or just introduced at the pump.
Post-fillup check engine lights most commonly produce these diagnostic codes:
Our team always pulls the complete code list before touching anything. A standalone P0455 with no other codes is a strong indicator the gas cap is the problem. Multiple concurrent EVAP codes together often suggest a broader system failure involving hoses or valves.
It is worth noting that unrelated electrical faults can coincide with a fill-up stop. Our team has also written about dashboard lights flickering — a separate concern that sometimes appears alongside the check engine light and almost never shares the same root cause.
The EVAP (Evaporative Emission Control System) captures fuel vapors from the gas tank and stores them in a charcoal canister until the engine is ready to burn them off through the intake manifold. It is a fully sealed system — any leak, no matter how small, causes the self-test to fail and triggers a stored fault code.
Key EVAP components to know:
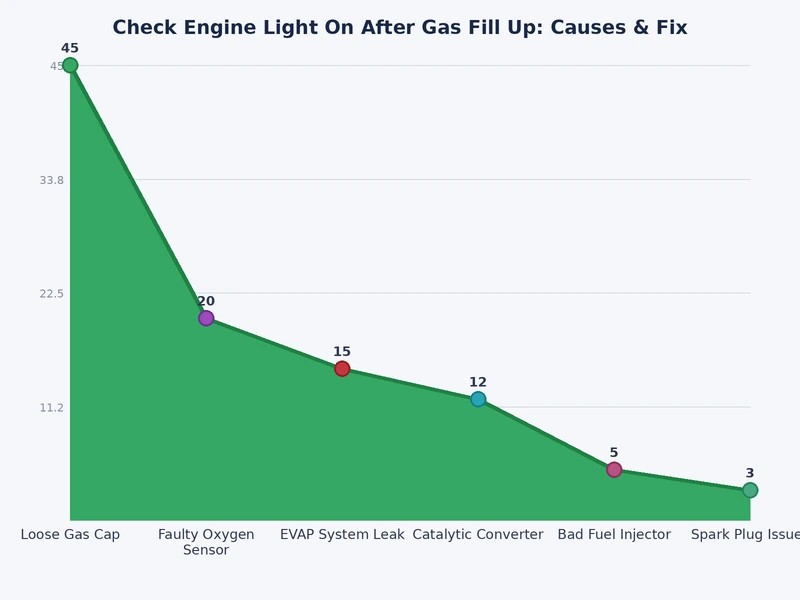
Based on our team's diagnostic experience, roughly 80% of post-fillup check engine light complaints trace back to just three causes. The remaining 20% involve deeper EVAP component failures or, less commonly, unrelated faults that simply coincided with the fill-up timing.
The gas cap is the first component our team inspects — and it resolves the situation more often than not. The cap must form an airtight seal for the EVAP self-test to pass. Even a quarter-turn of slack is enough to trigger a large-leak code.
Our experience: A cap that is simply loose will usually allow the code to clear within two to three drive cycles on its own. A cap with a cracked or compressed gasket will continue producing the code regardless of how tightly it is installed — replacement is the only fix in that case.
When a new cap does not resolve the light, the leak is somewhere deeper in the system. Our team looks at these areas next:
EVAP hose failures can occasionally cause vapor to reach hot engine components. Cases where smoke coming from under the hood accompanies the check engine light deserve a visual inspection of the EVAP hose routing before any other work begins.
Continuing to pump after the automatic shutoff nozzle clicks forces liquid gasoline into the charcoal canister. The canister is engineered to handle vapors only — liquid fuel saturates the activated charcoal inside and permanently destroys its vapor-absorbing capacity. A saturated canister will continue producing EVAP codes until it is replaced.
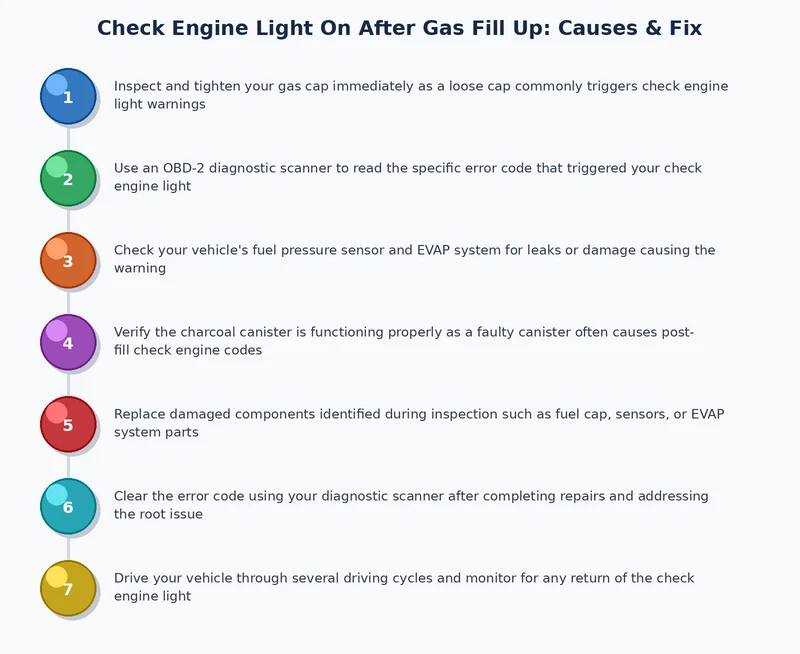
A systematic approach saves time and avoids the costly mistake of replacing parts based on guesswork. Our team follows the same sequence every time this complaint comes in.
If the vehicle has also recently started cranking without starting around fill-up events, a failing fuel pump or fuel pressure regulator may be contributing — a parallel investigation worth opening separately from the EVAP diagnosis.
Vehicles displaying a traction control light or other unrelated warning indicators at the same time the EVAP code appears should treat each warning light as a separate investigation. Our team almost never finds a single root cause behind two unrelated warning systems illuminating simultaneously.
Having the right tools on hand cuts diagnostic time dramatically. Our team keeps a short, focused list of essentials for EVAP-related work — nothing exotic, nothing unnecessary.
Not all code readers handle EVAP diagnostics equally well. Basic units read and clear codes. More capable scanners display live sensor data and EVAP monitor readiness status — which shows whether the self-test has completed at all, which is critical information when chasing an intermittent fault.
For anyone also dealing with a brake warning light appearing around the same time, a mid-range scanner that displays all system live data is the smarter long-term investment — it covers both systems and dozens of others in a single tool.
A smoke machine (also called an EVAP smoke tester) pumps inert, non-flammable smoke into the sealed EVAP system and makes leaks visible to the naked eye. It is the single most reliable method for locating leaks that pass visual inspection.
The EVAP system is largely maintenance-free — but small habits at the pump and during routine checks prevent the vast majority of post-fillup check engine lights our team sees.
Gas cap O-rings degrade quietly — most people do not notice a failing gasket until the check engine light appears. Our team recommends a quick visual check of the O-ring at every oil change interval:
Vehicles showing a rising temperature gauge alongside an EVAP code warrant a more thorough inspection. Occasional coincidences can mask compound problems — addressing each system separately and promptly prevents minor issues from becoming major repairs.
Repair costs for a check engine light on after a gas fill up range from essentially zero — a loose cap that just needs tightening — to a few hundred dollars for charcoal canister or valve replacement. The table below reflects the most common repairs our team encounters.
| Component / Repair | DIY Parts Cost | Shop Total (Parts + Labor) | Difficulty Level |
|---|---|---|---|
| Gas cap replacement | $10–$30 | $15–$50 | Easy |
| EVAP hose replacement | $5–$30 | $80–$150 | Easy to Moderate |
| Purge valve solenoid | $20–$80 | $100–$220 | Moderate |
| Vent valve replacement | $30–$100 | $120–$260 | Moderate |
| Charcoal canister | $50–$200 | $200–$450 | Moderate to Hard |
| Fuel tank pressure sensor | $30–$100 | $150–$310 | Moderate |
| Professional smoke test (diagnosis only) | N/A | $75–$150 | Professional tool required |
The gas cap and EVAP hoses are within reach for most home mechanics — no special tools or lift required. Purge and vent valves are moderately straightforward. The charcoal canister can be awkward depending on vehicle layout, sometimes requiring partial removal of a rear bumper cover or fuel tank skid plate.
In many cases, yes — provided the cause was simply a loose gas cap. Once the cap is properly tightened and sealed, the EVAP system will typically pass its self-test within two to three complete drive cycles and the light will extinguish automatically. If the light remains on after three or four days of normal driving, a deeper fault is present and requires diagnosis with an OBD-II scanner before any assumptions are made.
An EVAP-related check engine light is generally not an emergency — the vehicle will continue running normally in most cases. That said, our team always recommends having the code pulled within a few days to confirm the cause is EVAP-related and not something unrelated, such as a misfiring cylinder or a failing oxygen sensor, that simply happened to trigger around the same time as a fill-up stop.
A loose or improperly closed gas cap is the single most frequent cause by a significant margin. The EVAP system runs a pressure self-test shortly after engine start, and even a slightly loose cap fails that test and stores a fault code. Our team starts with the cap before pursuing any other diagnosis — and it resolves the issue more often than any other single fix.
Repeated overfilling can saturate the charcoal canister to the point it can no longer be recovered, requiring replacement at a typical shop cost of $200–$450. A single overfill event sometimes causes temporary codes that resolve on their own as the canister off-gasses during normal driving. However, our team does not recommend relying on that — stopping at the first nozzle click every time is the only safe practice for long-term EVAP system health.
Most vehicles clear the EVAP fault and turn off the light after two to three full drive cycles — where a complete cycle includes a cold engine start, a stretch of highway-speed driving, and a return to idle. Some vehicles require up to a week of varied normal driving. For anyone needing a quicker result ahead of an emissions test, an OBD-II scanner can manually clear the code once the repair is confirmed and the system has been given time to run at least one monitor cycle.
Almost always — the timing makes an EVAP fault the overwhelming probability, and that is where our team investigates first. However, our team has occasionally encountered cases where a different fault, such as a cylinder misfire or an oxygen sensor reading, happened to trigger right around a fill-up stop and was entirely coincidental. Reading the specific OBD-II fault code is the only way to confirm what system the light is actually reporting on.
P0455, indicating a large EVAP leak, is the most common code directly associated with a loose or missing gas cap. P0442 (small leak) and P0456 (very small leak) can also result from a degraded cap gasket, though those smaller-leak codes more frequently point toward cracked hoses or failed valves deeper in the system. Our team uses the specific code as the starting point for investigation — not as a definitive component diagnosis on its own.
 |
 |
 |
 |

About Sarah Whitfield
Sarah Whitfield is a diagnostics and troubleshooting specialist who spent ten years as an ASE-certified technician before joining the editorial team. She specializes in OBD-II analysis, electrical gremlins, and the kind of intermittent problems that make most owners give up.
Get some FREE car parts & gear.. Or check out the latest free automotive manuals and build guides here.
Disable your ad blocker to unlock all the hidden deals. Hit the button below 🚗
| | | |