by Sarah Whitfield
Nearly 40 percent of engine failures on the road trace directly to cooling system malfunctions — and a disproportionate share of those begin with nothing more than a deteriorating rubber hose. Coolant hose leaking symptoms are easy to overlook in the early stages, but the gap between a $30 hose replacement and a $4,000 engine rebuild is often measured in hours, not miles. Catching these signs before they escalate is one of the highest-return maintenance habits any driver can develop.
Coolant hoses — upper and lower radiator hoses, heater core inlet and outlet, bypass hoses — carry pressurized ethylene glycol-based fluid at sustained temperatures that regularly exceed 200°F. Every cold start and heat cycle stresses the rubber, hardens the walls, and fatigues the clamp seats. A pinhole breach at 15 PSI can drain the coolant reservoir in minutes at highway speeds, leaving the engine starved of thermal regulation with almost no warning.
This guide covers the full picture: identifying coolant hose leaking symptoms before they escalate, tracing root failure causes, replacing the hose correctly, and separating fact from myth about what actually shortens hose life. For a broader overview of the system these hoses serve, the cooling system guide covers thermostat, water pump, and radiator diagnostics in detail.
Contents
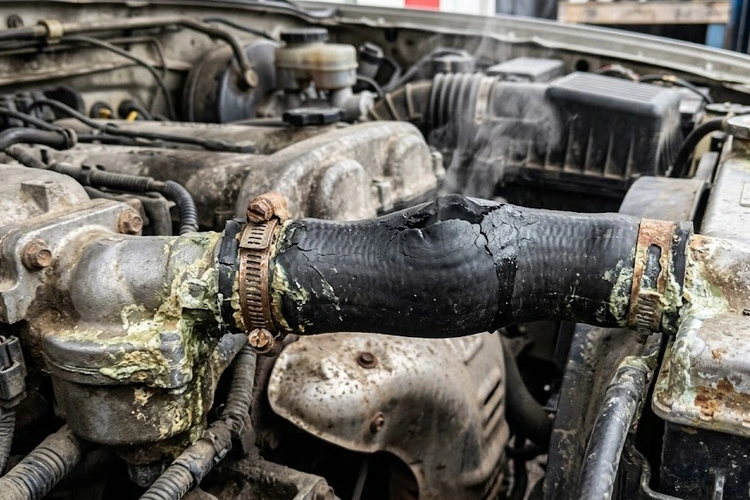
The clearest coolant hose leaking symptoms are visible without removing a single component. A puddle of bright green, orange, or pink liquid beneath the front of the vehicle after parking is the textbook indicator — coolant color varies by formulation, but all share a characteristically sweet odor distinct from oil, transmission fluid, or AC condensation. The liquid feels slightly slippery between the fingers, which distinguishes it from plain water.
Inside the engine bay, look for chalky white or yellow-brown crusty residue along the hose exterior, particularly concentrated near clamp seats. These deposits are mineral accumulations from evaporated ethylene glycol — they mark where slow seepage has been occurring for weeks or months before the leak became visually dramatic.
Several in-cab signals point toward active coolant loss:
A persistent P0128 code — coolant temperature below thermostat regulating temperature — can accompany a slow hose leak that has introduced enough air into the cooling circuit to disrupt thermostat operation. When coolant loss becomes severe enough to allow chronic overheating, milky oil on the dipstick signals that the engine has progressed to head gasket compromise — a repair that dwarfs the cost of the original hose.
A hands-on cold inspection covers four critical zones:
Coolant hoses endure a brutal daily cycle: cold starts followed by sustained heat above 200°F, then contraction during cool-down. EPDM (ethylene propylene diene monomer) rubber — the industry standard since the 1990s — handles this reliably for years, but no elastomer lasts indefinitely. Most OEM rubber hoses carry a practical service life of 4 to 10 years or 60,000 to 100,000 miles, with failure rates climbing sharply after the 10-year mark regardless of mileage. High-mileage, low-use vehicles are statistically at greater risk than high-mileage, frequent-use ones because the cumulative heat cycle count is lower but age-related degradation is not.
Electrochemical degradation (ECD) is the leading cause of hose failure in modern vehicles and the least understood by most drivers. As coolant breaks down over time it becomes slightly conductive, and dissimilar metals throughout the cooling circuit generate a small electrochemical potential. This drives attack through the hose wall, producing characteristic internal channels running perpendicular to the hose length — visible only when the hose is cut open.
ECD explains why hoses can fail from the inside out, appearing externally normal while the interior wall has already deteriorated significantly. This same pattern of hidden internal degradation appears across fluid systems — the transfer case fluid leak diagnostic process makes the same caution: external appearance cannot reliably confirm internal condition. Using expired coolant with depleted inhibitor packages accelerates ECD substantially.
Spring clamps relax over heat cycles and gradually lose the seating pressure that keeps hose ends sealed. Worm-drive clamps are more adjustable but can corrode or be overtightened during service, cutting into the hose wall and creating a failure point at the clamp edge rather than in the hose body. Hard plastic fittings on the thermostat housing or coolant reservoir can crack under thermal stress, producing a leak that appears to originate at the hose but actually begins at the fitting. Replacing the hose without addressing a cracked fitting puts the new hose on borrowed time.
Before starting, assemble the following:
Coolant chemistry compatibility matters more than most drivers appreciate. Mixing chemistries degrades inhibitor packages and can cause gelling that blocks coolant passages. The Wikipedia entry on antifreeze provides a useful primer on chemistry differences. When the coolant type currently in the system is unknown, a full drain, flush, and refill with the OEM-specified product eliminates any compatibility risk.
A cooling system pressure test is the definitive post-repair confirmation. A hand-pump tester threads into the radiator neck and pressurizes the circuit to the cap's rated pressure — typically 13 to 16 PSI on most passenger vehicles. Holding pressure for five minutes with no gauge drop confirms integrity. This step regularly catches micro-seeps at clamp seats that visual inspection alone cannot detect. The same verification logic applies after any fluid system repair: confirming completeness after an oil leak following an oil change prevents a second return trip for what turns out to be an adjacent issue that was missed on the first pass.
| Property | EPDM Rubber (OEM) | Silicone | Flex / Corrugated |
|---|---|---|---|
| Temperature Range | −40°F to 275°F | −65°F to 350°F | −40°F to 275°F |
| ECD Resistance | Moderate | Excellent | Moderate |
| Flexibility | Good | Excellent | Excellent |
| Typical Service Life | 4–10 years | 15+ years | 4–8 years |
| Cost per Hose | $8–$30 | $25–$90 | $15–$50 |
| Primary Use Case | All vehicles | Performance / high-heat builds | Tight routing around obstructions |
Silicone hoses are standard in motorsport and performance applications for defensible reasons: they handle temperatures well beyond normal EPDM limits, resist ECD almost entirely, and tolerate higher-pressure circuits without fatigue cracking. For the average daily driver, the cost premium over OEM EPDM rarely returns measurable benefit — properly scheduled EPDM replacement performs reliably within factory parameters throughout the vehicle's service life.
The calculus shifts for turbocharged engines running elevated sustained coolant temperatures, vehicles operating in extreme climates at both temperature ends, or any build where the cooling system is being pushed beyond factory specifications. Flex (corrugated) hoses are primarily a packaging solution for constrained routing scenarios — they offer no durability advantage over standard molded EPDM and should be evaluated on routing fit rather than longevity expectations.
Coolant hose replacement sits comfortably in the DIY-accessible tier for most vehicles. Mechanical complexity is low, required tools are common, and parts are inexpensive. A straightforward upper or lower radiator hose on a domestic sedan typically takes 45 to 90 minutes and costs $15 to $50 in parts — total cost often 70 to 80 percent lower than an equivalent shop visit.
Additional advantages of the DIY approach:
The primary DIY risk is incomplete air bleeding post-repair. Trapped air pockets produce erratic temperature behavior and localized overheating despite the coolant reservoir appearing full. Running the engine through a complete heat cycle with the heater on maximum output is the standard bleed protocol. Persistent sweet odors through the HVAC after the repair — the kind described in car smells like mildew scenarios — often trace to incomplete heater hose seating rather than a second independent failure.
Professional service becomes the practical choice in specific situations:
Shop labor for coolant hose replacement typically runs $80 to $200 depending on hose location and vehicle complexity. That's a fraction of what overheating damage costs. The same early-intervention calculus applies across fluid systems — a steering rack leak caught at the seep stage costs far less than one that's allowed to progress to pump starvation and rack bushing wear.
Myth: "If the hose looks fine externally, it is fine."
External appearance is an unreliable indicator for ECD-damaged hoses. Internal wall degradation produces no visible external cues until the hose is near catastrophic failure. The squeeze test — checking for softness or internal ridging near clamp ends — is substantially more diagnostic than visual inspection alone. Hoses that pass the look test and fail the squeeze test should be replaced.
Myth: "Stop-leak products are a permanent fix."
Chemical stop-leak products work by introducing particulate matter that clogs small openings. They can address very minor seepage as a temporary emergency bridge, but they also accumulate in heater core passages, thermostat ports, and water pump impeller clearances over time. No stop-leak manufacturer rates their product as a permanent substitute for hose replacement, and most OEM service documentation advises against use in closed cooling systems.
Myth: "Coolant hoses only need replacement when they visibly fail."
Preventive replacement based on service intervals is standard practice among professional technicians. At 10 years or 150,000 miles, EPDM failure rates rise sharply enough that proactive replacement — particularly when a cooling system flush is already scheduled — is straightforwardly cost-effective. Treating hoses as run-to-failure components is a consistent contributor to preventable roadside breakdowns.
Myth: "Adding water is a safe way to get home after a coolant leak."
Plain water reduces the mixture's boiling point, provides no corrosion inhibition, and in aluminum-heavy modern engines accelerates oxidation. It can serve in a genuine emergency to prevent immediate seizure, but it must be flushed completely and replaced with the correct coolant before normal operation resumes.
Several conditions require an immediate pull-over and shutdown:
Driving an overheating engine for even three to five minutes risks warped cylinder heads, failed head gaskets, and in severe cases, hydrolocking from coolant entering the combustion chamber. These failure modes are explored in the bad piston ring symptoms guide — chronic overheating is a well-documented accelerator of ring and bore wear that compounds repair costs significantly. The cost differential is clear: a $30 hose versus a $2,000 to $5,000 engine overhaul.
When the temperature climbs and a safe stop is not immediately possible, shifting to neutral and modestly increasing engine RPM improves coolant circulation. Running the cabin heater at maximum output bleeds heat from the engine block into the cabin — a short-term measure that can extend the safe driving window by several minutes while reaching an exit or shoulder.
The most recognizable coolant hose leaking symptoms include a sweet antifreeze odor inside or outside the vehicle, a rising temperature gauge especially under load, visible coolant puddles beneath the front of the car, white steam from the engine bay, and the low coolant warning light. A cold squeeze test that reveals soft or mushy rubber near clamp ends is the most reliable early indicator — often detectable before any visible leak develops.
There is no universally safe answer — it depends entirely on the leak rate and current coolant level. A slow seep losing a small amount over several days is categorically different from a split hose that can empty the reservoir in minutes. Any active coolant loss warrants prompt repair. Monitoring the temperature gauge and topping off coolant as a temporary measure is not a substitute for addressing the hose itself.
Radiator hose repair tape and hose clamps over a split can provide a short-term bridge to a shop, but these patches are not reliable under sustained pressure and repeated heat cycling. Chemical stop-leak products address minor seepage as an emergency measure but carry the documented risk of clogging heater core passages, thermostat ports, and water pump impeller clearances over time. Permanent repair requires full hose replacement.
The correct coolant chemistry is specified in the owner's manual or on the coolant reservoir cap — typically OAT (Organic Acid Technology), HOAT (Hybrid OAT), or IAT (Inorganic Additive Technology), each covering a distinct color range. Mixing chemistries degrades inhibitor packages and can cause gelling. When the type currently in the system is unknown, a complete drain, flush, and refill with the OEM-specified product is the safest course.
DIY replacement for a standard radiator hose typically costs $15 to $50 in parts plus coolant. Professional shop labor adds $80 to $200 depending on hose location and vehicle make. Heater core hoses routed through the firewall or beneath the intake manifold can bring the total shop cost to $300 or more on some models. Accessible engine bay hose replacements represent some of the most cost-effective preventive maintenance available on any vehicle.
Visual inspection and a squeeze test at every oil change — roughly every 5,000 to 7,500 miles — is a reliable cadence. A more thorough evaluation is appropriate at the 4-year or 60,000-mile mark. At 10 years or 150,000 miles, preventive replacement is standard practice regardless of external appearance, given the statistical rise in ECD-related internal failures at that mileage and age combination.
Not necessarily. A slow seep that doesn't substantially affect coolant temperature sensor readings can go entirely undetected by the OBD system. The check engine light may illuminate with a P0128 code if air introduced by the leak disrupts thermostat operation, or with a coolant temp sensor fault if severe overheating damages the sensor circuit. Many coolant hose leaks produce no DTC at all until the situation has advanced significantly.
Yes — heater core inlet and outlet hoses route heated coolant through or near the firewall to the heater core. A leak at either hose connection, or at the heater core itself, allows ethylene glycol vapor to enter the HVAC air stream, producing the characteristic sweet antifreeze odor inside the vehicle. This is one of the more location-specific coolant hose leaking symptoms because it points directly to the heater circuit rather than the main radiator loop.
A leaking coolant hose rarely announces itself dramatically — it tends to start as a faint sweet odor or a temperature gauge that climbs a little higher than usual, easy to rationalize away. Responding to those early coolant hose leaking symptoms before they compound is one of the clearest cost-benefit decisions in vehicle maintenance. The next time the hood is up for an oil change, take two minutes to squeeze every accessible hose near its clamp seats — that one habit, done consistently, eliminates the vast majority of cooling-related breakdowns before they ever happen.
 |
 |
 |
 |

About Sarah Whitfield
Sarah Whitfield is a diagnostics and troubleshooting specialist who spent ten years as an ASE-certified technician before joining the editorial team. She specializes in OBD-II analysis, electrical gremlins, and the kind of intermittent problems that make most owners give up.
Get some FREE car parts & gear.. Or check out the latest free automotive manuals and build guides here.
Disable your ad blocker to unlock all the hidden deals. Hit the button below 🚗
| | | |