by Sarah Whitfield
Our team spent a frustrating Saturday afternoon watching a buddy's coolant reservoir drain toward empty while his temperature gauge climbed steadily, and nobody could pinpoint the source for nearly two hours. The system looked fine externally — no puddles, no visible cracks — until we finally spotted a weeping heater core hose tucked behind the firewall. That single afternoon became the reason our team always digs deep whenever a coolant level keeps dropping situation lands on the diagnostic table.
A coolant level keeps dropping problem is one of the more deceptively simple symptoms in automotive diagnostics, capable of masking failures ranging from a cracked overflow tank all the way to a blown head gasket. Our team has tracked down dozens of these cases across aging sedans, turbocharged crossovers, and high-mileage trucks, and the root cause almost never announces itself cleanly. This guide covers every major cause, the right diagnostic pathway, and the long-term maintenance strategy our team recommends for anyone dealing with persistent coolant loss.
Contents
Most people don't discover they have a coolant loss issue until the temperature gauge spikes or an overheating warning appears on the dashboard. Our team sees this pattern constantly — the reservoir was low for weeks before the symptom escalated into something undeniable. Understanding how these situations typically unfold helps calibrate how urgently a diagnosis needs to happen.
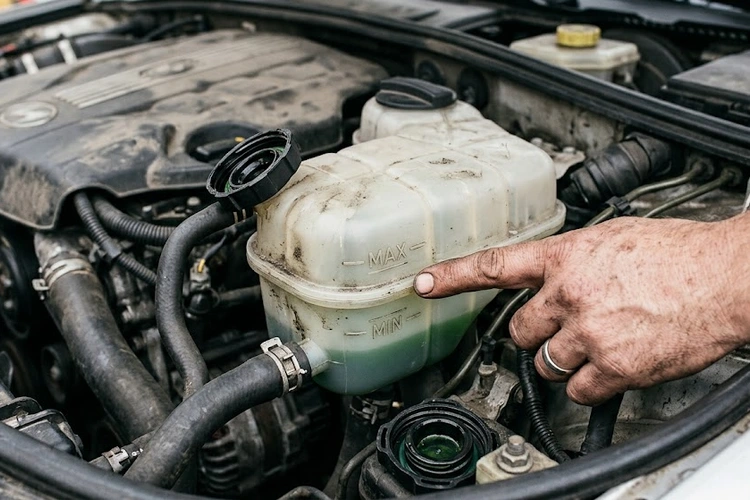
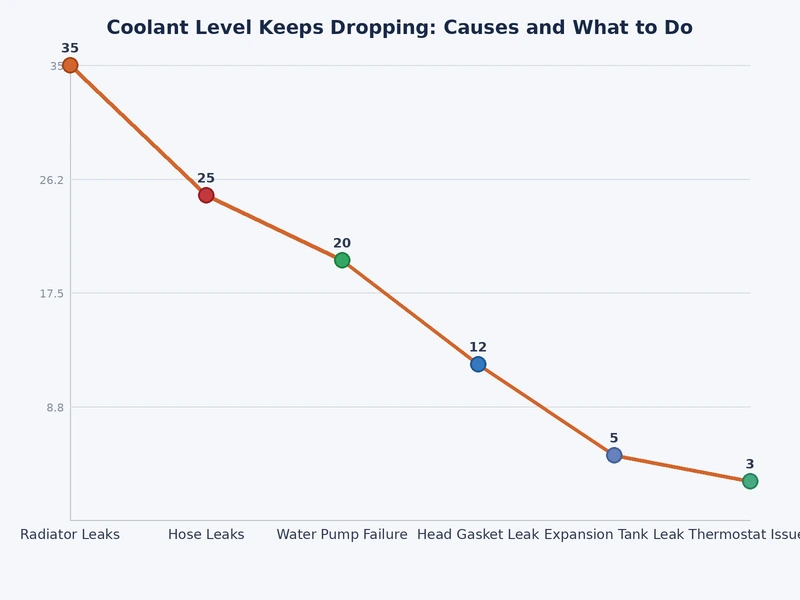
The most common real-world pattern involves a hairline crack or a weeping hose clamp that loses perhaps 50–100ml of coolant per week. Over a month, the reservoir drops from the MAX line to well below MIN, but since most people don't open the hood frequently, the drop goes unnoticed until a service appointment. Our team has seen radiator hoses weeping at the crimped end, reservoir tanks cracked along the bottom seam, and thermostat housing gaskets that sweat coolant onto the exhaust manifold and evaporate it completely — leaving zero external evidence of a puddle. If anyone notices a faint sweet smell after shutting the engine off, that's almost always glycol evaporating off a hot surface, and it warrants an immediate inspection.
A second common scenario involves a system that loses significant volume in a single drive cycle or overnight. This pattern strongly suggests either a pressurized failure — a burst hose, a failed radiator cap that vents prematurely, or a cracked coolant reservoir — or an internal leak routing coolant into the combustion chamber. Our team always checks for a coolant puddle under the car first in these cases, since a large external leak leaves a telltale green, orange, or pink stain beneath the engine bay. When there's no visible puddle but significant coolant is gone, the investigation shifts immediately toward head gasket integrity.
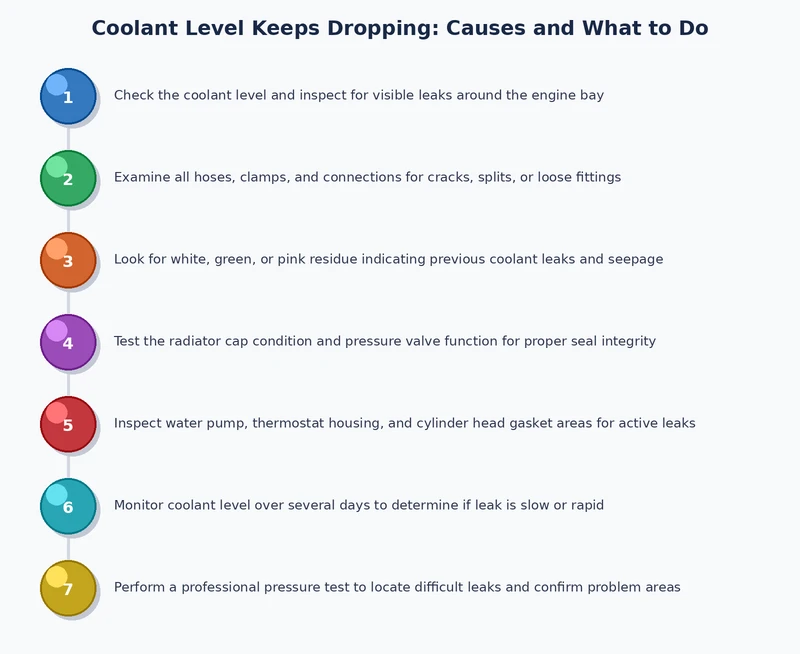
Trying to diagnose a coolant loss problem without the right tools wastes time and frequently leads to misdiagnosis. Our team's standard diagnostic kit for these cases is straightforward and inexpensive to assemble.
Warning: Never open a radiator cap or reservoir cap on a hot engine — the system operates at 15–18 psi above atmospheric pressure, and releasing that pressure while the coolant is near boiling can cause severe scalding burns.
The single most important triage step when coolant level keeps dropping is determining whether the loss is external or internal — these two categories have almost entirely different repair pathways, cost ranges, and urgency levels.
External leaks are almost always preferable to internal ones from a cost and complexity standpoint. A leaking coolant hose, a weeping water pump seal, or a cracked overflow reservoir are all straightforward repairs that most shops can complete in a single visit.
Internal leaks — almost always a head gasket failure, a cracked cylinder head, or in rare cases a cracked block — require significantly more invasive and expensive repairs. According to Wikipedia's overview of head gaskets, these failures are among the most consequential in internal combustion engines, and delaying diagnosis almost always compounds the damage.
| Cause | Type | Typical Repair Cost | Urgency |
|---|---|---|---|
| Cracked or weeping coolant hose | External | $50–$200 | Moderate |
| Leaking radiator cap | External | $15–$40 | Low–Moderate |
| Water pump seal failure | External | $250–$700 | High |
| Cracked coolant reservoir | External | $80–$250 | Moderate |
| Leaking heater core | External/Internal | $600–$1,200 | High |
| Head gasket failure | Internal | $1,200–$2,500+ | Critical |
| Cracked cylinder head | Internal | $2,000–$4,500+ | Critical |
Not every vehicle loses coolant the same way, and our team has learned that certain platforms develop specific failure patterns that are worth knowing before starting a diagnosis.
Engines with over 100,000 miles have coolant hoses, O-rings, and gaskets that have cycled through thousands of heat-and-cool events, leaving them brittle and prone to micro-cracking. The water pump seal and thermostat housing gasket are consistently the first external failure points our team replaces on high-mileage engines. Our team also watches for intake manifold gasket failures on older V6 engines from GM and Ford, where the intake gasket sits directly above a coolant passage and can develop a slow internal weep that bypasses combustion leak testing because it routes coolant into the oil rather than the cylinder.
Turbocharged engines run significantly hotter in localized areas — particularly around the turbocharger coolant feed and return lines — which accelerates hose degradation near those connections. Additionally, many modern turbocharged engines use plastic coolant crossover pipes and thermostat housings that become brittle and crack at the mounts. Anyone driving a turbocharged vehicle should inspect those specific lines annually, since a burst turbo coolant line at highway speed can drain the entire cooling system in under two minutes, leading directly to dangerous overheating conditions that can warp the cylinder head in a single event.
Our team has seen more cooling system damage caused by incorrect top-off procedures than by the original leak itself. Getting this right matters as much as finding the source of the loss.
Mixing incompatible coolant formulations is one of the fastest ways to accelerate gasket and seal degradation. Our team is blunt on this: always use the OEM-specified coolant type — IAT (green, silicate-based), OAT (orange, dexcool-style), HOAT (yellow or pink, hybrid), or NOAT for most European and Asian platforms — and never mix types without performing a full flush first. Using a universal premix is acceptable in an emergency, but the system should be flushed and refilled with the correct spec at the next service interval.
A reactive approach to cooling system maintenance — waiting until the coolant level keeps dropping before taking action — is the most expensive possible strategy. Our team strongly recommends a proactive maintenance schedule instead, especially for anyone driving vehicles in climates with extreme seasonal temperature swings, since thermal cycling accelerates degradation on every rubber and plastic component in the system. Hot-weather driving is particularly demanding on cooling systems, and our team's full breakdown of how to maintain a car in hot weather covers the complete seasonal checklist worth following.
Our team's diagnostic sequence prioritizes the most common and easiest-to-identify causes first, then escalates toward internal leak testing only when external sources have been conclusively ruled out.
A very minor drop over 12 months or more — a few milliliters — can occur from normal evaporation through the overflow system, but any noticeable drop over weeks or a single drive is not normal and warrants investigation. Our team treats any measurable loss that repeats over two or more checks as a confirmed leak until proven otherwise.
Absolutely — a radiator cap that fails to hold rated pressure vents coolant into the overflow reservoir prematurely and eventually out the overflow tube onto the ground. Our team always tests the radiator cap as a first step since replacement costs under $20 and eliminates one variable immediately. A cap that tests low on a pressure tester should be replaced before any further diagnosis.
Our team's position is straightforward: driving with a confirmed coolant loss problem is a calculated risk that scales with the rate of loss. A slow external drip might allow careful short-distance driving to a repair shop, but any situation involving rapid loss, overheating, or internal leak symptoms warrants pulling over and having the vehicle trailered. Engine damage from a single overheating event can cost more than the vehicle is worth.
Age accelerates material degradation — hoses, gaskets, and reservoir plastics all become more leak-prone with mileage and thermal cycling — but the coolant itself doesn't disappear without a pathway. Our team has never seen a case where a vehicle consumed coolant without a diagnosable external or internal leak, so anyone attributing loss to "just old age" without a proper inspection is skipping a step that will eventually become expensive.
 |
 |
 |
 |

About Sarah Whitfield
Sarah Whitfield is a diagnostics and troubleshooting specialist who spent ten years as an ASE-certified technician before joining the editorial team. She specializes in OBD-II analysis, electrical gremlins, and the kind of intermittent problems that make most owners give up.
Get some FREE car parts & gear.. Or check out the latest free automotive manuals and build guides here.
Disable your ad blocker to unlock all the hidden deals. Hit the button below 🚗
| | | |