by Sarah Whitfield
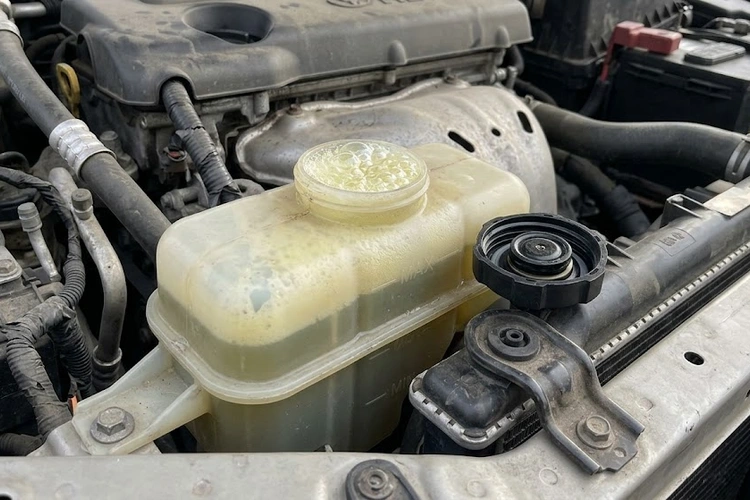
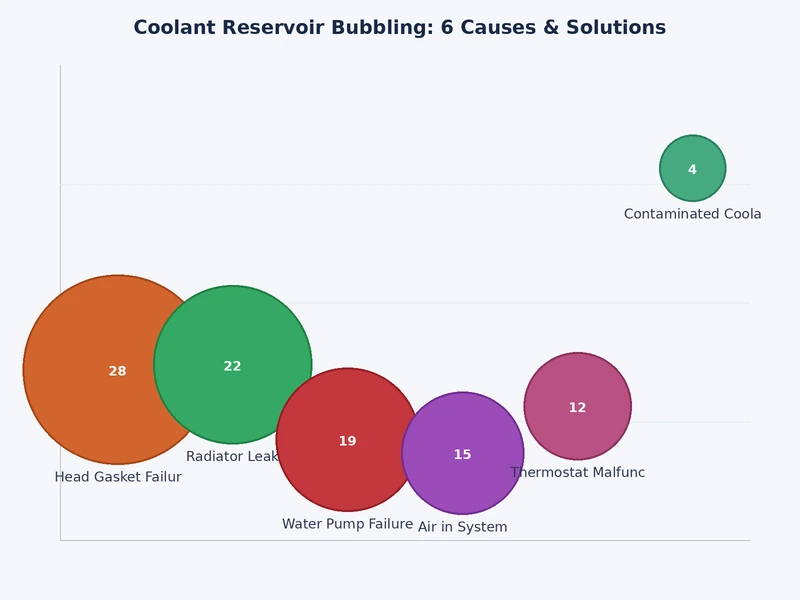
Coolant reservoir bubbling is almost always combustion gases entering the cooling system — and that points directly to a blown head gasket until proven otherwise. That one cause accounts for the majority of severe bubbling cases, though five other culprits can produce nearly identical symptoms.
Understanding which cause is at work determines whether the repair costs $20 or $2,000. Diagnosing it early keeps an annoying symptom from becoming an engine replacement. This guide breaks down all six root causes, how to distinguish them, and what to do about each one.
The cooling system's job is to move combustion heat away from the engine block via pressurized coolant (antifreeze) circulating through sealed passages. Any bubbling in the reservoir disrupts that sealed circuit and signals something has failed upstream.
Contents
The reservoir is a translucent plastic tank connected to the radiator overflow port. Under normal conditions, coolant level rises and falls slightly with engine temperature, but the fluid stays clear and calm. Bubbling breaks that pattern in ways that become unmistakable once a driver knows what to watch for.
These two presentations have different causes and different urgency levels. Treating them as interchangeable leads to misdiagnosis.
The distinction matters for triage. Active bubbling points toward a combustion leak. Foamy coolant means two fluids are actively mixing — oil and coolant — which accelerates bearing wear, sludge formation, and internal corrosion simultaneously on both sides of the engine.
Coolant reservoir bubbling rarely presents in isolation. Cluster these co-symptoms to build a differential diagnosis before opening the hood:
Warning: White exhaust smoke at operating temperature combined with coolant reservoir bubbling is a blown head gasket until a block test proves otherwise. Do not continue driving.
Not every bubble in the reservoir signals a problem. The cooling system circulates hot fluid under pressure, and minor activity is normal under specific, narrow conditions. Knowing the boundary prevents both unnecessary panic and dangerous complacency.
Three scenarios produce minor bubbling that falls within normal operating parameters:
The defining characteristic of normal bubbling: it resolves within a minute of shutdown, does not repeat on the next cold start, and is never accompanied by temperature gauge movement or coolant loss.
These presentations are never normal under any operating condition:
Two or more of these symptoms together makes the diagnosis near-certain: combustion gases are entering the coolant circuit via a compromised head gasket or cracked cylinder head. Every additional mile driven in this state increases the probability of a warped head.
The table below summarizes all six causes of coolant reservoir bubbling, their typical severity, repair cost range, and DIY viability for a competent home mechanic.
| Cause | Severity | Typical Repair Cost | DIY Viable? |
|---|---|---|---|
| Head gasket failure | Critical | $1,200 – $2,800 | Advanced only |
| Faulty radiator cap | Low | $10 – $30 | Yes |
| Air lock in cooling system | Moderate | $0 – $100 | Yes |
| Overheating engine | High | $150 – $1,500+ | Partial |
| Cracked coolant reservoir | Moderate | $40 – $180 | Yes |
| Failed thermostat | Moderate | $150 – $350 | Yes (most vehicles) |
A blown head gasket allows combustion gases to push into the coolant jacket at cylinder pressure — typically 150–200 PSI. Those gases travel to the reservoir and produce the aggressive, consistent bubbling that defines this failure mode. The full symptom picture is covered in the blown head gasket symptoms guide — coolant reservoir bubbling often appears late, which means significant gasket damage has usually accumulated by the time it becomes visible.
The combustion gases displace coolant, create expanding air pockets in the circuit, and cause localized boiling near the breach. Left unaddressed, the aluminum cylinder head warps and the repair escalates from a gasket replacement into a full head resurfacing or casting replacement. The diagnostic block test described below is the definitive field confirmation for this cause.
The radiator cap functions as a precision pressure-relief valve, typically rated at 13–18 PSI on modern vehicles. A cap that fails to hold rated pressure allows the system to vent coolant prematurely into the reservoir at lower temperatures than intended. When pressurized coolant suddenly hits the atmospheric-pressure reservoir, it flashes and bubbles.
This is both the cheapest cause on the list and the most frequently overlooked. A cap testing at 4 PSI instead of 16 PSI generates symptoms visually identical to a head gasket breach. The correct diagnostic sequence starts here — a $12 OEM-spec replacement eliminates this variable before running any expensive tests.
Pro tip: Replace the radiator cap before spending money on a combustion leak test. Under $15 and five minutes of work, it rules out one cause immediately and should always be the first step.
Air pockets trapped in the coolant circuit compress and expand with temperature cycling, producing bursts of bubbling at the reservoir. Air typically enters the system after:
An air lock is distinguishable from a combustion leak by the block test. It produces bubbling but rarely causes the milky emulsification, oil contamination, or sustained white exhaust smoke that characterize gasket failure. Post-service air locks typically self-purge within three to five heat cycles if the reservoir is kept at the correct fill level.
An engine operating above its design temperature boils coolant first in the hottest zones — typically adjacent to the combustion chambers. That steam pushes back through the circuit into the reservoir as visible bubbles. The root cause of the overheating determines the actual repair: a stuck-closed thermostat, depleted coolant level, clogged radiator core, failed water pump, or deteriorated coolant with a lowered boiling point can all trigger this cascade. See also: engine running cold for the diagnostic contrast of a stuck-open thermostat.
Overheating and head gasket failure frequently appear together because chronic thermal stress is the primary mechanism that compromises head gasket integrity in the first place. The failure sequence is self-reinforcing: low coolant leads to overheating, overheating breaches the gasket, combustion gases further displace coolant, causing more overheating. Breaking that cycle at the earliest sign of bubbling prevents the most expensive outcome.
A cracked reservoir introduces external air into the system rather than combustion gases from within. Plastic reservoirs degrade under repeated thermal cycling, becoming brittle over time. Hairline cracks near the cap neck, outlet hose fitting, or mounting bracket stress points let air enter as the system cools and creates a vacuum draw. That air then bubbles out of solution on the next heat cycle.
Diagnosis is straightforward: inspect the reservoir under good lighting for hairline fractures, dried coolant staining along seams, or white mineral deposits radiating from a crack. Tank repair attempts with epoxy or sealant rarely hold under sustained thermal stress. A direct replacement is the correct fix — reservoir prices range from $40 to $120 depending on vehicle.
A thermostat stuck in the closed position blocks coolant circulation entirely. Coolant in the engine block overheats rapidly without flow, flashes to steam locally, and that pressure pushes bursts of coolant out to the reservoir. The characteristic pattern is sharp, intermittent temperature spikes on the gauge — the engine heats quickly, the reservoir bubbles in a burst, then the stat briefly opens or the engine is shut off before gauge redline.
This differs from a gradual overheat, which usually indicates insufficient coolant volume or a clogged radiator core. Thermostat replacement is a genuinely accessible job on most four-cylinder and V6 engines — two to three hours for a careful first-timer, with thermostat kits typically under $30 in parts.
This decision point is where many drivers make the expensive mistake. They observe bubbling, decide to "watch it for a few days," and drive until catastrophic overheating forces a roadside stop. The correct call depends on which cause is at work — but without a confirmed diagnosis, the conservative position is always to stop.
Any single one of these symptoms alongside coolant reservoir bubbling warrants stopping. Two or more together means the head gasket is likely already breached. Continuing to operate the vehicle heats the aluminum cylinder head further, warps it past resurfacing tolerance, and converts a $1,500 gasket job into a $4,000 head replacement or engine swap.
In these cases, monitor actively for one week. Check the reservoir level every morning before the first start. Any measurable drop without a visible external leak escalates the situation immediately. If the bubbling resolves over three to five heat cycles post-service, an air lock has cleared itself and no further action is required.
A systematic diagnosis takes 30–45 minutes with basic hand tools and a $10 combustion leak test kit. Start with the zero-cost checks before spending anything.
Work through this sequence in order. Each step either confirms or eliminates specific causes:
When the visual inspection is inconclusive, two bench tests provide definitive answers.
Cooling system pressure test — A pump-style pressure tester connects to the radiator filler neck and pressurizes the circuit to the cap's rated PSI. Hold pressure for 15 minutes with the engine cold. No pressure drop indicates no active internal or external leak. A pressure drop demands further investigation with UV dye to locate the source precisely.
Combustion leak test (block test) — A chemical test using combustion leak test fluid detects hydrocarbons in coolant vapor. With the engine at operating temperature and the reservoir cap removed, draw vapor from the coolant surface through the test tube containing the indicator fluid. A color change from blue to yellow or green confirms combustion gases in the coolant — the single most reliable field confirmation of a head gasket breach or cracked casting.
Insider note: The block test is the definitive field diagnostic for combustion intrusion. A $10 kit eliminates all guesswork before any major repair decision and pays for itself on the first use.
These two tests together cover every cause on the list. The pressure test finds external leaks, reservoir cracks, and cap failures. The block test confirms or rules out combustion intrusion. Air locks and thermostat failures are eliminated by process of elimination when both tests return clean results.
Four of the six causes on this list are legitimate DIY jobs for a driver with basic mechanical confidence. The remaining two carry enough diagnostic complexity and torque-spec precision that professional service produces better outcomes for most owners.
Vehicles that experience repeated overheating events are also candidates for related heat-soak failures. The car won't start in hot weather guide covers the downstream electrical and fuel system failures that chronic cooling system neglect can trigger.
Most coolant reservoir bubbling problems are preventable. The cooling system is low-maintenance by design — but not zero-maintenance. Years of neglect set up the failure cascade that leads to the expensive end of this diagnosis list.
Several practices significantly reduce the probability of cooling system failure beyond the standard maintenance schedule:
The cooling system operates as a single interconnected circuit under pressure. A $12 radiator cap that loses its pressure rating puts thermal stress on every downstream component. Consistent small investments — fresh coolant on schedule, annual cap testing, monthly level checks — are the only reliable defense against coolant reservoir bubbling becoming a $2,000 repair.
 |
 |
 |
 |

About Sarah Whitfield
Sarah Whitfield is a diagnostics and troubleshooting specialist who spent ten years as an ASE-certified technician before joining the editorial team. She specializes in OBD-II analysis, electrical gremlins, and the kind of intermittent problems that make most owners give up.
Get some FREE car parts & gear.. Or check out the latest free automotive manuals and build guides here.
Disable your ad blocker to unlock all the hidden deals. Hit the button below 🚗
| | | |