by Joshua Thomas
Has the temperature gauge ever crept toward the red zone with no obvious explanation? That situation almost always points back to the cooling system, and one of the most overlooked culprits is a cracked coolant reservoir. Recognizing cracked coolant reservoir symptoms early can be the difference between a straightforward $30 parts swap and a several-thousand-dollar engine repair. Our team has tracked this failure pattern across dozens of vehicles, and the findings are consistent: small cracks cause significant damage when drivers miss the early warning signs.
The coolant reservoir — also called an overflow tank or expansion tank — is a translucent plastic container that stores excess coolant (a liquid mixture of antifreeze and water) as the engine heats up and cools down. When this tank develops a crack, coolant escapes, levels drop, and the engine becomes vulnerable to overheating. Most people notice something is wrong only after damage has already progressed. Our guide covers every symptom, the most reliable ways to confirm the diagnosis, and what the repair actually costs from a real-world perspective.
Contents
The engine cooling system circulates coolant from the radiator through the engine block and back again, continuously pulling heat away from metal components that would otherwise warp or seize under extreme temperatures. As coolant heats up, it expands, and that excess volume needs somewhere to go — the reservoir is precisely that destination. Once the engine cools, the system draws stored coolant back into circulation, maintaining consistent pressure throughout the entire loop.
Without a properly functioning reservoir, the system loses coolant every time the engine reaches operating temperature, creating a slow-motion leak that many drivers misidentify as a radiator problem or a more serious head gasket failure. Our troubleshooting coverage consistently shows that reservoir failures rank among the most misdiagnosed cooling system complaints we encounter, largely because the symptoms overlap with more expensive problems.
Most modern reservoirs are molded from high-density polyethylene or polypropylene — plastics that degrade under repeated thermal cycling (the expansion and contraction caused by constant heating and cooling). Over time these materials become brittle and develop hairline fractures that widen under system pressure. Several factors accelerate this breakdown at a meaningful rate:
Pro tip: Coolant should be flushed and replaced every 30,000–50,000 miles — degraded coolant is one of the most preventable causes of premature reservoir failure, and the cost of a flush is a fraction of a reservoir replacement.
Identifying cracked coolant reservoir symptoms before they escalate into overheating events is the single most effective way to keep repair costs manageable. Our team has catalogued the most reliable warning signs based on direct inspection records and confirmed repair histories across a wide range of vehicle makes and model years.
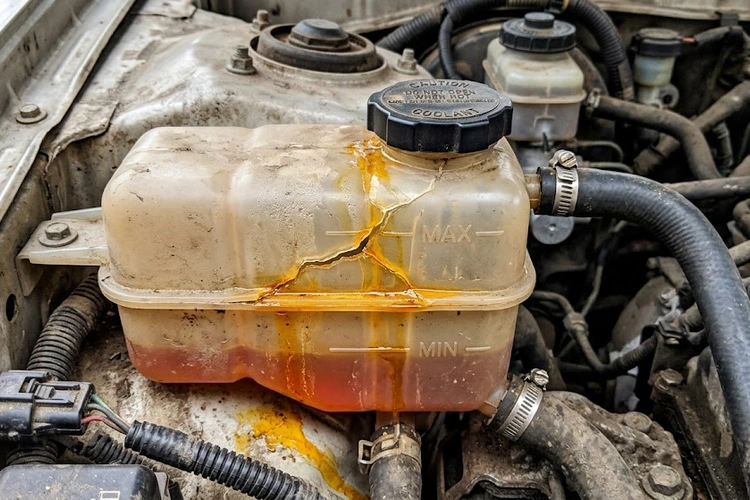
The most immediate cracked coolant reservoir symptoms are physical and visible, detectable by anyone who opens the hood and spends two minutes examining the engine bay with a flashlight in decent lighting conditions.
Beyond the visual evidence, a cracked reservoir produces a chain of performance symptoms that grow more severe the longer the problem is ignored. These secondary signs often surface before most people connect them to a coolant issue.
Warning: Never open a hot coolant reservoir cap — pressurized coolant can spray violently at temperatures above 200°F and cause serious burns before the pressure fully releases.
Our recommended first step is a cold-engine visual inspection, performed before the vehicle is started in the morning when the system is fully depressurized and safe to examine closely. With the hood propped open, our team checks the following in a consistent sequence:
When the visual check produces inconclusive results, a cooling system pressure test is the definitive diagnostic tool available to any home mechanic with a modest tool investment. A hand-pump pressure tester (available for under $30 at any auto parts retailer) connects to the reservoir cap neck and pressurizes the system to the cap's rated pressure, typically 13–16 PSI for most passenger vehicles.
Any crack will begin weeping coolant visibly within two to three minutes of sustained pressure, and even hairline fractures become apparent when the system is held at rated pressure with steady observation. This test also cleanly separates a reservoir problem from a different failure type — for instance, the fluid migration patterns we describe in coverage of a rear main seal leak can spread coolant-adjacent fluid across engine components in ways that make source identification difficult during a quick visual check alone.
Not every instance of coolant loss traces back to the reservoir — the cooling system contains multiple potential failure points, and accurate identification determines both the repair approach and the total cost. Our team compiled this comparison to distinguish the reservoir from the other culprits that produce similar symptoms in the early stages.
| Leak Source | Location | Key Distinguishing Symptom | Avg. Repair Cost | Urgency |
|---|---|---|---|---|
| Cracked coolant reservoir | Engine bay overflow tank | Residue on tank exterior, slow level drop | $80–$250 | Moderate — fix within days |
| Radiator leak | Front of engine bay | Puddle under front of vehicle after parking | $150–$900 | High — fix immediately |
| Blown head gasket | Between engine block and cylinder head | White exhaust smoke, milky oil on dipstick | $1,000–$3,000 | Critical — stop driving |
| Coolant hose failure | Upper or lower radiator hose | Visible split, collapsed hose, rapid loss | $35–$150 | High — fix immediately |
| Water pump leak | Front of engine behind pulley | Weep hole drip, bearing noise at idle | $300–$750 | High — fix within days |
| Reservoir cap failure | Top of reservoir | Overflow without visible tank crack | $5–$25 | Low — replace soon |
The table makes one fact clear: a cracked reservoir is among the least expensive cooling system failures to resolve, but only when it is caught before triggering secondary heat damage like the overheating-induced engine pinging and detonation that can warp cylinder heads and push repair costs well into four figures.
Our position: Any confirmed coolant loss — regardless of the suspected source — warrants a pressure test before adding coolant and continuing to drive, because topping off without locating the leak only delays a more expensive failure.
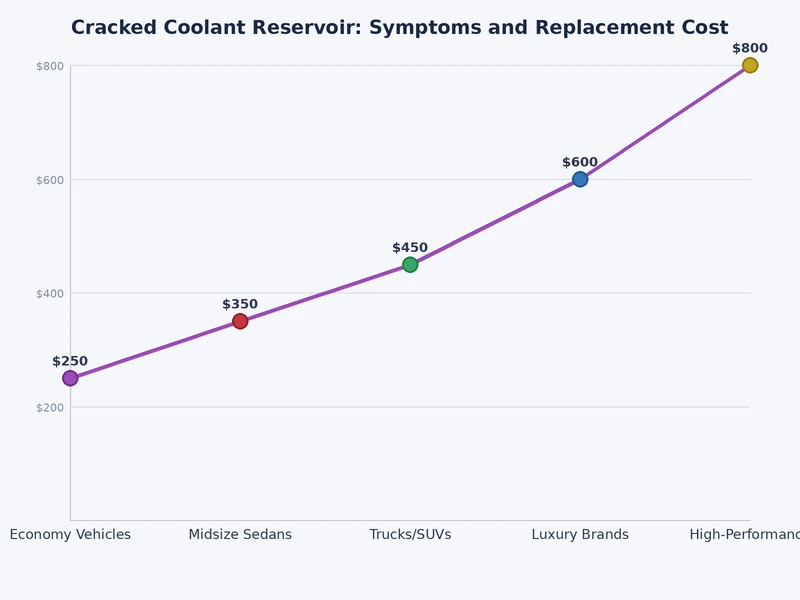
The coolant reservoir is one of the more affordable components in any engine bay, and parts pricing varies primarily by vehicle make, model year, and whether the replacement is an OEM (original equipment manufacturer) part or an aftermarket equivalent from a third-party supplier.
Our team consistently recommends OEM or OEM-equivalent parts for the reservoir rather than the cheapest available option, since lower-cost tanks show a notably higher early failure rate in our repair tracking, particularly on vehicles with high-pressure cooling systems that stress components repeatedly. The same principle applies broadly — cutting corners on sealing components, a pattern we see repeatedly in vehicles presenting warning lights following fluid service, tends to create compounding failures that cost significantly more to resolve the second time.
Labor is the most variable element of a reservoir replacement, driven by how accessible the tank is in a given engine bay and whether the job requires significant coolant drainage or sensor disconnection before the tank can be removed.
Total all-in cost for a coolant reservoir replacement runs $80–$250 for most domestic and Japanese vehicles, and $200–$500 for European luxury brands with pressurized expansion tank systems. Independent mechanics deliver the best overall value for this repair, and the procedure falls well within reach for experienced DIYers with basic hand tools and a drain pan, which can reduce the total outlay to under $60 on most accessible applications. For context, catching cracked coolant reservoir symptoms before the engine sustains overheating damage is the most effective way to avoid the escalating diagnostic costs we describe in cases involving a P0171 lean running code or similar secondary engine management faults triggered by chronic heat stress.
 |
 |
 |
 |
About Joshua Thomas
Joshua Thomas just simply loves cars and willing to work on them whenever there's chance... sometimes for free.
He started CarCareTotal back in 2017 from the advices of total strangers who witnessed his amazing skills in car repairs here and there.
His goal with this creation is to help car owners better learn how to maintain and repair their cars; as such, the site would cover alot of areas: troubleshooting, product recommendations, tips & tricks.
Joshua received Bachelor of Science in Mechanical Engineering at San Diego State University.
Get some FREE car parts & gear.. Or check out the latest free automotive manuals and build guides here.
Disable your ad blocker to unlock all the hidden deals. Hit the button below 🚗
| | | |