An oil leak after an oil change almost always comes down to three culprits: a loose or cross-threaded drain plug, an improperly seated oil filter, or a missing filler cap. All three are fixable in under 30 minutes — but ignoring the leak can escalate from a $0 mistake to a seized engine.
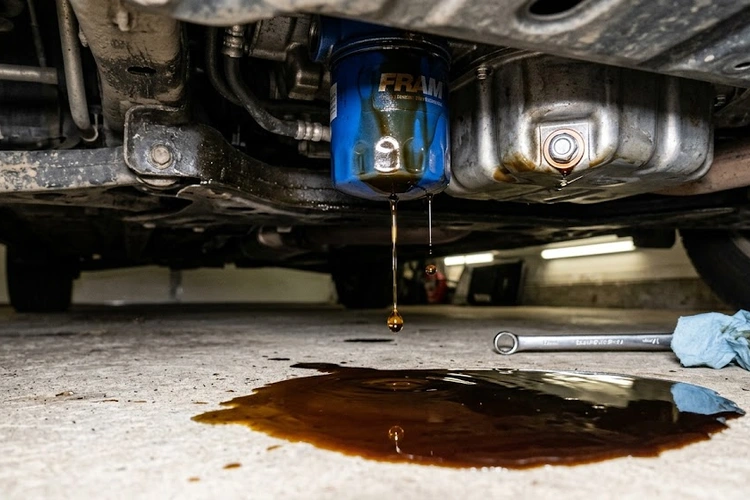
If you've spotted a fresh puddle on your driveway after a recent service, you're in the right place. Check the oil puddle under your car first — the color, consistency, and location tell you a lot before you even open the hood. This guide covers every cause of a post-change oil leak, how to trace it to the source, and exactly how to fix it.
Figure 1 — A fresh puddle under the engine bay is the clearest sign of an oil leak after an oil change — but the exact location determines the cause.
An oil change touches several sealing points on your engine — every one of them a potential new leak source. Knowing which components were disturbed helps you zero in on the problem without guessing.
Drain Plug Issues
The drain plug is pulled out every single service. That repetition, combined with the heat and vibration it sees, makes it the most common source of an oil leak after an oil change. Several failure modes are possible:
Under-tightened plug: Not torqued to spec, so oil seeps past the threads under pressure. Extremely common on DIY jobs where a torque wrench was skipped.
Cross-threaded plug: If the plug is started at an angle, it strips the soft aluminum threads of the oil pan. The plug may feel snug but will never seal properly — and it gets worse every time it's reinstalled.
Worn or missing crush washer: Most drain plugs use a soft aluminum or copper crush washer as the sealing element. Reusing a deformed washer or forgetting to install a new one produces a persistent slow drip that doesn't respond to retorquing.
Damaged oil pan threads: Years of over-tightening strip the pan threads progressively. The plug feels tight but can't hold oil pressure. The only real fixes are a helicoil insert or a pan replacement.
Wrong plug specification: If a shop used the wrong drain plug size or thread pitch, it will never form a reliable seal regardless of torque.
Pro tip: A new crush washer costs under $1. Replacing it every oil change is the cheapest insurance against a drain plug leak — skip it once and you'll pay for a new oil pan eventually.
Oil Filter Problems
The oil filter is the second most common culprit after an oil change. Unlike the drain plug, filter leaks usually come from installation errors rather than hardware wear:
Double-gasketing: The old filter's rubber gasket sticks to the engine's mounting surface when you unthread the filter. Install the new filter on top of it and you have two gaskets trying to seal simultaneously — and neither succeeds. This is a well-known mistake that still catches experienced mechanics off guard.
Under-tightened filter: Filters require hand-tight plus exactly three-quarters of a turn. Less than that and oil will work past the gasket once the engine reaches operating pressure.
Over-tightened filter: Cranking down too hard crushes the gasket unevenly, causing it to deform and fail. It also makes the next removal brutally difficult.
Wrong filter part number: A filter with the wrong thread pitch or gasket diameter simply won't seat correctly against the mounting surface. Always verify the part number against your year, make, model, and engine before installing.
If you suspect the filter or a related pressure issue, also review oil filler cap blowing off — excessive crankcase pressure can force oil past a marginally seated filter gasket and make a minor leak significantly worse.
Oil Filler Cap
This one is almost embarrassingly simple, but it happens in shops as often as driveways: someone forgets to reinstall the filler cap after adding oil. With the cap off, oil sprays around the valve cover at idle — and the mess looks catastrophic when it's actually trivial.
Check the cap immediately if you see oil splattered across the top of the engine or on surrounding components under the hood.
The cap's rubber O-ring can also harden and crack over time, causing a slow seep even when the cap is installed correctly. If the O-ring looks flat, brittle, or cracked, replace the entire cap — they're typically $10–$20.
Pre-Existing Gasket Leaks
Sometimes the oil change doesn't create the leak — it exposes one that was already developing. Draining the oil and running a freshly-filled crankcase at full pressure can push a marginal seal past its limit. The most common pre-existing sources are:
Valve cover gasket: Rubber gaskets harden over time. A seep that was invisible before the service can become a visible drip after.
Rear main seal: A slow weep from this seal is common on higher-mileage engines. The oil change itself didn't cause it — the fresh pressure just made it obvious.
Oil pan gasket: The pan gasket can weep from cracks or compression loss. Oil appears along the bottom seam of the oil pan.
If the leak is at the top of the engine or toward the rear, elevated crankcase pressure from worn internal components may be a factor. Bad piston ring symptoms include oil consumption and increased blowby — both of which push pressure past aging seals and accelerate external leaks.
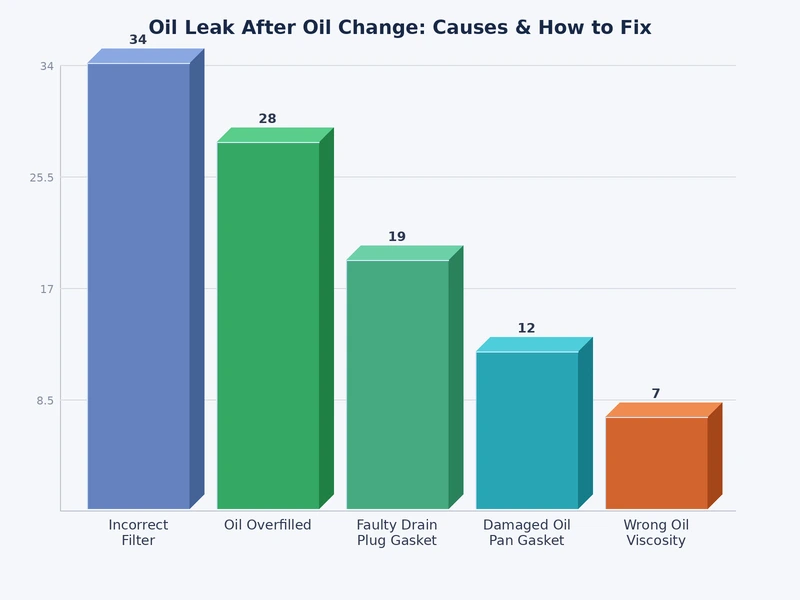
Figure 2 — Frequency and severity breakdown of the most common oil leak sources following a DIY or shop oil change.
Oil Leak Sources at a Glance
Use this table to match what you're seeing to the most likely cause, the urgency, and whether it's a reasonable DIY fix:
Leak Source
Visual Clue
Severity
DIY Fix?
Typical Shop Cost
Drain plug (loose)
Active drip from lowest point of oil pan
Medium
Yes — retorque to spec
$0–$30
Drain plug (cross-threaded)
Drip persists even after retorquing
High
Partial — helicoil or pan replacement
$100–$400
Crush washer worn or missing
Slow seep around the plug base
Low–Medium
Yes — drain, replace washer, refill
$20–$50
Oil filter (loose or double-gasketed)
Drip or wet ring around filter area
Medium–High
Yes — remove and reinstall correctly
$20–$60
Oil filler cap missing or cracked
Oil spray on top of engine and valve cover
Low (if caught early)
Yes — reinstall or replace cap
$10–$25
Valve cover gasket
Oil seeping along valve cover edges
Low–Medium (slow leak)
Yes (intermediate)
$150–$350
Rear main seal
Oil pooling under the rear of the engine
High
No — requires transmission removal
$400–$900
How Serious Is Your Leak?
Not every drip is a crisis — but every drip demands attention. Correctly sizing the severity keeps you from overreacting to a seep and underreacting to a gusher.
Seepage vs. Active Drip
Here's how to read the difference:
Seepage: A slight wet film or oily residue around a seal with no active dripping. Oil level drops less than a quarter quart between oil changes. It's a monitor-and-schedule situation — fix it at the next service if it doesn't worsen.
Slow drip: One drop every few minutes when the engine is at operating temperature. You'll see a small spot — quarter-sized or less — after parking overnight. Fix it within the week.
Active leak: Continuous dripping, or a puddle that visibly grows while the engine runs. The dipstick drops below minimum within days. Stop driving and address it today.
Warning: Running more than 1–2 quarts low on oil causes accelerated bearing wear — and at highway speeds, an oil-starved engine can sustain catastrophic internal damage within minutes.
Low oil pressure from an active leak can also cause engine pinging noise as oil-starved bearings develop excessive clearance. If you hear ticking or knocking after a recent oil change, check your level on the dipstick before driving another mile.
When to Stop Driving Immediately
Pull over and shut the engine off without delay if any of the following occur after an oil change:
The oil pressure warning light illuminates — this is a hard stop, not a suggestion
You smell burning oil while driving, especially with the heat on
You see smoke rising from the engine bay while moving
The dipstick shows the oil level at or below the minimum mark
A large puddle forms within minutes of parking in a new spot
Driving with critically low oil is one of the fastest ways to total an engine. Tow it. The tow is cheaper than the rebuild.
What the Leak Location Tells You
Where the oil ends up on the ground — and what it looks like on the engine — points directly at the source. Read these clues correctly and you'll cut your diagnosis time in half.
Puddle Under the Engine Bay
A fresh puddle centered under the front half of the car, directly below the engine, almost always points to the drain plug or oil filter. Here's how to narrow it down further:
Directly under the oil pan's lowest point: Drain plug. Feel around the plug with a clean rag — if it comes back wet, retorque it before anything else.
Slightly forward of the drain plug, offset to one side: Oil filter. Look for a wet ring or active seep around the filter's gasket line.
Under the rear of the engine or toward the transmission: This is not a post-change issue. Rear main seal leaks originate here — a substantially more involved repair.
Remember: oil travels along surfaces before dripping. What looks like a drain plug leak from below might actually originate at the filter and run rearward along the oil pan rail. Always trace the wet trail upstream to its origin point on the engine, not just where it drops.
This same tracing technique applies to other fluid leaks on your car. A transfer case fluid leak follows identical logic — trace the trail to the seal, not to the puddle.
Smoke or Burning Smell While Driving
Smoke from the engine bay after an oil change almost never means the engine is overheating. It means oil landed on a hot exhaust component — the manifold, catalytic converter, or exhaust pipe — and is burning off. Common causes:
Oil spilled during filling that wasn't wiped up before starting the engine
A missing filler cap letting oil spray onto the exhaust manifold at idle
An overfilled crankcase pushing oil out through the PCV system onto hot surfaces — check your dipstick to confirm you didn't add too much
The smoke clears within a few minutes once the residual oil burns off. If it persists beyond 5–10 minutes of driving, you have an ongoing leak that's landing on hot metal continuously — that's an active problem, not a residual one.
If you're also seeing white or gray smoke mixed with the oil smell, read up on milky oil on the dipstick — coolant contamination produces very different symptoms and requires different action.
Smell but No Visible Puddle
A burning oil smell without a puddle on the ground means the leak is small enough that oil burns off on hot exhaust components before it ever reaches the floor. Your driveway stays clean, but the smell is unmistakable after parking. Sources to check:
Valve cover gasket seeping oil that drips onto the exhaust manifold below
Oil filler cap O-ring that seeps slowly while the engine is under load
Residual oil from the service itself — check the oil pan and filter area for smeared oil you didn't wipe off
This pattern can also develop into a spark plug tube seal leak. Oil works into the plug wells over time and fouls spark plugs, causing rough idle and misfires. Catching a valve cover seep early avoids that secondary problem entirely.
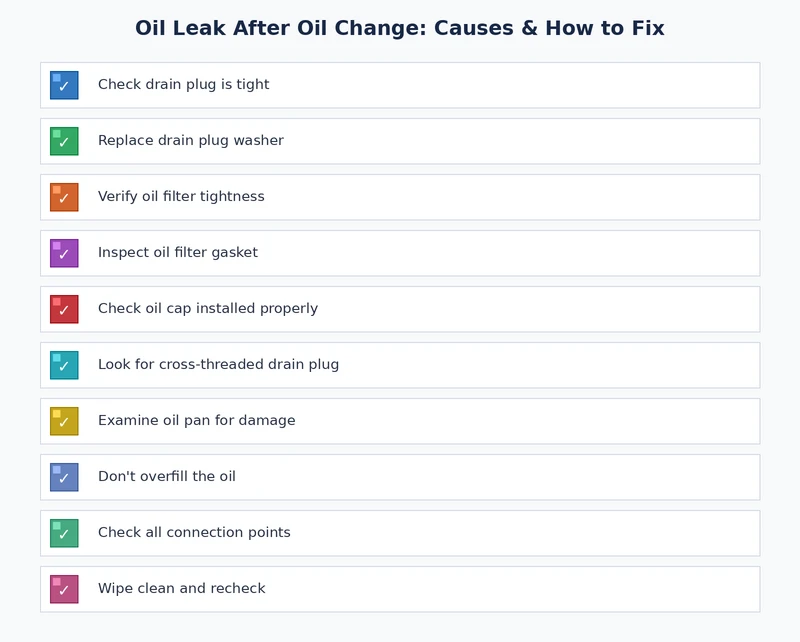
Figure 3 — Follow this checklist in order to systematically identify and address the source of a post-oil-change leak without missing steps.
How to Diagnose and Fix the Leak
Whether you did the oil change yourself or took it to a shop, the diagnostic process is identical. Follow these steps in order — don't skip ahead.
Step-by-Step Diagnosis
Check the oil level first. Pull the dipstick with the engine off and cold. Note whether you're at full, low, or critically low. This determines your urgency level before you do anything else.
Clean the area. Wipe down the drain plug, filter, and any wet surfaces with a clean rag. This gives you a dry baseline so new oil is easy to spot.
Start the engine and let it idle for 5 minutes. Running the engine at operating temperature brings the system to full oil pressure, which makes any active leak immediately visible.
Shut it off and inspect immediately. With a flashlight, check the drain plug and filter first — these are responsible for the majority of post-change leaks. Feel around each one with your fingertips.
Check the filler cap. Make sure it's installed, fully seated, and the O-ring looks intact. This takes 10 seconds and eliminates a surprisingly common culprit.
Inspect the valve cover edges. Fresh oil on the sides of the cover indicates a gasket leak unrelated to the oil change itself.
Place cardboard overnight. Slide a sheet under the engine and leave it for 8–12 hours. A slow or intermittent leak will produce a spot that tells you exactly where to look the next morning.
Pro tip: A UV dye kit (around $15 at any parts store) added to the oil makes even tiny leaks glow under a UV flashlight — the fastest and most reliable way to pinpoint a seep that's too small to find by sight alone.
Fixing the Drain Plug
Once you've confirmed the drain plug is the source, the fix depends on exactly what went wrong:
Loose plug: Re-torque to the manufacturer's specification. Most passenger car drain plugs take 20–30 ft-lbs — check your owner's manual or a service database, never guess. Do not over-tighten trying to compensate.
Worn or missing crush washer: Drain the oil completely, remove the plug, install a brand-new crush washer, reinstall the plug to torque spec, and refill. Total job: 20 minutes.
Cross-threaded plug: This is the worst outcome. A helicoil thread repair kit can save a mildly damaged pan — it inserts a steel thread sleeve into the stripped aluminum threads. Severe damage requires oil pan replacement, which runs $200–$600 in parts and labor depending on the vehicle. If a shop caused the cross-threading, they're liable for the repair.
Stripped pan threads: An oversized drain plug (one thread size larger) is a short-term workaround at best. The permanent fix is a helicoil insert. Avoid drain plug repair kits that rely on expansion plugs — they're unreliable at operating pressure.
Per EPA used oil management guidelines, used motor oil must be collected in a sealed container and brought to a recycling center — never poured into drains or onto the ground. Keep a dedicated drain pan for any repair that requires draining.
Fixing the Oil Filter
Loose filter: Use a filter wrench to snug it an additional quarter to half turn. Don't exceed three-quarters of a turn from hand-tight total — more than that and you risk the same over-tightening failure you're trying to fix.
Double-gasketed filter: Remove the filter completely. You'll see two rubber gaskets stacked on the mounting flange — carefully peel off the stuck old one. Check the surface for damage. Install the new filter with only its own gasket in contact with the sealing surface.
Wrong filter: Pull it and replace with the correct part number. Verify the thread pitch and gasket diameter before threading it on by hand.
Over-tightened filter: You'll need a strap wrench or filter removal tool. Once it's off, inspect the filter mount's sealing surface for damage. If it's gouged or deformed, that's a shop repair.
After any filter repair, run the engine for 3 minutes, shut it off, wait 5 minutes for the oil to settle, then recheck the dipstick and look for fresh oil around the filter. This confirmation step takes less than 10 minutes and prevents repeat trips under the car.
Prevention: What to Do on Your Next Oil Change
The most efficient fix for a post-change oil leak is to never have one. These quick habits add five minutes to your service routine and eliminate the most common leak sources before they start.
Before You Start
Confirm the correct oil filter — cross-reference by year, make, model, and engine size, not just visual similarity
Have a new crush washer on hand that matches your drain plug diameter
Set your torque wrench to the drain plug specification before you get under the car
Inspect the new filter — verify the gasket is seated properly in the filter housing and isn't pinched or folded
During the Change
Before threading on the new filter, run a clean finger around the filter mount to feel for the old gasket — this catches double-gasket situations before they happen
Apply a thin film of clean oil to the new filter's gasket — it seats evenly and makes the next removal easier
Start the drain plug by hand before applying any tool — if it catches rough, stop and check for cross-threading immediately
Use a torque wrench on the drain plug every time, without exception
Tighten the filter to exactly hand-tight plus three-quarters of a turn
After the Change
Confirm the filler cap is installed and fully seated before starting the engine
Wipe down the drain plug area and filter with a clean rag before firing the engine — clean surfaces make new leaks visible immediately
Start the engine and watch the oil pressure warning light — it should go out within 5 seconds
Let it idle for 3 minutes, shut it off, wait 5 minutes, then check the dipstick for the correct level
Slide cardboard under the engine and leave for 10 minutes — any leak will show up as a fresh stain
Check again after the first highway drive, when the system runs at full operating pressure and temperature
These steps are exactly what a competent lube shop should perform on every service. If you're taking the car in, it's reasonable to ask the service writer to confirm the drain plug torque and the filter gasket check were completed. A quality shop will confirm this without hesitation.
The same systematic approach applies to other slow leaks you might find on your car. Whether it's a tire slowly losing air or a contaminated oil reading on the dipstick, methodical diagnosis always beats guessing — and it usually saves you money on parts you don't actually need to replace.
Key Takeaways
An oil leak after an oil change traces back to the drain plug, oil filter, or filler cap in the vast majority of cases — all three are fixable in under 30 minutes with basic tools.
Double-gasketing the filter and skipping the crush washer replacement are the two most preventable causes of post-change leaks, and both are eliminated with a 10-second pre-install check.
An active drip that drops your oil level below the minimum mark is a stop-driving situation — low oil destroys bearings fast, and no engine tolerates running dry.
A torque wrench on the drain plug, a new crush washer every service, and a finger-check of the filter mount before installation are the three habits that prevent this problem from ever happening again.
Sarah Whitfield is a diagnostics and troubleshooting specialist who spent ten years as an ASE-certified technician before joining the editorial team. She specializes in OBD-II analysis, electrical gremlins, and the kind of intermittent problems that make most owners give up.