by Joshua Thomas
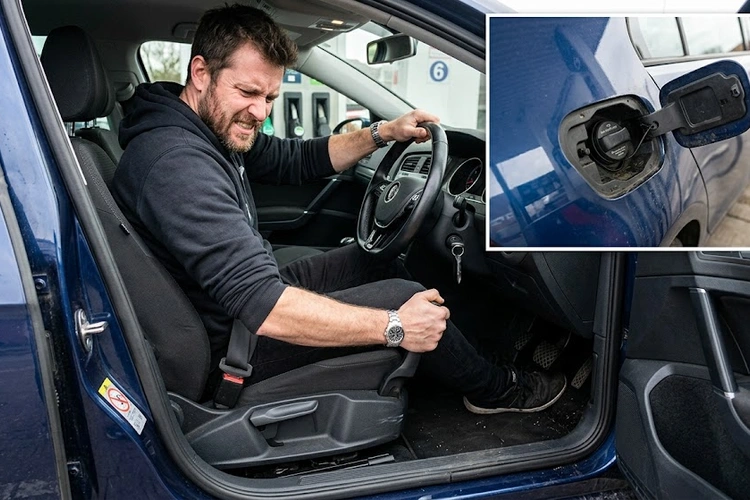
Nearly 12% of car owners will face a fuel door that won't open at some point during vehicle ownership — and the problem almost always strikes at the worst possible moment: standing at a gas pump. Our team has diagnosed this issue across dozens of makes and models. The root cause is almost always one of five things: a broken release cable, a failed electric actuator, a bent hinge, a corroded latch, or a frozen mechanism in cold weather. Each has a distinct fix, and most can be handled at home with basic tools.
Understanding which cause applies is the fastest path to a solution. Our team also recommends reviewing the guide on where the fuel pump relay is located when diagnosing any fuel system issue — electrical faults can affect multiple components at once, and the relay is a frequent culprit.
Contents

Our team consistently traces fuel door failures to the same five causes. Here is what each one looks like — and how to tell them apart before reaching for any tools.
Older vehicles rely on a manual cable running from a lever inside the cabin to the fuel door latch. When that cable snaps or slips off its anchor, pulling the release lever does nothing. The problem is common on high-mileage cars — our team has seen cable failures appear as early as 80,000 miles on certain makes.
Cable failures tend to accelerate once a frayed section starts. Our team does not recommend temporary fixes like zip ties — a full cable replacement is the correct repair.
Vehicles with electronic fuel door releases use a solenoid — a small electromagnetic device — to unlatch the door when commanded. These solenoids are tied to the central locking system or a dedicated release button. When the solenoid burns out or loses electrical signal, the door stays locked regardless of what buttons are pressed.
Anyone dealing with related electrical failures should also review our breakdown of remote start not working — the root causes overlap significantly, particularly blown fuses and body control module (BCM) faults.
Physical damage is a direct and obvious cause. A minor parking lot collision, a heavy object leaning against the quarter panel, or years of misaligned closure can bend the hinge or distort the surrounding sheet metal. When this happens, the latch may release correctly — but the door still won't swing open because the hinge geometry is off.
The latch mechanism sits exposed to moisture, road salt, and temperature extremes. Corrosion (rust) builds up inside the latch assembly over time. In regions with wet winters or coastal climates, our team sees this issue appear far earlier than in dry climates — sometimes within five years on vehicles that are never garaged.
Pro tip: A direct shot of WD-40 or white lithium grease into the latch can free a corroded fuel door in under a minute — our team considers this the first step worth trying before any disassembly or parts ordering.
In cold climates, water seeps into the door gap during rain or a car wash, then freezes overnight. The result is a fuel door that is locked solid by ice, not by the latch mechanism. Forcing it open is a mistake — our team has seen hinges crack and door panels deform from drivers who pried too hard in freezing temperatures.
Our team's guide on frozen car door locks covers the de-icing methods that apply equally well to fuel doors. The same techniques work for both problems.
Our team divides fuel door diagnosis into two tiers. The first tier requires no tools. The second tier requires disassembly and basic electrical testing.
According to NHTSA recall records, some fuel door latch and actuator failures have triggered manufacturer recalls — particularly on certain domestic trucks and crossovers. Our team always recommends checking an open VIN (Vehicle Identification Number) recall search before spending a dollar on repairs.
Our team maintains a standard kit for fuel door repairs. Most items cost under $20 and serve multiple purposes across common car repairs.
Our team recommends OEM (Original Equipment Manufacturer) parts for cable and solenoid replacements. Aftermarket versions frequently fit poorly or fail within a year of installation — the cost savings are not worth the repeat labor.
Our team outlines the correct repair process for each of the five causes. These are in order from simplest to most involved.
This works for broken cables, stuck latches, and situations where access to the lever is lost. Most vehicles have a manual override accessible through the trunk.
Warning: Never force a frozen or jammed fuel door open with a pry bar — our team has seen hinges crack and door panels deform from this mistake, turning a $15 de-icer fix into a $300 panel repair.
After any latch or hinge repair, our team recommends applying a rubber seal conditioner to the fuel door gasket. Cracked or brittle seals allow moisture back in and restart the corrosion cycle. Our write-up on car door seal leaking explains exactly how seal degradation leads to recurring mechanical problems in door assemblies.
Repair costs vary significantly based on the cause, the vehicle make, and whether the work is done at home or at a shop. Our team compiled average figures from repair forums, independent shop invoices, and parts supplier listings.
| Cause | DIY Parts Cost | Shop Labor Cost | Total (Shop) | Difficulty |
|---|---|---|---|---|
| Broken Release Cable | $15–$40 | $60–$100 | $75–$140 | Moderate |
| Failed Electric Solenoid | $25–$80 | $80–$150 | $105–$230 | Moderate |
| Bent Hinge | $20–$65 | $100–$220 | $120–$285 | Hard |
| Corroded Latch | $5–$20 (lubricant) | $50–$80 | $55–$100 | Easy |
| Frozen Fuel Door | $5–$12 (de-icer) | $40–$60 | $45–$72 | Easy |
Our team's bottom line: corroded latch and frozen door repairs are the most cost-effective fixes in existence. A $10 can of de-icer or $8 of lubricant resolves two of the five causes completely. The only expensive scenario is a bent hinge, and that usually traces back to avoidable physical damage.
Most fuel door repairs fall within reach of a home mechanic with basic tools. But some situations call for professional equipment and expertise. Our team draws a clear line between the two.
Our team's position is direct: if the repair stays at the latch, cable, fuse, or solenoid level, most people can handle it in a driveway on a weekend afternoon. Once structural sheet metal or body electronics enter the picture, a shop is the faster and safer investment.
A weak or broken latch spring is the most common cause. The spring loses tension over time and can no longer hold the door firmly shut against wind pressure at speed. Our team recommends replacing the spring assembly rather than just lubricating it — once the spring has fatigued, its tension does not return.
Yes, on any vehicle with an electric solenoid release. The actuator requires battery power to operate, and a fully discharged battery leaves it unresponsive. Our team recommends keeping a portable jump starter in the vehicle — it resolves both problems simultaneously and prevents being stranded at a fuel pump.
Most cable replacements take 45 minutes to two hours depending on the vehicle. The main variable is cable routing length and how many trim panels must be removed to access the path. Trucks and SUVs with longer cable runs generally take more time than compact cars.
Safe for short, low-speed trips — but our team advises against highway driving with an open or loose fuel door. At highway speeds, the door can catch wind, flex against the hinge, and cause permanent bending or paint damage. The fix is straightforward enough that driving around the problem is not worth the risk.
A fuel door that won't open is almost never a major repair — the five causes are known, the fixes are proven, and the only expensive outcome is the one that comes from forcing something that needs patience instead of force.
 |
 |
 |
 |
About Joshua Thomas
Joshua Thomas just simply loves cars and willing to work on them whenever there's chance... sometimes for free.
He started CarCareTotal back in 2017 from the advices of total strangers who witnessed his amazing skills in car repairs here and there.
His goal with this creation is to help car owners better learn how to maintain and repair their cars; as such, the site would cover alot of areas: troubleshooting, product recommendations, tips & tricks.
Joshua received Bachelor of Science in Mechanical Engineering at San Diego State University.
Get some FREE car parts & gear.. Or check out the latest free automotive manuals and build guides here.
Disable your ad blocker to unlock all the hidden deals. Hit the button below 🚗
| | | |