by Sarah Whitfield
You fill up the tank on a Monday morning, drive confidently for three days, and then watch the needle plunge straight to empty while sitting at a red light. That jolt of panic is real, and it's exactly what happens when a fuel gauge not working starts quietly lying to you about how much gas you actually have. The problem often creeps in gradually, which makes it easy to miss until it leaves you stranded on the side of the road.
Most drivers assume a broken fuel gauge means a complicated repair, but that's rarely the case. The fuel gauge system is a straightforward electrical circuit, and pinpointing the weak link is something you can often do at home before spending money at a shop. Understanding related components like the fuel pump relay and sending unit gives you a real advantage when tracking down the root cause without guessing.
Contents
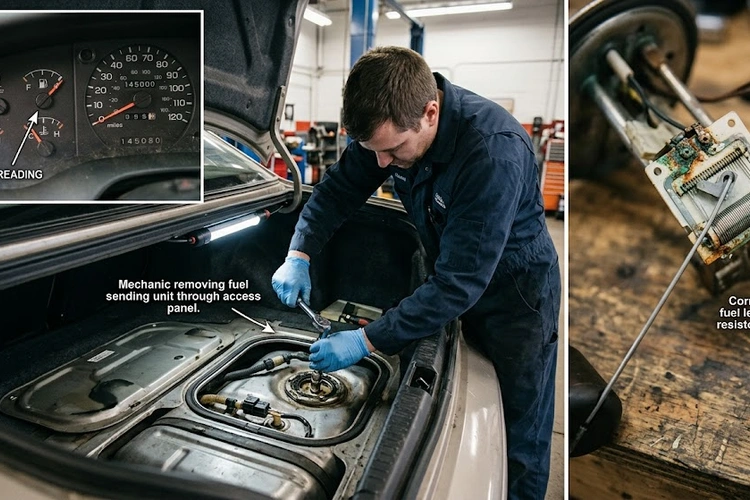
The fuel gauge is part of a simple electrical circuit with three main components: the sending unit inside the fuel tank, the needle gauge on your instrument cluster, and the wiring and fuses connecting them. The sending unit contains a float attached to a variable resistor (a part that changes electrical resistance based on its position), and as fuel rises and falls, the float moves to shift the needle on your dashboard. When any link in that chain breaks, the needle stops tracking your actual fuel level and gives you a false reading instead.
The sending unit mounts directly on the fuel pump module, which sits submerged inside your fuel tank and keeps fuel moving to the engine at all times. Most mechanics will tell you that the sending unit fails far more often than the dashboard gauge, and that's because the resistor strip it rides on degrades gradually with each cycle of the float arm. Vehicles that regularly run on a near-empty tank accelerate this wear, because the float arm spends more time working in the narrow range at the very bottom of the tank where deposits and corrosion accumulate fastest.
Identifying the exact cause of your fuel gauge not working is the only way to avoid replacing parts you don't need, which is a mistake that costs real money and real time. These six causes cover the vast majority of cases, listed roughly from most to least common so you can work through them in a logical order.
This is the most frequent culprit by a wide margin, and it usually develops gradually rather than failing all at once. The resistor strip inside the sending unit wears thin after years of the float arm sliding back and forth across it, causing the needle to read erratically, stick at a fixed point, or give completely wrong readings that get worse over time.
The gauge itself can fail internally, though this is much less common than sending unit problems. When it fails, the needle typically freezes at full or empty and stays there regardless of actual fuel level, which makes it easier to distinguish from the intermittent readings you typically see with a worn sending unit.
Your fuel gauge circuit shares a fuse with other systems on most vehicles, and a single blown fuse cuts power to the entire circuit instantly. This is the first thing you should check because it requires no tools beyond a fuse puller, costs nothing, and takes under two minutes to rule out completely before moving on to anything more involved.
The wiring harness between the sending unit and the dashboard gauge is exposed to heat, moisture, and road salt for years, and any break or corroded terminal along that run is enough to kill the reading entirely. Ground connections are especially vulnerable and responsible for more mysterious gauge failures than most drivers ever suspect when they're chasing the problem.
If your fuel gauge fails alongside your speedometer and other cluster gauges simultaneously, the instrument cluster itself has lost power or failed internally rather than the fuel circuit specifically. This is a more expensive fix, but it's clearly distinguishable because multiple gauges fail together at once instead of the fuel gauge going down in isolation.
The float arm inside the sending unit can stick from corrosion or debris, or it can become waterlogged (saturated with fuel or condensation) and lose buoyancy, causing a permanent false low reading on the gauge. Filling from a genuinely empty tank and watching whether the needle moves at all is a simple way to check whether the float has seized or the circuit has broken entirely.
Check your fuses and ground connections before you touch anything else — those two steps take under ten minutes and solve the problem more often than most people expect.
The symptoms of a fuel gauge not working range from subtle inconsistencies to a needle that simply refuses to move, and recognizing the pattern early prevents you from running genuinely dry at a dangerous moment. Watch how the gauge behaves across several fill-up cycles rather than judging a single reading, because some sending unit faults show up intermittently before they fail completely.
A gauge that refuses to move away from full or empty after you've definitely added or burned a significant amount of fuel is almost certainly dealing with a stuck sending unit or a broken wire in the circuit. If you notice this alongside an unexpected car stalling at idle, a fuel delivery problem beyond the gauge itself may be involved, and that changes the diagnosis significantly.
A gauge that swings between full and empty while you're cruising at a steady speed almost always traces back to a loose or corroded wiring connection or a float arm that's intermittently losing contact with the resistor strip beneath it. This kind of erratic behavior tends to get worse over time as the connection degrades further with every mile you drive.
Many modern vehicles store a diagnostic trouble code (a fault stored in the ECU, or engine control unit) when the fuel level sensor circuit reads outside its expected range, which lights up your check engine light. Pulling those codes with an OBD-II scanner points you directly at the fuel sensor circuit — our guide on a check engine light flashing breaks down exactly what those codes mean and how to act on them.
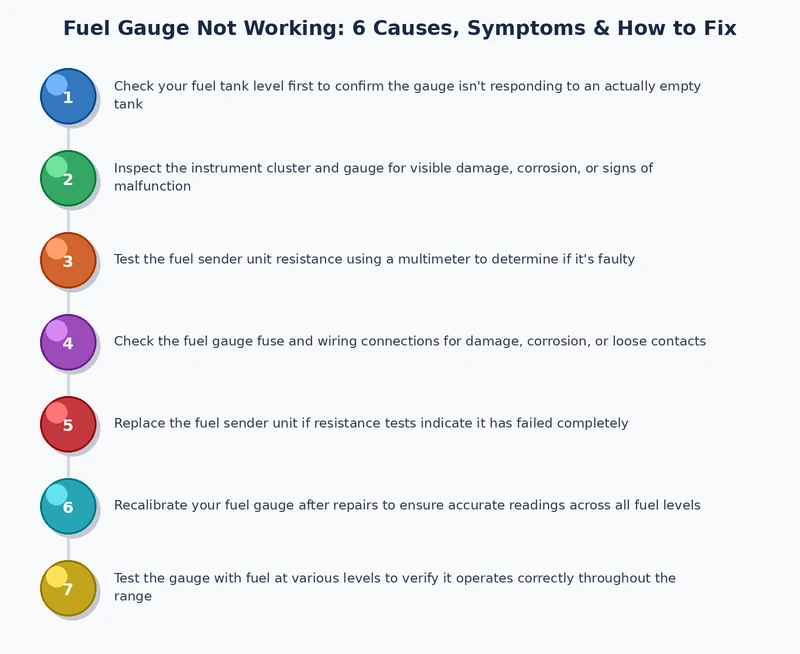
Diagnosing a fuel gauge not working problem at home requires a basic digital multimeter (a tool that measures voltage and resistance, available for under $30) and about an hour of focused work. Going through these steps in order prevents you from replacing the wrong component and wasting money on a misdiagnosis that a little testing would have caught immediately.
Locate the fuse for the instrument cluster or fuel gauge circuit in your owner's manual diagram, pull it with a fuse puller, and hold it up to light to check for a broken filament inside. Replace it with an identical-amperage fuse if it's blown, restart the engine, and check whether the gauge responds before proceeding to anything more involved.
Disconnect the wiring harness from the sending unit connector, set your multimeter to ohms (resistance), and probe the two signal terminals while slowly moving the float arm through its full range by hand. The resistance should sweep smoothly from one end to the other — any jumping, sticking, or infinite resistance reading confirms the sending unit has failed and needs to be replaced.
A corroded or loose ground wire causes more gauge failures than most drivers realize, and the same multimeter technique used to diagnose a parasitic battery drain applies directly here. Look for the chassis ground point near the sending unit connector and verify it has a clean, tight connection with no visible corrosion at the terminal or fastener.
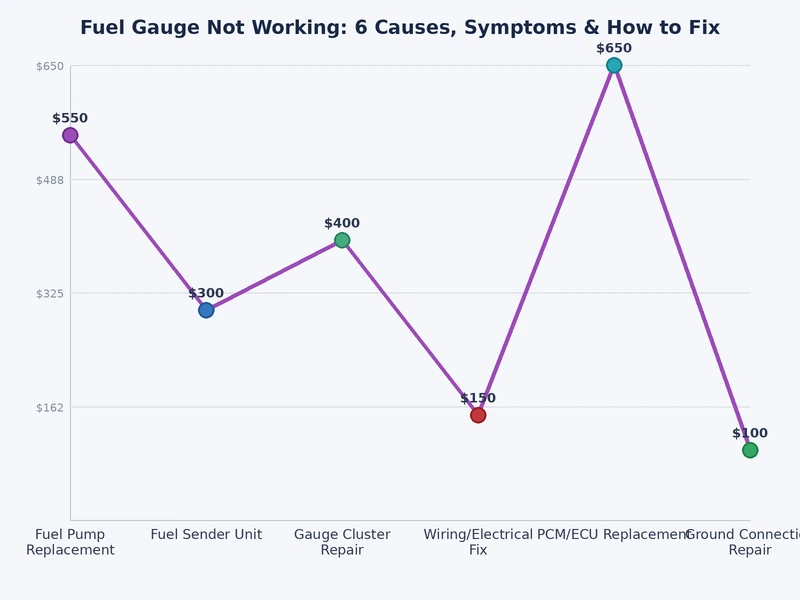
Repair costs vary significantly depending on which component has failed, and knowing the realistic range before you walk into a shop lets you evaluate any estimate without getting caught off guard.
| Repair | Parts Cost | Labor Cost | Total Estimate |
|---|---|---|---|
| Blown fuse replacement | $1–$5 | $0 (DIY) | $1–$5 |
| Wiring or ground connection repair | $10–$40 | $80–$120 | $90–$160 |
| Fuel sending unit only | $50–$250 | $100–$300 | $150–$550 |
| Fuel pump + sending unit (combined module) | $150–$400 | $100–$300 | $250–$700 |
| Instrument cluster repair or replacement | $150–$600 | $100–$200 | $250–$800 |
When the sending unit fails, it often makes financial sense to replace the entire fuel pump module at the same time, because the labor cost of accessing the tank is the same whether you replace one part or both, and doing both jobs together saves you from paying that labor cost a second time in a few years. Fuel delivery issues can also mimic other problems — bad fuel injector symptoms, for example, can cause rough running that looks like fuel starvation and sends drivers chasing the gauge when the real problem is downstream from it.
Replacing a blown fuse, cleaning a ground connection, or running multimeter tests on the sending unit connector is genuine DIY territory that any mechanically curious person can handle on a weekend afternoon. Accessing the sending unit or fuel pump module is a completely different category of job, and that distinction matters more than most people think before they start.
These tasks fall safely within reach for a home mechanic with basic tools and a willingness to follow your vehicle's wiring diagram:
Working near an open fuel tank means working near fuel vapors that can ignite — if you haven't done this repair before, the savings are genuinely not worth the risk.
Replacing the sending unit or pump module requires dropping or opening the fuel tank and working in direct contact with fuel and its vapors, which is a serious hazard without proper experience and a safe outdoor workspace. If your car is also losing power when accelerating alongside a bad gauge reading, a broader fuel delivery failure is likely involved and warrants a professional diagnosis from the start rather than a DIY approach that risks missing the real root cause.
Protecting your fuel gauge over the long term comes down to how you treat the fuel system every day, and a few simple habits make a measurable difference in how long the sending unit lasts. The most impactful thing you can do is stop letting the tank drop below a quarter before you refuel. The fuel itself acts as a coolant and lubricant for the pump motor and sending unit mechanism, and running consistently near empty forces those components to work in a degraded environment on every single trip.
Poor fuel delivery from years of low-tank habits contributes to symptoms you might not immediately connect to gauge problems — our guide on rough idle causes walks through how fuel system neglect feeds into wider drivability issues that compound over time and become harder and more expensive to resolve the longer they sit.
The first myth is that a stuck or inaccurate gauge is a cosmetic quirk you can safely live with, but driving without a reliable fuel reading is a genuine safety risk because you're guessing your remaining range at all times with no reliable data. The second myth is that adding a fuel system cleaner to the tank can fix a bad sending unit — it cannot, because a mechanical or electrical failure doesn't respond to a chemical additive no matter what the label claims. According to Wikipedia's overview of fuel gauge design, modern gauges use electronic damping (a built-in delay that smooths needle movement) to prevent erratic readings from sloshing fuel, which means a persistently stuck needle is almost never a calibration issue — it's a hardware failure that requires a real repair.
You can drive, but it's genuinely risky. Without a working gauge, you have no reliable way to know how much fuel remains in the tank, which means running out of gas on a highway or in an unsafe location becomes a real possibility. Track your mileage and refuel more frequently as a short-term workaround, but get the repair done as soon as possible rather than relying on guesswork long-term.
Not always, but it's the most likely cause by a wide margin. Always check the fuse first since it's the fastest and cheapest thing to rule out, then move to the sending unit if the fuse is fine. The dashboard gauge itself fails occasionally, but it's the least common component to go bad and is typically only suspected after the sending unit and wiring have been tested and cleared.
Most sending units last between 100,000 and 150,000 miles under normal use. Vehicles that regularly run with less than a quarter tank tend to wear them out significantly sooner because the pump motor runs hotter and the float arm works harder in a narrower range near the bottom. If you're approaching high mileage and the gauge starts reading erratically, the sending unit is the first place to look.
A fuel gauge that lies to you isn't a minor inconvenience — it's a warning that your fuel system needs attention, and the sooner you diagnose it, the cheaper and safer the fix will be.
 |
 |
 |
 |

About Sarah Whitfield
Sarah Whitfield spent ten years as an ASE-certified automotive technician before transitioning to full-time automotive writing, giving her a diagnostic skillset that goes well beyond what most reviewers bring to the subject. She specializes in OBD-II code analysis, electrical system troubleshooting, and the intermittent failure modes that frustrate owners and confound general mechanics. At CarCareTotal, she covers car troubleshooting guides, diagnostic tools, and repair resources for drivers dealing with warning lights, strange symptoms, and hard-to-diagnose problems.
Get some FREE car parts & gear.. Or check out the latest free automotive manuals and build guides here.
Disable your ad blocker to unlock all the hidden deals. Hit the button below 🚗
| | | |