by Sarah Whitfield
Roughly 1 in 4 manual transmission vehicles develops measurable shifter play before 100,000 miles — and in automatics, worn selector cables account for nearly 30% of drivability-related complaints at independent repair shops. A gear shifter loose or wobbly to the touch is not a cosmetic nuisance; it's an early warning sign in a mechanical system where millimeters of precision separate clean gear engagement from a missed shift at speed. Our team has tracked this pattern across hundreds of diagnostics, and the trajectory is consistent: ignored early wobble leads to missed gear engagement, stuck selectors, and in the worst cases, a vehicle that cannot be placed in Park. The mechanics behind shifter slop span a surprisingly wide component range — from a $4 nylon bushing to a cracked transmission mount to a failed Bowden cable. Pinpointing the failure point accurately cuts repair cost in half compared to the parts-swapping approach most shops default to.
This guide covers everything our team uses to diagnose and fix a loose or wobbly gear shifter — causes, symptoms, diagnostic process, repair procedures, and long-term prevention. Both manual and automatic transmissions are covered throughout.
Contents
Understanding which components are in motion during a shift cycle is the foundation of accurate diagnosis. A gear shifter is not a single part — it's a mechanical chain, and wobble propagates differently depending on where that chain is broken. Our team's first diagnostic question is always structural: is the play internal to the shifter assembly, or is the entire powertrain unit moving?
In a manual transmission, the shift lever seats in a ball-and-socket joint at the base of the gearbox tunnel. Nylon or polyurethane bushings line both the ball pivot and the shift tower — these are the primary wear points in virtually every platform. The shift rod connects the lever to the transmission's external selector shaft through rubber isolator grommets. When any of these components degrades, lateral play increases and the lever no longer returns to a clean neutral position between gates.
The full list of wear points in a manual shift assembly:
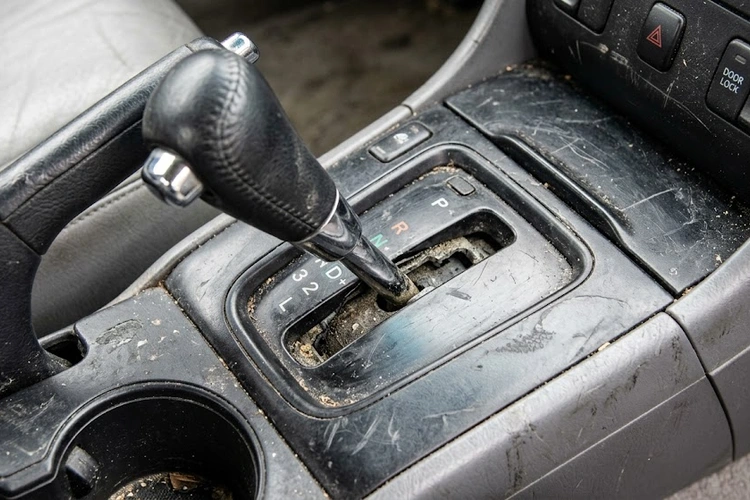
Automatic transmissions use a selector cable — a Bowden cable assembly — running from the floor shifter or column shifter to the transmission manual valve lever. Wear concentrates at the cable end clips and the shifter bracket pivot pin. Floor-mounted selectors and column-mounted selectors share the same fundamental failure modes, though column-shift routing through the steering column adds replacement complexity. The gear stick mechanism has evolved considerably from early column-shift designs, but the wear physics are unchanged. Unlike manual systems, automatic selectors carry direct safety implications: a worn cable or broken detent prevents clean Park engagement, which our team treats as a priority repair regardless of mileage or vehicle age.
Not every degree of shifter play carries equal urgency. Our team uses a straightforward triage framework: symptoms that affect gear engagement or Park lock are same-day items; symptoms limited to tactile feel and aesthetics can wait for a scheduled service window without meaningful risk escalation.
A shifter that disengages from a gear while driving — even once — is a same-day shop visit, full stop. One missed engagement at highway speed is all it takes to create a far larger problem.
Our diagnostic database consistently surfaces the same cluster of failure points across makes and models. The table below summarizes them by transmission type, repair complexity, and typical parts cost to give a realistic baseline before any shop estimates are solicited.
| Cause | Transmission Type | DIY Difficulty | Parts Cost (Typical) | Labor Hours |
|---|---|---|---|---|
| Worn shift tower bushings | Manual | Easy | $8–$30 | 0.5–1.5 hr |
| Worn pivot ball grommet | Manual | Moderate | $15–$45 | 1–2 hr |
| Stretched or broken shift rod grommet | Manual | Easy–Moderate | $5–$20 | 0.5–1 hr |
| Worn selector cable end clips | Automatic | Moderate | $20–$60 | 1–2 hr |
| Failed selector cable assembly | Automatic | Moderate–Hard | $40–$150 | 1.5–3 hr |
| Failed transmission mount | Both | Hard | $30–$120 | 1–3 hr |
| Broken shifter bracket or housing | Both | Moderate–Hard | $50–$200 | 2–4 hr |
This is the most common cause of a gear shifter loose or wobbly complaint across all vehicle categories. Nylon bushings compress and crack under thermal cycling; rubber grommets harden, split, and eventually disintegrate. The failure accelerates with heat exposure, aggressive shifting technique, and incorrect or degraded transmission fluid. Most compact cars and light trucks under 150,000 miles that present with gradual shifter play resolve completely with a bushing kit — a $15 fix that eliminates the majority of wobble complaints our team encounters.
Our team typically orders platform-specific bushing kits from specialty suppliers rather than dealer OEM parts — quality is equivalent and cost is significantly lower. For polyurethane upgrades, specialty manufacturers produce kits for most domestic and Japanese import platforms that deliver tighter tolerances and longer service life than the original nylon specification. The trade-off is marginally more NVH transmitted through the shifter, which is imperceptible in most daily-driver applications.
Shift linkage rods develop slop at their end pivot pins as the pressed-in nylon inserts wear. Selector cables stretch over accumulated shift cycles and lose their zero-lash calibration — the cable still moves, but the detent positions no longer align precisely with the transmission's valve body positions. This is a particularly insidious failure in automatics because the shifter indicator may display "Drive" while the transmission is actually in a neutral-adjacent position.
Our team has documented cases where a stretched selector cable was initially misdiagnosed as a transmission solenoid fault, resulting in an unnecessary $2,800 rebuild estimate. A simple cable tension adjustment — a 20-minute repair — resolved the drivability complaint entirely. Accurate diagnosis at the linkage level is non-negotiable before any internal transmission work is authorized.
A collapsed transmission mount allows the entire powertrain unit to move under load. The shifter doesn't have increased internal play — the whole assembly displaces with the transmission. This produces a characteristic clunk-with-wobble pattern that is load-dependent, most pronounced at hard takeoff and during sharp deceleration. The symptom overlaps with several drivability complaints; our team has seen failed mounts contribute to the stalling behavior that appears during deceleration when powertrain movement disrupts throttle cable geometry on older cable-actuated platforms. A 30-second visual inspection from underneath — looking for torn rubber, visible mount separation, and metal-to-metal contact — eliminates this variable immediately.
Systematic diagnosis eliminates guesswork. Our two-phase protocol — static followed by dynamic — isolates the failure point to a specific component before any parts are ordered, preventing the costly trial-and-error approach that drives up repair bills unnecessarily.
With the vehicle parked and engine off, the static test establishes baseline play measurements and identifies the failure axis:
With the engine running — clutch engaged on manual, brake applied on automatic — the dynamic test reveals engagement-level failures that static testing misses:
The repair path follows directly from what the diagnostic reveals. Attempting the most expensive component first — a common shortcut when diagnosis is skipped — wastes time and money on a problem that frequently has a solution under $25.
Bushing and grommet replacement is accessible to anyone with basic mechanical aptitude and a standard socket set. The process on most front-wheel-drive platforms follows this sequence:
Selector cable end clip replacement on automatics follows comparable logic. The clip presses off the ball stud at the transmission end with a flat-blade screwdriver; replacement clips typically cost under $12 and restore zero-lash cable calibration immediately. This single repair eliminates false-neutral risk and corrects PRNDL misalignment in one step.
Transmission mount replacement requires lifting the transmission off the crossmember — a procedure that demands a floor jack, a transmission jack, and rated safety stands under the subframe. Our team does not recommend solo DIY execution of this repair without a lift. Similarly, full selector cable replacement on column-shift automatics routes through the firewall and steering column shroud; the routing complexity and torque specifications on column components make this a legitimate shop repair on most platforms. Budget two to three hours of flat-rate labor. In both cases, the parts cost is modest — the labor access is where the expense concentrates.
Shifter wear is not random failure — it follows predictable degradation curves that respond directly to maintenance discipline. The components responsible for gear shifter loose or wobbly conditions all share the same vulnerabilities: lubrication starvation, thermal cycling, and deferred inspection. Addressing these proactively extends component service life by a measurable margin.
For vehicles past 75,000 miles, our team recommends the following cadence as a minimum baseline:
Severity determines risk. Minor play with clean gear engagement carries low immediate danger, but the condition progresses without intervention. A shifter that struggles to seat gears or fails to engage Park cleanly represents a direct safety hazard — our team does not recommend driving on a broken detent spring, failed cable end, or collapsed transmission mount under any circumstances.
Bushing and grommet replacement runs $50–$150 all-in for parts and labor at most independent shops. Selector cable replacement on automatics costs $150–$350 depending on routing complexity. Transmission mount replacement adds $200–$450 depending on access. The diagnostic step is critical — misidentifying the cause doubles total repair cost on average in our team's experience.
Yes, in specific failure modes. A worn bushing that allows the shift lever to sit off-center in its travel arc can cause incomplete synchronizer engagement in manuals, accelerating synchronizer wear. On automatics, a misaligned selector cable creates partial valve body engagement that generates heat and pressure anomalies in the hydraulic circuit. Neither failure is immediate, but both compound with mileage if the root cause goes unaddressed.
On most front-wheel-drive compact cars and trucks, complete console removal, bushing swap, and reassembly takes 45 to 90 minutes for anyone with basic mechanical experience. Rear-wheel-drive platforms with remote shifter assemblies and extension rods typically require two to three hours. Having the correct platform-specific bushing kit sourced before starting eliminates the most common time delay in this repair.
A gear shifter that wobbles is the mechanical system telling the truth — ignore it early and it will cost three times as much to fix later.
 |
 |
 |
 |

About Sarah Whitfield
Sarah Whitfield is a diagnostics and troubleshooting specialist who spent ten years as an ASE-certified technician before joining the editorial team. She specializes in OBD-II analysis, electrical gremlins, and the kind of intermittent problems that make most owners give up.
Get some FREE car parts & gear.. Or check out the latest free automotive manuals and build guides here.
Disable your ad blocker to unlock all the hidden deals. Hit the button below 🚗
| | | |