by Sarah Whitfield
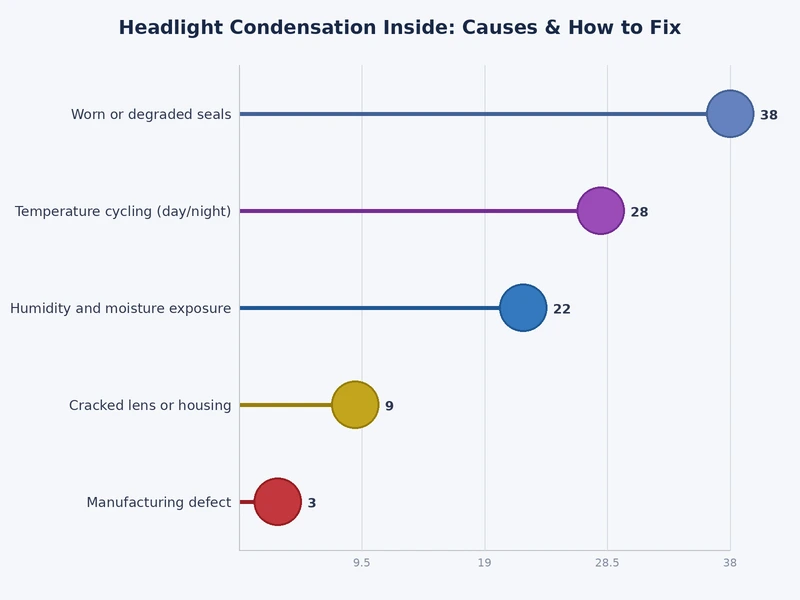
Around 35% of headlight assemblies develop internal moisture buildup before the 100,000-mile mark — and most drivers write it off as cosmetic until light output drops noticeably or a bulb burns out well ahead of schedule. Headlight condensation inside the housing is more than a foggy lens. It degrades the reflector coating, accelerates bulb failure, and in severe cases creates a short-circuit risk inside an electrical component that's supposed to last the life of the vehicle.
The good news: you don't automatically need a new assembly. The fix depends entirely on how the moisture got in. A cracked vent tube and a failed housing seal require different approaches, and conflating the two is the single biggest reason DIY fixes don't hold. This guide breaks down the real causes, walks you through the most effective fixes, and tells you exactly when to stop patching and buy a replacement. If you've also been dealing with outside noise creeping into the cabin through degraded seals, the diagnostic approach in how to reduce wind noise in your car is worth reading alongside this — deteriorating weatherstripping and failing headlight sealant often share the same root cause on aging vehicles.
Contents
Modern headlight assemblies are sealed units — or at least they're designed to be. The polycarbonate housing, reflector bowl, and outer lens are bonded with butyl sealant and include small rubber vent tubes that equalize internal pressure as temperatures swing. When any part of that system fails, moisture gets in and has nowhere meaningful to go.
The butyl or silicone sealant around the lens-to-housing joint is the primary moisture barrier on every sealed assembly. Heat cycling — the housing gets hot, cools down, gets hot again — causes this sealant to harden and crack over years of use. Once it does, the joint becomes a direct moisture entry point. You won't always see visible cracks. Sealant can fail microscopically, allowing capillary action to pull water vapor inside during heavy rain or a pressure car wash.
Minor parking lot impacts that don't visibly crack the housing can still shift the lens slightly and break the sealant bond at one corner. This is one of the most underdiagnosed causes of headlight condensation inside — the driver never registers the tap, but moisture starts building up weeks later. If the lens has any flex when you press it gently by hand, your sealant bond is compromised.
Every sealed headlight assembly includes one or two small rubber or plastic vent tubes, typically positioned at the base or rear of the housing. Their job is critical: they let air pressure equalize as the housing heats up and cools down, and they allow moisture to escape through that same thermal cycling process. When they work correctly, brief condensation after rain or a car wash clears within 20–30 minutes of driving with the headlights on.
When the vent tube gets clogged with road debris or insect material, that pressure equalization stops. The assembly traps whatever moisture enters. Worse, a cracked vent tube becomes an active intake — it pulls humid air in and holds it. If your vehicle has been showing other weather-related electrical symptoms, like the misfires covered in engine runs rough after rain, there's a real chance moisture infiltration extends beyond just the headlight housing.
Not every foggy headlight demands immediate action. Knowing the difference between normal condensation behavior and genuine moisture intrusion saves you from wasted repairs — and from ignoring damage that's getting worse.
A thin haze on the inner lens surface after driving through heavy rain or a car wash is normal. This happens because the sealed assembly experienced a thermal shock — hot bulb, sudden cold water — and the small amount of humid air trapped inside deposited briefly on the cooler lens. Run the headlights for 20–30 minutes and the bulb heat evaporates it. If it clears completely, your seals and vents are doing their job.
This is especially common in climates with significant daily temperature swings and on HID or LED assemblies. Those housings run cooler at the lens surface than halogen units, which gives condensation more opportunity to form before the thermal cycle pushes it back out. Halogen assemblies bake moisture out faster simply because everything inside runs hotter.
Condensation that doesn't clear after a full drive is a problem. So are visible water droplets rather than just a haze, rust staining on the reflector components, or a milky white fogging that persists regardless of weather conditions. These indicate standing moisture — not the temporary humidity that functional vent tubes handle as a matter of routine.
If you see actual water pooling at the bottom of the headlight housing, stop driving on it. You have an active seal failure, not a ventilation issue — running the lamp in that condition risks a short circuit or a cracked bulb from thermal shock when the water contacts the hot glass envelope.
Moisture-corroded reflectors are a permanent loss. Once the vacuum-deposited aluminum coating oxidizes or flakes, the housing loses its ability to focus light properly, and no amount of drying reverses that. Keep this in mind as you diagnose — the question isn't just whether moisture is present, but whether it has already done irreversible damage.
The method you need depends on what's letting moisture in. Drying out a housing that still has an active leak is a temporary fix at best. Nail the diagnosis before you pick a technique.
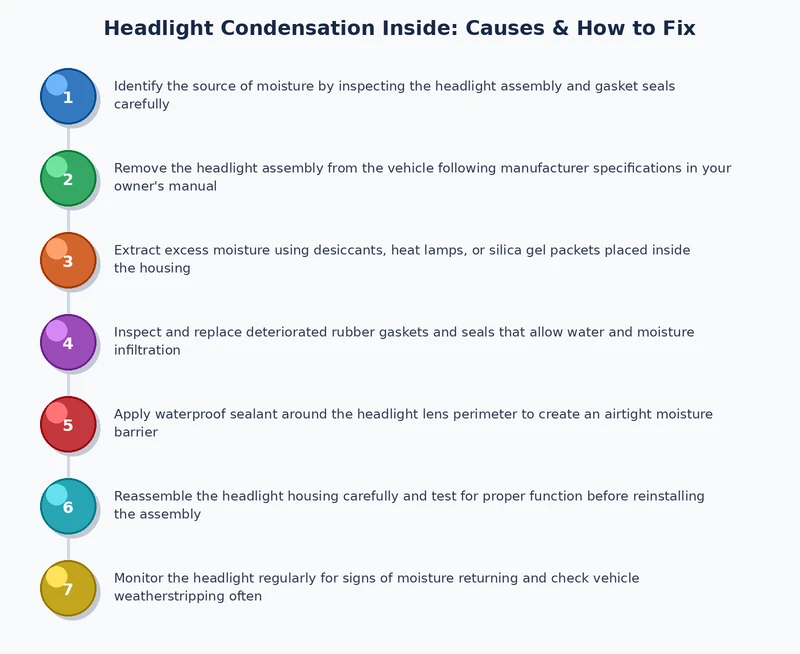
If the seals and vent tubes appear intact and you're dealing with trapped residual moisture rather than active ingress, you can dry the housing without removing it from the car. Remove the bulb access cover from the rear of the housing. Point a hairdryer on its lowest heat setting into the bulb cavity for 10–15 minutes — not directly at the polycarbonate lens. This drives warm, dry air through the interior and pushes moisture out through the vent pathway.
A slower but more thorough approach: place a sealed packet of fresh silica gel desiccant inside the bulb cavity, replace the cover, and leave it overnight. The desiccant pulls residual moisture out of the trapped air volume inside the housing. Pull the packet in the morning before you drive. This works especially well in humid climates where a standard warm-up cycle isn't aggressive enough to fully clear the housing, and it's safe to repeat as often as needed without risk to the lens or sealant.
For assemblies where the service port is large enough to access the interior directly, a short burst of compressed air followed by desiccant placement is the fastest reliable combination. Don't spray compressed air directly at the reflector surface — the pressure can dislodge flaking coating on an already-degraded reflector and accelerate the damage.
Resealing a headlight housing is a legitimate long-term repair, but it requires patience. The standard method: place the assembly in a household oven at around 200°F (93°C) for 8–10 minutes to soften the original butyl sealant, then carefully separate the lens from the housing using a trim tool — not a screwdriver. Remove all remnants of the old sealant from both mating surfaces. Apply fresh butyl rope sealant evenly around the channel, press the lens into position firmly, clamp it if possible, and allow proper cure time before reinstalling.
Done correctly, a reseal holds for years. Done carelessly — with gaps in the sealant bead, insufficient curing time, or silicone applied over old butyl residue — and moisture will be back within a season. If you're not comfortable with the process, a body shop can reseal a standard housing for $100–$200 in labor, which is significantly less than a replacement assembly on most vehicles.
| Fix Method | Best For | DIY Difficulty | Approx. Cost | Expected Longevity |
|---|---|---|---|---|
| Hairdryer / warm air flush | Trapped moisture, intact seals | Easy | $0 | Temporary |
| Silica gel desiccant | Residual humidity, minor moisture | Easy | $5–$10 | Days to weeks |
| Vent tube cleaning / replacement | Blocked or cracked vent tube | Moderate | $10–$30 | Permanent (if no seal damage) |
| Full housing reseal (DIY) | Failed lens-to-housing sealant | Hard | $20–$50 | 3–7 years |
| Professional reseal | Complex projector assemblies | N/A (shop) | $100–$200 | 3–7 years |
| Assembly replacement | Corroded reflector, cracked housing | Moderate | $150–$800+ | 10+ years |
Once you've resolved the immediate problem, keeping it from coming back is straightforward — mostly a matter of catching deterioration before it opens a new entry point.
Every few months, locate the vent tubes on each headlight housing. They're typically small rubber nubs or stubs at the base or rear of the assembly, sometimes covered by a foam filter cap. They should be soft, flexible, and clear of debris. If a tube has hardened, cracked, or shows visible blockage, clean it out or replace it. Replacement vent tubes are inexpensive — usually under $15 — and take five minutes to swap on most platforms.
While you're there, run a finger along the lens-to-housing sealant seam and feel for any raised or lifted edges. Catching a failing seal before moisture enters means a simple bead of fresh butyl along the exterior joint as a stopgap, rather than a full disassembly. If your car has also been showing water intrusion elsewhere — like the clear water pooling underneath the car that signals clogged drainage channels near the firewall — inspect your headlight seams at the same time. Seal failures rarely happen in isolation on older vehicles.
Also pay attention to your headlight beam pattern. A housing with developing moisture damage often shows a diffused, uneven beam well before you can clearly see fogging on the lens. If your headlights seem dimmer or the cutoff line has gone soft, inspect the interior condition of the housing before assuming the bulb is at fault.
A thin application of dielectric grease around the bulb socket and at the vent tube junction reduces moisture intrusion at those two specific weak points without restricting airflow. Don't seal the vent tube opening entirely — it needs to breathe to function. UV-protective headlight sealant sprays from 3M and Sylvania also slow polycarbonate UV degradation, which indirectly protects the sealant bond by reducing the thermal expansion stress that causes it to crack in the first place.
For taillights and other rear lighting that use the same sealed-housing design, identical vent-tube maintenance logic applies. Rear housings see more direct water spray and are statistically more likely to develop vent blockages than front units — don't leave them out of your inspection routine.
Repair is almost always the correct starting point. But there's a clear threshold where continued patching stops making sense economically and safety-wise — and missing that line costs you more in the end.
The reflector bowl is the component that actually determines your light output. It's coated in a thin layer of vacuum-deposited aluminum — precisely shaped to direct light forward and create the beam pattern your headlamp is designed to produce. Once moisture oxidizes that coating, you'll see a whitish haze or dark spotting on the reflector surface that doesn't wipe away. That damage is permanent. A dried-out housing with a corroded reflector is not a fixed headlight — it's a dim, poorly aimed light that's a genuine safety hazard at night.
Bulbs also burn out faster in a moisture-affected housing. The thermal stress of condensation contacting a hot halogen envelope causes premature failure. If you're replacing bulbs more than once every 12 months in an affected housing, you're spending money that should go toward resolving the root problem. The same logic applies to other electrical components exposed to uncontrolled moisture — problems like interior lights not working sometimes trace back to water intrusion that started somewhere seemingly unrelated and spread through shared wiring.
Replace the assembly outright when the reflector coating shows visible oxidation damage, the polycarbonate housing has a structural crack rather than just sealant failure, the lens has deep internal etching that scatters light, or you've resealed twice and moisture keeps returning. A cracked housing cannot be permanently sealed — the plastic flexes with every temperature cycle and any sealant spanning a crack will fail again, usually within a single season.
Aftermarket assemblies from reputable suppliers like Dorman, TYC, and Depo are priced well below OEM on most common vehicles and represent a sound investment. For high-end projector housings or adaptive headlight units, OEM is worth the premium — optics alignment tolerances matter far more on those systems than on a standard reflector housing. And if persistent electrical oddities like interior lights staying on unexpectedly are showing up at the same time as your headlight moisture problem, have the vehicle's grounding circuit checked. Water intrusion and compromised ground paths often appear together.
Briefly, yes — if it's a light haze that clears within 20–30 minutes of driving with the headlights on. Persistent moisture that doesn't evaporate reduces light output and creates a short-circuit risk at the bulb socket, so you need to address it rather than normalize it as a quirk of your car.
No. A heat gun generates enough concentrated heat to warp the polycarbonate lens and melt the butyl sealant, which turns a moisture problem into a structural one. Use a hairdryer on its lowest heat setting only, or stick to passive desiccant methods if you're not confident in the distance and angle.
Because drying treats the symptom, not the entry point. If condensation returns within a few days, you have an active moisture path — a failed seal, a cracked vent tube, or a housing crack — that needs to be repaired before any drying method has a lasting effect. Identify the source before repeating the fix.
A properly executed reseal using quality butyl rope sealant typically holds for three to seven years under normal driving conditions. Cutting corners on sealant coverage, skipping adequate cure time, or applying new sealant over old residue drops that significantly — some rushed reseals fail within a single season of temperature cycling.
 |
 |
 |
 |

About Sarah Whitfield
Sarah Whitfield is a diagnostics and troubleshooting specialist who spent ten years as an ASE-certified technician before joining the editorial team. She specializes in OBD-II analysis, electrical gremlins, and the kind of intermittent problems that make most owners give up.
Get some FREE car parts & gear.. Or check out the latest free automotive manuals and build guides here.
Disable your ad blocker to unlock all the hidden deals. Hit the button below 🚗
| | | |