by Joshua Thomas
Learning how to apply ceramic coating yourself can save you hundreds of dollars compared to professional installation, while still delivering years of paint protection. Ceramic coating forms a semi-permanent glass-like layer over your clear coat, repelling water, UV rays, bird droppings, and light scratches. Before you begin, make sure your paint is in good condition — if you have peeling clear coat, read how to fix peeling clear coat on a car first. This guide walks you through every step from prep to cure so you get professional results at home.
Contents
Ceramic coating — sometimes called nano-ceramic or SiO2 coating — is a liquid polymer that bonds chemically with your car's factory paint. Once cured, it creates a hydrophobic surface that makes water bead and roll off, carrying dirt with it. Unlike wax, it doesn't wash away or need reapplication every few months. A quality DIY ceramic coating lasts one to three years; professional-grade coatings can last five or more.
Traditional carnauba wax sits on top of the paint and degrades within weeks. Paint sealants last a few months. Ceramic coatings chemically bond to the clear coat, creating a far harder and more durable layer. The result is superior scratch resistance, easier cleaning, and much longer protection intervals.
Ceramic coating and paint protection film (PPF) are often compared, but they do different jobs. PPF is a thick urethane film that absorbs rock chips and deep scratches — ceramic coating cannot. However, ceramic coating is far cheaper, covers the entire car easily, and enhances gloss more noticeably. Many enthusiasts apply ceramic coating over PPF for the best of both worlds.
| Protection Type | Durability | Hydrophobic Effect | Scratch Resistance | Avg. Cost (DIY) |
|---|---|---|---|---|
| Carnauba Wax | 4–8 weeks | Moderate | Minimal | $10–$30 |
| Paint Sealant | 4–6 months | Good | Low | $20–$60 |
| DIY Ceramic Coating | 1–3 years | Excellent | Moderate | $50–$150 |
| Professional Ceramic | 3–7 years | Excellent | High | $500–$2,000 |
| Paint Protection Film | 7–10 years | Good | Very High | $200–$800+ |
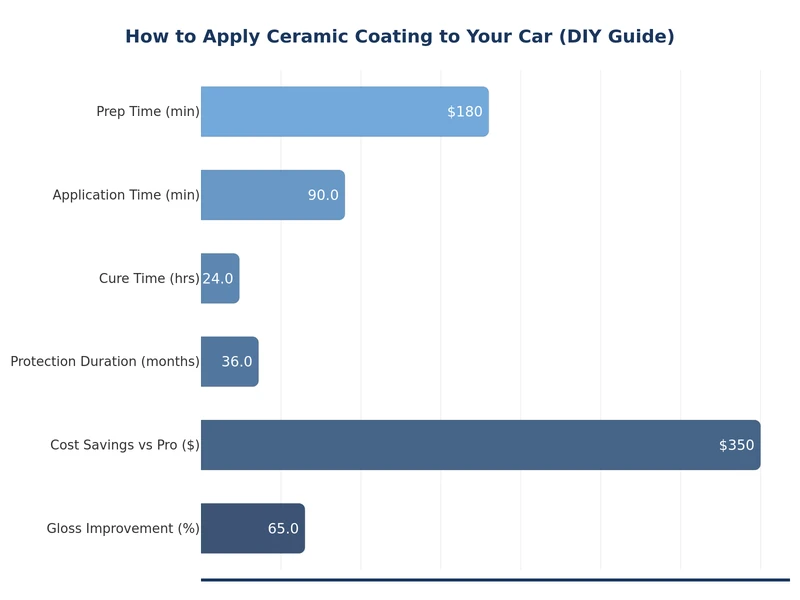
Gather everything before you start. Running to the store mid-application risks the coating flashing prematurely on open panels.
Work in a clean, shaded garage with the temperature between 50°F and 75°F (10°C–24°C). High humidity or direct sunlight causes the coating to cure too fast, leaving streaks and high spots.
Preparation is the most important part of learning how to apply ceramic coating yourself. The coating locks in whatever is on the paint, so any contamination, swirls, or oxidation will be sealed permanently under the glass layer.
Start with a thorough two-bucket wash. Rinse the car, wash panel by panel, and rinse again. Follow with an iron remover spray to dissolve embedded brake dust — you'll often see the product turn purple as it reacts with metal particles. Then clay bar the entire car to remove bonded surface contaminants. The paint should feel smooth as glass when you run a clean finger across it.
After claying, wash once more to remove clay residue, then dry completely with clean microfibers.
Any swirl marks, light scratches, or oxidation visible before coating will still be visible after. If your paint has defects, now is the time to correct them with a dual-action polisher and a finishing polish. For oxidized paint, check out how to remove oxidation from car paint before proceeding. According to the EPA's Safer Choice program, many modern car care chemicals are formulated to reduce volatile organic compound emissions — choose products certified under such programs when possible.
After polishing, wipe every panel with an IPA solution (1:1 IPA and distilled water) using a fresh microfiber. This strips any polish oils, wax residue, or silicone that would prevent the ceramic coating from bonding. Work one panel at a time and let it air dry for 2–3 minutes before moving on. The paint should now look slightly dull — that is normal and means it's clean and ready.
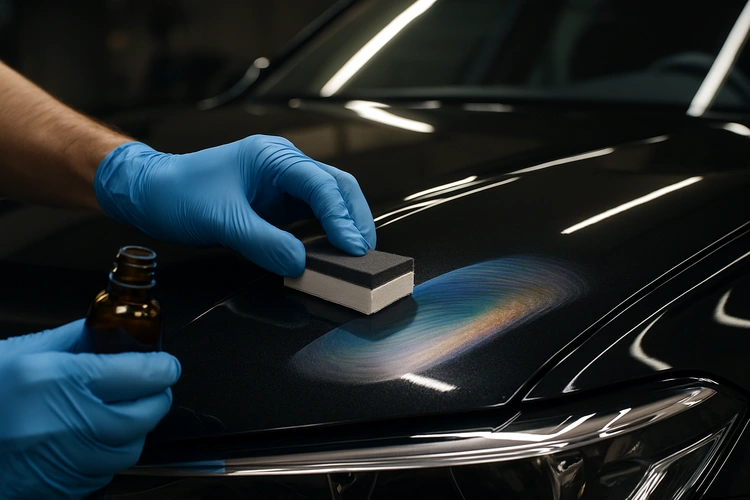
Apply the coating in a cool, shaded area. Direct sunlight will cause it to flash — cure unevenly on the surface — before you can buff it off, leaving permanent streaks.
Dispense 4–6 drops of ceramic coating onto a wrapped foam applicator block. Apply using overlapping straight-line passes — horizontal then vertical (a crosshatch pattern) — across a section no larger than 2 feet by 2 feet. Do not apply in circular motions. You will notice the coating begin to "rainbow" or show a slight iridescent sheen after 30–90 seconds, depending on temperature. This is your signal to buff.
Using a clean, plush microfiber towel, gently buff off the coating with light pressure before it fully flashes. Flip to a fresh side of the towel frequently. Use a second dry microfiber to follow up and level the surface. Shine an LED light at a low angle to check for high spots — these appear as smeared, hazy patches. If you catch them early, a quick buff with a fresh towel removes them. High spots that cure completely require machine polishing to remove.
Work your way around the car panel by panel: roof → hood → trunk → doors → bumpers. Coat glass and plastic trim last if your product supports those surfaces.
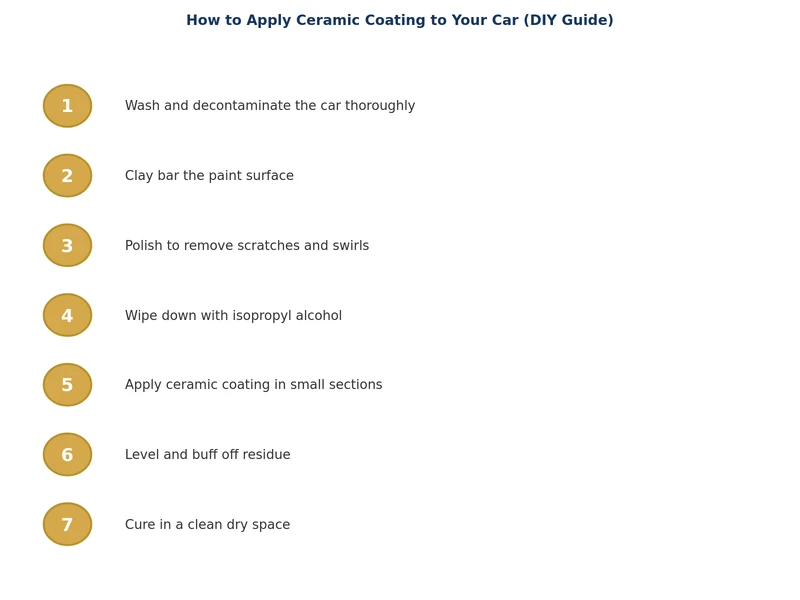
Once applied, the coating enters its initial cure phase. During the first 24 hours, keep the car completely dry. Do not drive in rain, park under trees, or allow water of any kind to contact the surface. Many coatings reach 70–80% hardness in 24–48 hours but continue curing for 2–4 weeks to full hardness.
After the initial cure window, the coating is fully bonded and the hydrophobic effect will be dramatic — water sheets off instantly and the gloss depth looks noticeably richer.
Ceramic coating dramatically reduces the time and effort needed to keep your car clean, but it still requires regular washing. Dirt and fallout can accumulate on top of the coating and diminish its hydrophobic properties if left too long.
With proper care, a DIY ceramic coating easily lasts 1–3 years. When the water beading starts to diminish noticeably, it's time to reapply or top up with a spray sealant.
Even experienced detailers can trip up on ceramic coating application. Here are the most common errors:
Yes. Most DIY ceramic coating kits require only an applicator block and microfiber towels. The key is thorough surface preparation — washing, claying, and an IPA wipe-down — which any home detailer can do. A dual-action polisher helps if you need to correct paint first, but it isn't mandatory on newer, swirl-free paint.
Most consumer-grade ceramic coatings last 1–3 years with proper maintenance. Durability depends on product quality, surface preparation, application technique, and how often the car is washed. Applying a ceramic spray booster every few months extends the coating's hydrophobic performance significantly.
Yes. Clay barring removes bonded contaminants — iron particles, tar, industrial fallout — that washing alone cannot remove. If these contaminants are left under the coating, the bond is weaker and the surface will feel rough even after coating. Always clay bar as part of the prep process.
High spots occur when the coating cures before you buff it off. If caught within a few minutes, additional buffing with a clean microfiber usually removes them. Fully cured high spots require machine polishing to level. Always work in small sections and use an LED inspection light to catch them early.
No. Wax, sealants, and polish oils must be completely removed before applying ceramic coating. An IPA wipe-down or dedicated panel wipe solution strips these residues. Coating over wax prevents proper chemical bonding to the clear coat, significantly reducing durability and protection.
Absolutely. Daily drivers benefit most from ceramic coating because they accumulate dirt, UV exposure, and environmental fallout constantly. The hydrophobic properties make washing faster and easier, and the UV protection helps prevent clear coat fade and oxidation over years of regular use.
 |
 |
 |
 |
About Joshua Thomas
Joshua Thomas just simply loves cars and willing to work on them whenever there's chance... sometimes for free.
He started CarCareTotal back in 2017 from the advices of total strangers who witnessed his amazing skills in car repairs here and there.
His goal with this creation is to help car owners better learn how to maintain and repair their cars; as such, the site would cover alot of areas: troubleshooting, product recommendations, tips & tricks.
Joshua received Bachelor of Science in Mechanical Engineering at San Diego State University.
Get some FREE car parts & gear.. Or check out the latest free automotive manuals and build guides here.
Disable your ad blocker to unlock all the hidden deals. Hit the button below 🚗
| | | |