by Joshua Thomas
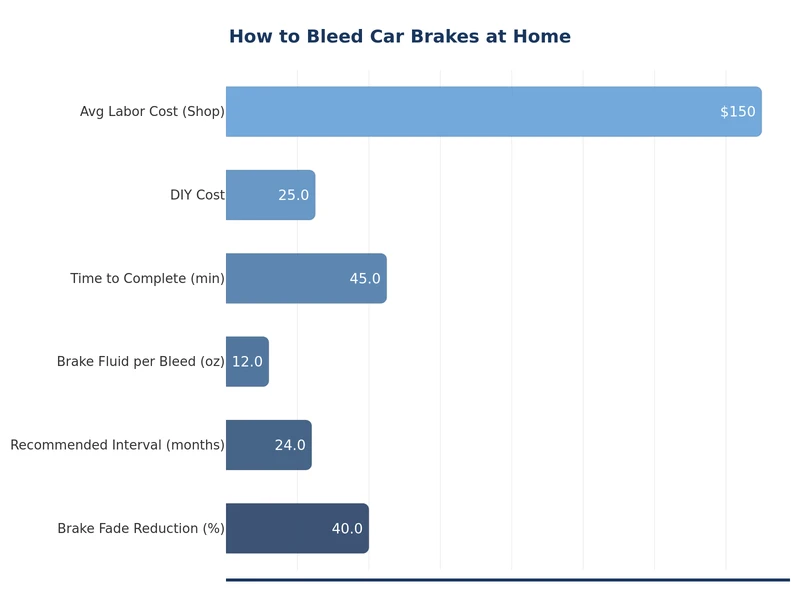
A soft, spongy brake pedal is a clear sign that air has crept into your brake lines. Knowing how to bleed car brakes at home is a practical skill that restores firm pedal feel, improves stopping power, and saves you a shop visit. With the right tools and a methodical approach, most home mechanics can complete the job in under two hours. Before you start, it pays to understand your current fluid condition — read our guide on how to check brake fluid to assess quality and reservoir levels first.
Bleeding brakes removes both trapped air bubbles and degraded fluid in one step. Air is compressible; brake fluid is not. Any air in the lines creates that mushy pedal feel where the pedal has to travel farther before the brakes engage. Fresh fluid and bubble-free lines put that firm, confidence-inspiring pedal back under your foot.
Contents
Brake fluid is hygroscopic — it absorbs moisture from the air over time. As water content rises, the fluid's boiling point drops significantly. Under repeated hard braking, degraded fluid can boil inside the calipers, producing vapor bubbles that compress just like air and cause temporary brake fade. According to the National Highway Traffic Safety Administration (NHTSA), brake system condition is a primary factor in crash avoidance performance. Bleeding replaces compromised fluid and purges air simultaneously, restoring the hydraulic integrity the system depends on.
Having everything ready before you open the system prevents interruptions that let air in. The list is short and inexpensive.
| Tool / Material | Purpose | Approx. Cost |
|---|---|---|
| Brake fluid (correct DOT spec) | Replaces old fluid during bleed | $8–$15 |
| Clear plastic tubing (1/4 in. ID) | Lets you watch fluid flow and bubbles | $3–$6 |
| Catch bottle or jar | Collects expelled fluid safely | $2–$5 |
| Box-end wrench (8 or 10 mm) | Opens and closes bleeder screws | $10–$20 |
| Turkey baster or syringe | Removes old fluid from reservoir | $3–$8 |
| Jack stands (pair) | Supports the vehicle safely | $30–$60 |
| Wheel chocks | Prevents rolling during work | $10–$15 |
| Nitrile gloves + rags | Brake fluid strips paint on contact | $5–$10 |
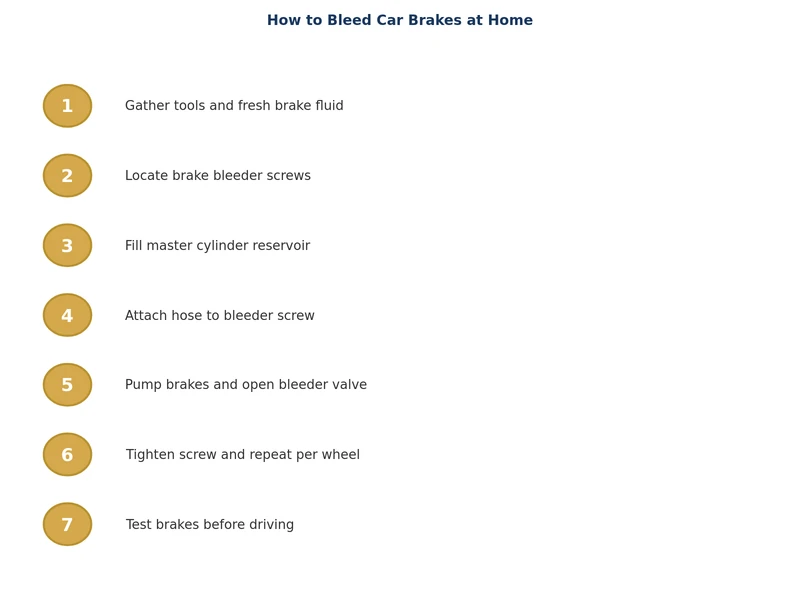
Park on a level, hard surface. Apply the parking brake and place wheel chocks behind the rear tires. Loosen the wheel lug nuts a half-turn before lifting the car. Use a floor jack to raise the vehicle, then support it on jack stands at the manufacturer's designated lift points — never work under a car supported only by a hydraulic jack. Remove the wheels to expose the calipers and bleeder screws.
Remove the master cylinder reservoir cap and use a turkey baster to extract as much old, dark fluid as possible. Refill with fresh fluid matching the DOT rating printed on the cap. Keep the cap loosely placed (not fully seated) throughout the job to reduce air exposure, and top off the reservoir after finishing each wheel — letting it run dry is the most common mistake made when bleeding brakes at home.
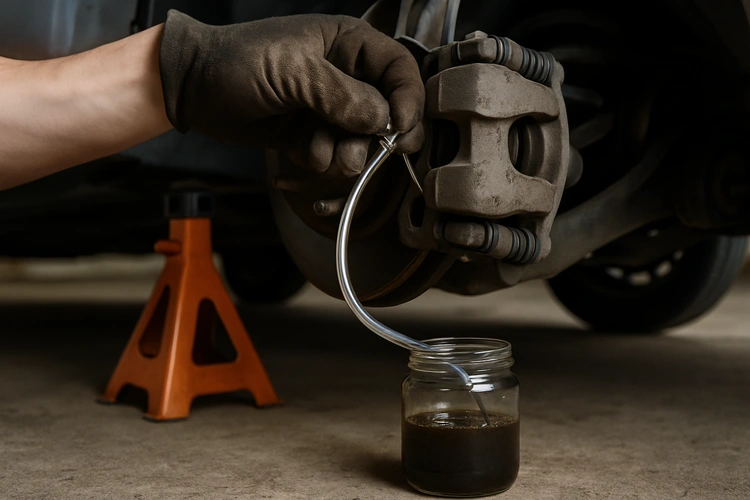
Each wheel's caliper or wheel cylinder has a bleeder screw — a small nipple with a rubber dust cap. Remove the dust cap and clean the area with a rag. Fit a box-end wrench over the screw (avoid open-end wrenches, which round off the soft brass). Push one end of the clear plastic tubing snugly over the nipple and submerge the other end in your catch bottle with a small amount of fresh fluid covering the tube tip. This fluid seal prevents air from being drawn back into the line when you close the screw.
Always bleed from the caliper farthest from the master cylinder to the closest. On most vehicles the sequence is: right rear → left rear → right front → left front. Some manufacturers specify a different order, so confirm in your owner's manual. Skipping around traps air closer to the master cylinder and forces you to repeat the process.
With a helper in the driver's seat, instruct them to pump the brake pedal slowly three times, then hold firm pressure on the third stroke. While they hold: crack the bleeder screw a quarter turn. Fluid and any trapped air bubble out through the tube. Watch the clear tubing for bubbles. Once flow slows, tighten the bleeder screw before telling your helper to release the pedal — releasing while the screw is open pulls air back into the line and undoes your work. Repeat this cycle at each wheel until fluid runs clear and bubble-free. Refill the reservoir each time.
Reinstall wheels and torque lug nuts to spec in a cross (star) pattern. Lower the car, then sit in the driver's seat and pump the pedal repeatedly until it feels firm — it will be soft initially as the system re-pressurizes. Test braking at slow speed in a safe area before driving normally. A pedal that remains spongy after two full bleed cycles indicates a leak or air entering through a cracked hose.
A hand-operated vacuum bleeder kit attaches to the bleeder screw nipple and draws fluid through without a second person. It's convenient, but screw threads can leak air around them, creating misleading bubbles in the tube. Wrapping the screw threads with PTFE tape before attaching the tool usually solves this. Check the catch bottle frequently and keep the reservoir topped off, since vacuum bleeding moves fluid quickly.
A pressure bleeder replaces the reservoir cap with a pressurized adapter. You pump it to about 10–15 PSI, then open each bleeder screw in sequence and let fluid push through on its own. It's the fastest method, works solo, and is what most professional shops use. Pressure bleeder kits cost $30–$80 and are a worthwhile investment if you maintain multiple cars. Just never exceed the cap's rated pressure — too much can damage reservoir seals.
Running the reservoir dry introduces air into the master cylinder bore, which may require bench-bleeding the master cylinder separately — a much more involved procedure. Check the reservoir after every single wheel.
Using the wrong fluid is a serious mistake. DOT 3 and DOT 4 are glycol-based and are compatible with each other in a pinch. DOT 5 is silicone-based and is not interchangeable with DOT 3/4 systems. Mixing them damages rubber seals. Always match what is printed on your reservoir cap.
Overtightening bleeder screws strips the soft brass threads. Snug them to around 8–10 ft-lbs — firm fingertight is sufficient. If a screw is corroded and seized, soak it with penetrating oil for 15 minutes before attempting to turn it.
Ignoring paint protection — brake fluid dissolves automotive clear coat almost instantly. Wipe spills immediately with water. If your paint needs attention afterward, our guide on how to decontaminate car paint before polishing walks through removing contaminants safely.
Brake bleeding is not strictly mileage-based — it's condition-based. Bleed your brakes when you notice any of the following:
Brake system health is one component of a broader maintenance routine. Pairing brake bleeds with other fluid services keeps everything on schedule — see our complete car maintenance schedule for a mileage-based checklist covering all major systems. And if you are simultaneously tackling drivetrain maintenance, our guide on how to replace a serpentine belt is a natural companion job while the wheels are already off.
Most manufacturers recommend bleeding brakes every two to three years or whenever fluid appears dark and contaminated. Performance or track-driven vehicles benefit from annual bleeding because high heat degrades fluid faster. Always bleed after any hydraulic brake component replacement regardless of the time interval.
Yes. Both vacuum bleeding and pressure bleeding methods are designed for solo use. A vacuum bleeder kit draws fluid through when you open the screw, while a pressure bleeder pushes fluid from the reservoir. Either method works well at home and eliminates the need to coordinate pedal timing with a second person.
Not always — pad replacement alone does not open the hydraulic system, so air cannot enter. However, when you retract the caliper piston to fit new pads, you push old fluid back into the reservoir. It is good practice to flush with fresh fluid at the same time, which requires a bleed. If the fluid is already clean, you can skip it.
When fluid flowing through the clear tubing shows no bubbles at all and runs a consistent, clean color, the line is clear of air. The definitive test is pedal feel: a firm, high pedal with no sponginess after pumping confirms a properly bled system. If softness persists, inspect for leaks at fittings and hose connections.
DOT 3 and DOT 4 are both glycol-ether based and are technically compatible in an emergency top-off situation. However, mixing dilutes the higher-performing fluid's boiling point advantage. For a full bleed, use a single fluid type throughout — whichever the manufacturer specifies on the reservoir cap. Never mix either with DOT 5, which is silicone-based and incompatible with standard brake seals.
With the two-person pedal method, expect 45 to 90 minutes for all four wheels once the car is jacked up and wheels are removed. Vacuum and pressure methods are slightly faster since you do not need to coordinate pedal pumping. First-timers should budget closer to two hours to allow for setup, reservoir checks, and going slowly at each bleeder screw.
 |
 |
 |
 |
About Joshua Thomas
Joshua Thomas just simply loves cars and willing to work on them whenever there's chance... sometimes for free.
He started CarCareTotal back in 2017 from the advices of total strangers who witnessed his amazing skills in car repairs here and there.
His goal with this creation is to help car owners better learn how to maintain and repair their cars; as such, the site would cover alot of areas: troubleshooting, product recommendations, tips & tricks.
Joshua received Bachelor of Science in Mechanical Engineering at San Diego State University.
Get some FREE car parts & gear.. Or check out the latest free automotive manuals and build guides here.
Disable your ad blocker to unlock all the hidden deals. Hit the button below 🚗
| | | |