by Joshua Thomas
Getting a flat tire is one of those situations every driver will face eventually. Knowing how to change a flat tire can save you time, money, and stress — whether you're stranded on the highway or sitting in an empty parking lot. This step-by-step guide covers everything you need: the tools, the process, and the safety precautions to get you back on the road without calling for a tow. Before you need it, make sure your trunk is stocked and your spare is in good shape.
Changing a tire is not complicated, but skipping steps or rushing can lead to dangerous results. Follow this guide carefully and you'll handle the job with confidence.
Contents
Before you attempt to change a flat, confirm you have everything on hand. Most vehicles come with a jack and lug wrench stored under the trunk floor or beneath the cargo area — check your owner's manual for the exact location.
A rain poncho, a small block of wood to stabilize the jack on soft ground, and a tire pressure gauge are all worth keeping in your emergency kit. These extras can make a roadside change faster and safer, especially in bad weather or on an unpaved shoulder.
This is the core process. Work through each step in order — rushing or skipping steps is how accidents happen.
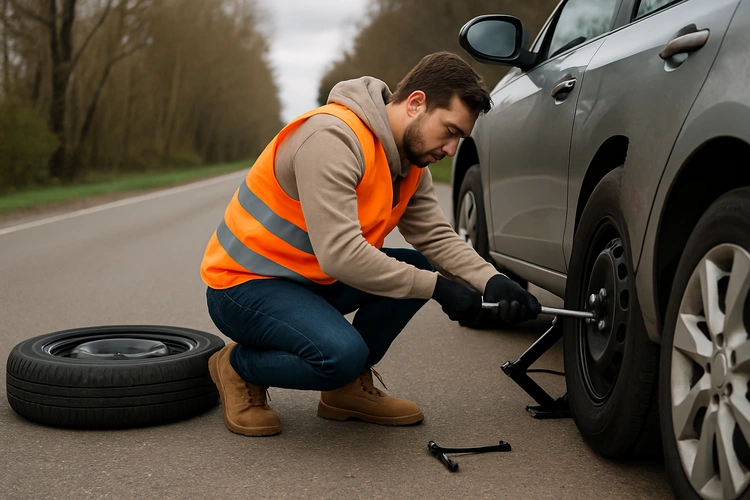
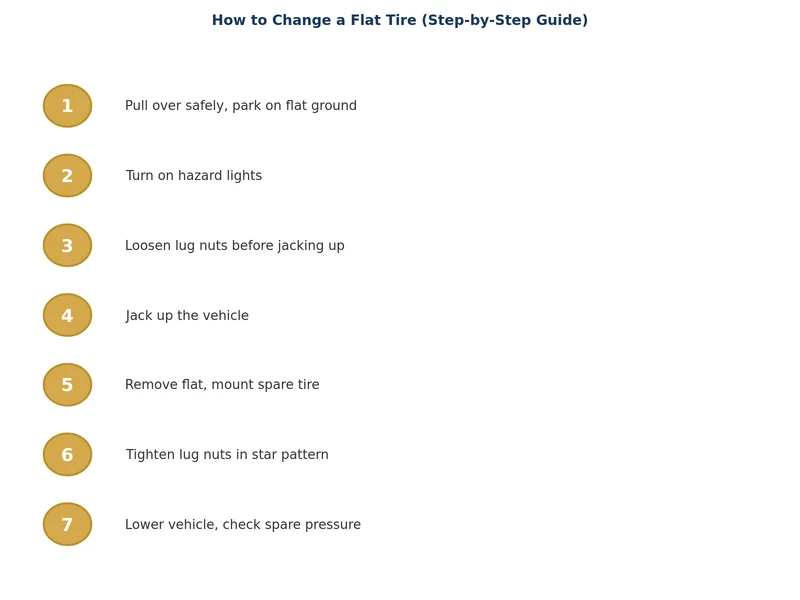
The moment you feel or hear a flat, grip the wheel firmly and slow down gradually — don't brake hard. Pull as far off the road as possible onto a flat, stable surface. Avoid stopping on soft ground, hills, or curves. Turn on your hazard lights immediately and set out reflective triangles or flares at least 50 feet behind the vehicle.
Shift into park and apply the parking brake. Place wheel wedges or large rocks against the tires on the opposite end of the car. If the flat is on a rear tire, chock the front tires — and vice versa. This prevents rolling while the vehicle is raised.
Before jacking the car up, use the lug wrench to break the lug nuts loose — turn counterclockwise, one half-turn each. Do not remove them yet. Loosening while the tire is still on the ground uses the tire's resistance and is far easier than fighting them in the air.
Consult your owner's manual to locate the vehicle's jack points — reinforced sections along the frame specifically designed to bear load. Placing the jack in the wrong spot can crack the vehicle's body or cause a dangerous collapse. Our guide on how to use a car jack covers proper positioning in detail. Raise the jack until the flat tire is about six inches off the ground. Never place any body part under a vehicle supported only by a floor jack.
Remove the lug nuts completely and keep them in a pocket or cup. Pull the flat tire straight toward you and set it aside. Lift the spare, align the bolt holes with the wheel studs, and push it flush against the hub. Thread the lug nuts by hand in a star (crisscross) pattern — this ensures the wheel seats evenly and avoids warping the rotor.
Lower the jack until the spare just contacts the ground but the full vehicle weight is not yet on it. Tighten the lug nuts fully with the wrench in the same star pattern. Lower the jack completely and remove it. Give each lug nut one final tighten. Check the spare's pressure with a gauge before driving — the correct PSI is listed in your owner's manual and on the door jamb sticker.
Not all spare tires are the same. Understanding what type of spare your vehicle carries helps you drive safely after the swap.
| Spare Type | Max Speed | Max Distance | Replaces Regular Tire? |
|---|---|---|---|
| Compact Donut | 50 mph | ~50 miles | No — temporary only |
| Full-Size Spare | Normal | Normal use | Yes — until repaired |
| Run-Flat Tire | 50 mph | ~50 miles | No — needs inspection |
| Inflatable Sealant Kit | 55 mph | ~100 miles (varies) | No — punctures only |
Compact spares — often called "donuts" — are the most common type in passenger vehicles. They are not designed for highway speeds or extended driving. If you're not sure what type of spare you have, check the sidewall markings or your owner's manual before you need it. Reviewing tire wear patterns regularly is also a good way to catch deteriorating tires before a blowout forces the issue.
According to the National Highway Traffic Safety Administration (NHTSA), tire-related crashes injure thousands of drivers each year — many while attempting roadside repairs. Always keep hazard lights on. At night, wear light-colored clothing and use a flashlight. Set flares or reflective triangles well behind the vehicle on both sides if available.
If the flat occurs in heavy traffic, on a bridge, or in any location where you cannot safely step outside the vehicle, do not attempt the change. Stay in your car with your seatbelt on, turn on hazards, and call roadside assistance. No tire is worth risking your life over.
Drive to a tire shop as soon as possible. Many flats caused by nails or small screws can be repaired inexpensively — often for under $30. Sidewall damage, however, is not repairable and the tire must be replaced. Don't delay; driving without a spare leaves you completely exposed if another tire fails.
After driving 50 to 100 miles on the newly mounted tire, have the lug nuts re-torqued to the manufacturer specification with a calibrated torque wrench. Lug nuts can loosen slightly as the wheel fully seats against the hub, and proper torque prevents dangerous wheel separation.
Check your spare tire's pressure monthly — spares lose air over time even in storage. If you swap tires seasonally, it's a good opportunity to confirm the spare is road-ready. Our guide on how to store tires properly covers best practices for keeping both seasonal sets and spares in optimal condition.
Replace any used items — flares, gloves, or wedges — before your next trip. A flat tire emergency kit is only useful if it's complete when you need it.
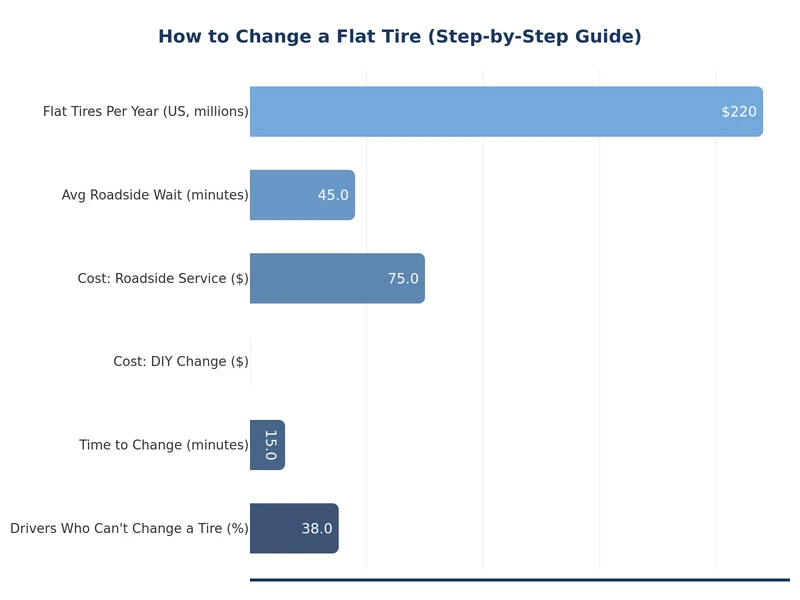
Yes. With the right tools and this step-by-step guide, most drivers can change a flat tire on their own. The process takes 15 to 30 minutes. The most important things are finding a safe location, securing the vehicle before jacking it, and tightening lug nuts in a star pattern.
For someone doing it for the first time, expect 20 to 30 minutes. An experienced driver can complete the job in 10 to 15 minutes. Having your tools organized and accessible beforehand makes the biggest difference in speed.
A compact spare is safe for short distances at reduced speeds — typically no more than 50 miles at 50 mph or slower. Do not use it on the highway for extended travel, and avoid using it in wet or icy conditions if possible. Get the original tire repaired or replaced as soon as you can.
Some newer vehicles come with a tire inflator and sealant kit instead of a spare. These kits can seal small punctures and reinflate the tire temporarily, but they won't work on sidewall damage or large holes. If your car has run-flat tires, you can drive a limited distance to a service center without a spare.
Check your spare tire pressure at least once a month, as spares lose air over time even when unused. The correct PSI is printed on the tire sidewall and in your owner's manual. A flat spare discovered roadside is a frustrating and preventable problem.
In many cases, yes. Punctures in the tread area smaller than a quarter inch can typically be patched by a tire shop for a modest fee. Damage to the sidewall, large tears, or multiple punctures usually require full replacement. Always have a professional assess the tire before deciding.
 |
 |
 |
 |
About Joshua Thomas
Joshua Thomas just simply loves cars and willing to work on them whenever there's chance... sometimes for free.
He started CarCareTotal back in 2017 from the advices of total strangers who witnessed his amazing skills in car repairs here and there.
His goal with this creation is to help car owners better learn how to maintain and repair their cars; as such, the site would cover alot of areas: troubleshooting, product recommendations, tips & tricks.
Joshua received Bachelor of Science in Mechanical Engineering at San Diego State University.
Get some FREE car parts & gear.. Or check out the latest free automotive manuals and build guides here.
Disable your ad blocker to unlock all the hidden deals. Hit the button below 🚗
| | | |