by Diego Ramirez
About 30% of differential failures trace directly to neglected or degraded fluid — not mechanical damage from accidents or abuse. That one number should reshape your maintenance priorities. Knowing how to change differential fluid is one of the highest-impact drivetrain services most owners never do. If you're already following a solid car maintenance schedule, adding this service puts you well ahead of the curve. Differential fluid handles extreme-pressure hypoid gear contact, absorbs heat cycles, and picks up metal particles over time — and when it breaks down, gear wear accelerates fast.
The differential sits between your drive wheels and allows each to spin at independent speeds through cornering. Hypoid gears inside generate intense sliding contact forces that standard engine oil cannot survive. The lubricant carrying EP (extreme-pressure) additives is the only thing preventing metal-on-metal wear at those load levels. When that fluid degrades, so does everything inside the housing.
Contents
The differential is a gearset housed inside a cast-iron or aluminum carrier. It splits engine torque between two output shafts while allowing each to rotate at independent speeds. The hypoid gears inside create a sliding contact geometry that generates far more pressure than straight-cut spur gears. Only gear oil loaded with EP additives can survive those contact conditions without film breakdown.
Without the right fluid at adequate viscosity, gear surfaces begin wearing metal-to-metal. Heat builds in the housing. The clutch pack in a limited-slip unit loses its ability to transfer torque correctly. The fluid isn't a lifetime fill — it absorbs heat cycles, accumulates metallic particulate, and eventually becomes an accelerant for the very wear it's supposed to prevent.
Your differential type determines which fluid spec applies and how critical the service interval becomes.
You don't always need to wait for a scheduled interval. These symptoms indicate the fluid needs attention immediately:
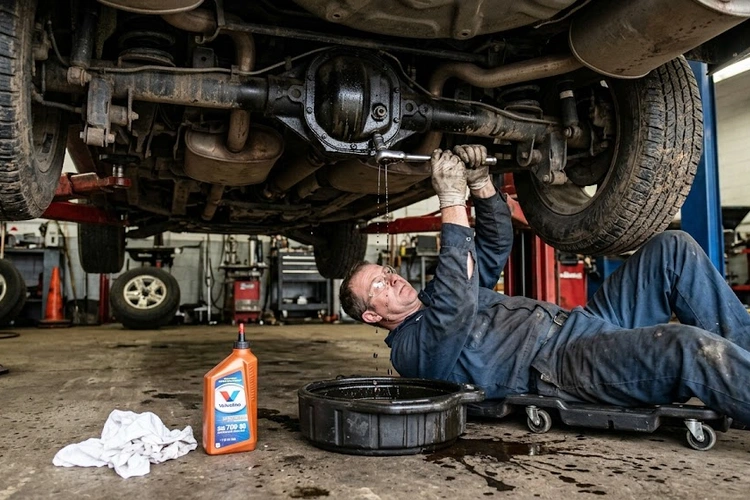
Checking fluid level takes about ten minutes. Most differentials don't have a dipstick — you access the fluid through a fill plug on the side of the carrier. Remove the plug and the fluid should be level with the bottom edge of the fill hole. If it drips out when the plug comes free, the level is correct. If you insert your finger and can't reach fluid, the level is low and needs topping off before you go any further.
Check when the axle is cold or barely warm. Hot fluid expands and can give a misleadingly high reading at the plug. Always position the vehicle on level ground when you check.
Fresh gear oil is amber to dark brown and slightly viscous. Degraded fluid tells a different story depending on the failure mode:
The drain-and-fill process is linear and straightforward on most rear-wheel-drive trucks and SUVs. Front differentials on 4WD vehicles and transaxle-mounted units on AWD platforms follow the same logic but may require removing skid plates or subframe components for access. Plan an extra 30 minutes for those configurations. Fitting this service into a broader maintenance day — especially if you're also handling seasonal car maintenance before or after winter — makes the most of your time under the vehicle.
For clutch-type LSDs, friction modifier is not optional. Without it, clutch discs grab unevenly and produce the chirping or chattering you'll notice immediately on tight parking lot turns. Most GM, Ford, and Chrysler LSDs require a separate friction modifier added to the gear oil — typically 2–4 oz per quart. Some synthetic gear oils come pre-blended with LSD additive; check the label before adding more on top. Toyota and Honda differentials often require OEM-specified fluid rather than aftermarket blends, particularly on newer platforms. Mixing a generic synthetic with an OEM-spec unit can cause compatibility issues.
Choosing the wrong fluid doesn't just affect performance — it can accelerate wear, cause clutch damage, and void powertrain warranty coverage. The spec on the fill plug cap or in the service manual is the only reference that matters.
API GL ratings define the concentration and type of EP additives in the oil. GL-5 carries higher sulfur-phosphorus EP additive loads than GL-4, which makes GL-5 incompatible with yellow-metal components like brass and bronze. That's why manual transmissions with synchro rings typically specify GL-4, while differentials almost universally call for GL-5. Synthetic GL-5 extends service intervals and handles higher sustained temperatures — relevant for towing and off-road use.
| Fluid Type | API Rating | Common Viscosity | LSD Compatible | Best For |
|---|---|---|---|---|
| Conventional GL-5 | GL-5 | 75W-90, 80W-90 | With separate additive | Open differentials, light daily driving |
| Synthetic GL-5 | GL-5 | 75W-90, 75W-140 | With separate additive | Towing, performance, extended service intervals |
| Synthetic LSD GL-5 | GL-5 | 75W-90 | Yes (pre-mixed) | Clutch-type LSDs in most trucks and SUVs |
| GL-4 | GL-4 | 75W-90 | No | Manual transmissions, select European differentials |
| OEM-Specific | Proprietary | Varies by platform | Yes | Toyota, Honda, BMW, Jeep factory LSD units |
Thicker 75W-140 synthetic suits sustained high-load use — towing near max rated capacity or repeated off-road cycles. Standard 75W-90 covers most daily-driver and light-use scenarios. Always verify against your factory service manual before purchasing fluid.
A differential fluid change is one of the more DIY-accessible drivetrain services. But there are specific situations where bringing the vehicle to a shop is the better call — not because the job is complex, but because underlying conditions require proper diagnosis before you refill anything.
If you're already comfortable with oil changes and you have jack stands and a torque wrench, this service is within reach. Most rear differentials on trucks and body-on-frame SUVs have straightforward plug access and take 1–2 quarts of gear oil. The process is linear, the tools are minimal, and the margin for error is low as long as you don't over-tighten the plug or cross-thread it on reinstall.
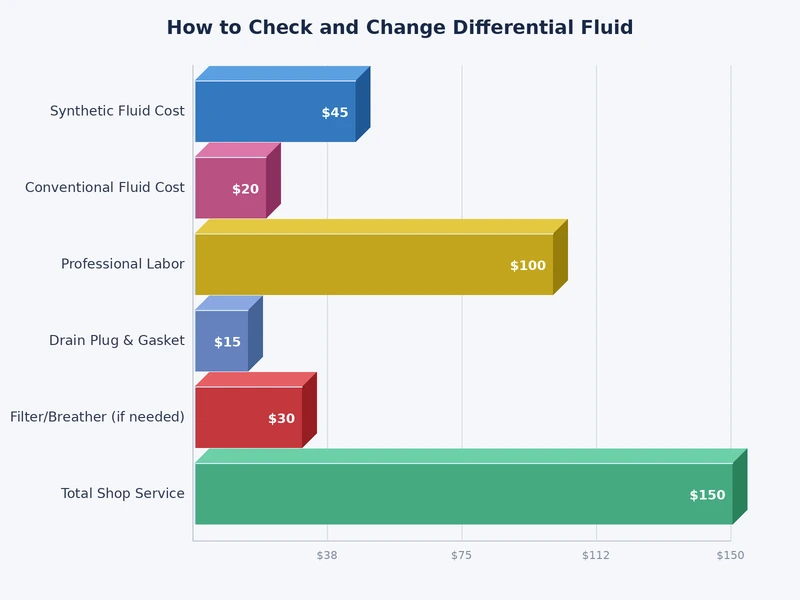
Shop labor for a differential fluid change typically runs $80–$150 depending on vehicle type and access difficulty. That's reasonable for complex configurations. For a straightforward rear axle on a truck, the DIY route gets the job done in under an hour at the cost of fluid and a new drain plug crush washer.
Interval recommendations vary significantly by manufacturer, fluid type, and operating conditions. The generic "every 30,000 miles" guideline is a reasonable baseline, but it's not universally accurate — and relying on it without context leads to both unnecessary services and genuine neglect.
Factory intervals for differential fluid typically fall between 30,000 and 60,000 miles for conventional gear oil, and 60,000 to 100,000 miles for full synthetic. These figures assume normal highway driving without extended high-load events. Condition-based triggers override mileage in the following situations:
If you tow near your vehicle's rated capacity on a regular basis, halve your differential service interval. Sustained high-load towing generates axle temperatures well above what normal highway driving produces. Conventional gear oil degrades faster under those conditions — synthetic holds up better but still needs more frequent monitoring. Switch to 75W-140 synthetic if you're consistently working the drivetrain hard.
For off-road use, water crossings are the primary concern. Even brief submersion above the axle centerline can push water past the axle breather tube and into the housing. After any crossing where water reached the axle, pull the fill plug and check fluid color before your next extended drive. Milky fluid means immediate change — driving on water-contaminated gear oil accelerates bearing and gear wear more than almost any other single failure mode.
Keeping your truck well-maintained at every level — from drivetrain fluids to the cab — helps you stay on top of what the vehicle actually needs. If you're doing mechanical service days, it's worth pairing this with interior work too; a guide on how to detail a truck interior covers exactly that kind of top-to-bottom truck upkeep.
Knowing how to change differential fluid — and actually doing it on schedule — separates proactive vehicle owners from reactive ones. Pull your service manual, confirm your fluid spec and LSD additive requirements, and get it done before the next time you're already under the vehicle. If you're running full synthetic, do a visual check at the fill plug every 30,000 miles regardless of your interval — it takes five minutes and can prevent a differential rebuild that runs $800 or more at a shop.
 |
 |
 |
 |

About Diego Ramirez
Diego Ramirez is a maintenance and care specialist who has been wrenching on cars since he was sixteen. He focuses on fluid changes, preventive care routines, paint protection, and the small habits that turn a five-year-old car into a fifteen-year-old car.
Get some FREE car parts & gear.. Or check out the latest free automotive manuals and build guides here.
Disable your ad blocker to unlock all the hidden deals. Hit the button below 🚗
| | | |