by Joshua Thomas
Engine oil problems account for a significant share of all catastrophic engine failures reported each year — the vast majority of which could have been avoided with a five-minute dipstick inspection. Knowing how to check engine oil level is one of the most practical skills any vehicle owner can have. It costs nothing, requires no professional training, and delivers real-time insight into one of the most critical systems in any car. For drivers already thinking about broader preventive care, keeping a car in good shape during hot weather starts with the same fundamental habit: monitoring fluids consistently.
Engine oil does more than lubricate. It carries heat away from moving components, suspends combustion byproducts, and maintains a protective film between metal surfaces spinning at thousands of revolutions per minute. When that film breaks down — due to low level, degraded quality, or contamination — internal engine wear accelerates fast. An oil change costs between $35 and $120. An engine replacement costs between $4,000 and $10,000. The math is straightforward.
This guide walks through the complete process: the supplies needed, the proper technique, how to interpret results, and how to build a consistent monitoring habit. Readers who want a deeper look at capacity and viscosity recommendations by vehicle type should consult the engine oil quantity guide for specifics.
Contents
One clear advantage of this maintenance task is its low barrier to entry. No hydraulic lift, no specialty tools, no formal training required. Most of what is needed is already in the average household or costs only a few dollars at any auto parts retailer.
The owner's manual is the single most authoritative reference for this task. It specifies the correct oil grade, the engine's total oil capacity (typically between four and eight quarts for most passenger vehicles), and the recommended change interval. Using the wrong viscosity — particularly in extreme temperature climates — can compromise oil flow at startup when engine protection is most critical.
The oil dipstick is a long, thin metal rod with a looped or T-shaped handle, almost always colored bright yellow, orange, or red. It sits in a narrow tube that runs down into the engine's oil pan. On most front-engine vehicles, it is positioned near the front or side of the block and easy to spot by its color contrast against the engine components.
Newer vehicles with turbocharged or transversely mounted (sideways) engines sometimes route the dipstick under plastic engine covers or to an awkward location near the firewall. In those cases, the owner's manual diagram identifying the engine bay layout saves guesswork. Note that fully electric vehicles have no engine oil and therefore no dipstick — oil-check procedures for those platforms differ entirely.
Pro tip: Do not confuse the engine oil dipstick with the transmission fluid dipstick — both may share similarly colored handles on some vehicles. The engine oil dipstick is typically labeled with an oil-can icon and is positioned closer to the center or front of the engine block.
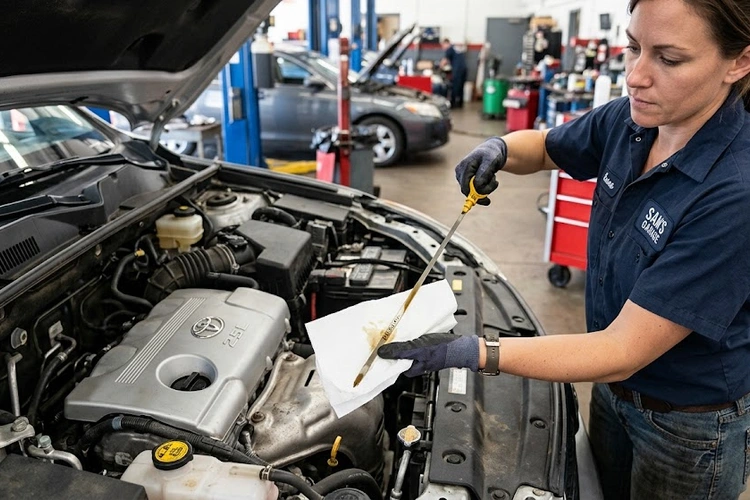
The procedure for how to check engine oil level is straightforward. Sequence matters, however. Checking immediately after shutdown, on a running engine, or on an inclined surface all produce unreliable readings that could lead to incorrect decisions about adding oil.
The position of the oil film on the dipstick communicates the engine's current status directly:
A sudden unexplained drop in oil level — with no obvious spill at the fill port — warrants further investigation. Drivers noticing spots or puddles beneath the vehicle can reference what an oil puddle under the car indicates to identify whether a gasket, drain plug, or oil cooler line is the likely source.
Even experienced vehicle owners sometimes get misleading dipstick results due to small procedural errors. The tips below address the most common issues observed by mechanics.
Warning: Overfilling engine oil by even a quart can cause the spinning crankshaft to whip the excess into foam — aerated oil cannot form a proper lubricating film and can cause wear patterns similar to running with critically low oil.
Fresh engine oil is typically amber or honey-colored. As it accumulates combustion byproducts and oxidizes, it darkens progressively to brown and then black. According to Wikipedia's motor oil overview, modern oil formulations include detergent and dispersant additives engineered specifically to hold contaminants in suspension — which is why darkening alone is not always an immediate indicator that a change is required.
Certain appearances, however, signal problems that go beyond a routine change:
A single oil check is useful. A consistent checking schedule is what actually protects an engine across tens of thousands of miles. A simple routine removes the dependency on memory and ensures that low levels are caught before they become expensive problems.
Recommended check frequency varies by vehicle age, driving conditions, and oil specification in use:
Many drivers tie oil checks to fuel fill-ups — once every two to three tanks is a natural trigger that requires no calendar reminder. The check engine light can illuminate in response to low oil pressure even when a vehicle feels normal to drive. Regular dipstick checks are among the simplest preventive steps to keep that warning from ever appearing.
All gasoline engines consume some oil — the question is whether consumption is stable or trending upward. A basic log makes this visible:
A consumption rate above roughly one quart per 1,000 miles is considered outside normal range for most passenger vehicles, though acceptable thresholds vary by manufacturer. Many automakers publish specific consumption limits in their service documentation. Vehicles exceeding those thresholds should be inspected for worn valve seals, piston rings, or PCV (positive crankcase ventilation) system failures.
The financial argument for consistent oil monitoring is clear. A five-minute dipstick check costs nothing in parts and negligible time. The engine repairs it prevents can reach into the thousands — or beyond, for catastrophic failures.
| Service Method | Typical Cost Range | Time Required | Skill Level Needed |
|---|---|---|---|
| Quick-lube chain (conventional oil) | $35–$60 | 20–30 min | None (drop-off) |
| Quick-lube chain (full synthetic) | $70–$120 | 20–30 min | None (drop-off) |
| Independent mechanic shop | $50–$100 | 30–60 min | None (drop-off) |
| DIY (conventional oil) | $20–$40 | 30–45 min | Beginner |
| DIY (full synthetic) | $40–$80 | 30–45 min | Beginner |
DIY oil changes require an upfront investment in a drain pan, oil filter wrench, and ramps or jack stands — a one-time outlay of roughly $40–$80 that pays back across multiple services. Drivers preparing to do their first DIY change should use the engine oil quantity guide to confirm the correct capacity before purchasing supplies, since overfilling during a DIY change is a common first-timer error.
Deferred oil maintenance rarely stays inexpensive. The repair cost ladder for oil-related engine damage climbs steeply:
Automakers and extended warranty providers routinely deny claims when documented maintenance neglect can be shown as a contributing factor to engine failure. A dated log of regular oil checks serves as evidence of proper care — practical protection that costs nothing to create beyond the habit of keeping records.
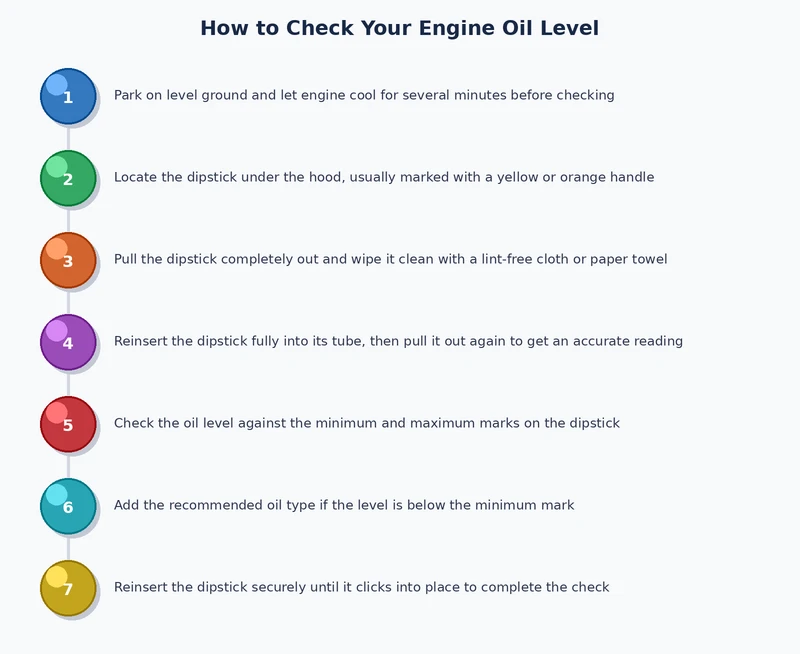
Most vehicles benefit from a dipstick check at least once a month, or every 1,000 to 3,000 miles — whichever comes first. Older or high-mileage engines typically consume more oil and warrant more frequent monitoring. Modern vehicles running full synthetic oil can stretch check intervals slightly, but a monthly inspection remains a sound baseline habit for any driver.
Checking immediately after shutdown is not recommended for precision. The most accurate readings come after the engine has been off for at least five to ten minutes, allowing oil to drain back into the pan from the upper engine components. Checking too soon can produce a reading that appears lower than the actual oil level in the pan.
Black oil does not automatically mean the oil has failed or that an immediate change is required. Engine oil darkens naturally as it accumulates combustion byproducts — a sign that the detergent additives are doing their job. However, oil that is extremely dark and carries a burnt odor may be overdue for service. Milky, frothy, or foamy oil is a more urgent warning that points to coolant contamination rather than normal darkening.
Adding too much oil causes the spinning crankshaft to contact the excess and whip it into foam. Aerated oil cannot form a proper lubricating film between metal surfaces, creating wear conditions similar to running critically low. If the dipstick reads above the MAX marker after adding oil, the excess should be drained before driving. Most shops will perform a drain procedure quickly and at low cost.
Oil should always be added in small increments — no more than half a quart at a time — followed by a full wipe-and-recheck of the dipstick. The gap between MIN and MAX on most dipsticks represents approximately one quart. Pouring a full quart when only a partial top-up is needed is one of the most common causes of DIY overfill. Multiple small additions are far safer than a single large pour.
Yes. Some engines consume measurable amounts of oil through normal combustion, particularly at higher mileage. This oil passes the piston rings or valve seals and burns in the combustion chamber, exiting through the exhaust without leaving puddles on the ground. If consumption consistently exceeds roughly one quart per 1,000 miles, a mechanic should inspect the piston rings, valve seals, and PCV (positive crankcase ventilation) system for wear or failure.
Oil type — conventional, synthetic blend, or full synthetic — primarily affects how long the oil remains usable before a change is needed, not how quickly the level drops between checks. Full synthetic oil does not prevent leaks or consumption. Monthly dipstick checks are advisable regardless of which oil specification is in use. Regular monitoring is a habit independent of oil type or change interval.
Checking engine oil level is among the highest-return maintenance habits any vehicle owner can develop — and one of the lowest-effort ones to start. Drivers who build a consistent monthly routine around the dipstick are statistically far less likely to face the expensive consequences of oil starvation, contamination, or undetected leaks. Pull out the dipstick today, note the level and color, record the mileage, and set a reminder for the next check. That five minutes of attention is, without exaggeration, one of the best investments in any engine's long-term health.
 |
 |
 |
 |
About Joshua Thomas
Joshua Thomas just simply loves cars and willing to work on them whenever there's chance... sometimes for free.
He started CarCareTotal back in 2017 from the advices of total strangers who witnessed his amazing skills in car repairs here and there.
His goal with this creation is to help car owners better learn how to maintain and repair their cars; as such, the site would cover alot of areas: troubleshooting, product recommendations, tips & tricks.
Joshua received Bachelor of Science in Mechanical Engineering at San Diego State University.
Get some FREE car parts & gear.. Or check out the latest free automotive manuals and build guides here.
Disable your ad blocker to unlock all the hidden deals. Hit the button below 🚗
| | | |