by Diego Ramirez
Ever reached into your cup holder and pulled your hand back sticky? That moment of disgust is entirely avoidable. Knowing how to clean car cup holders — and the surrounding center console — takes less than 30 minutes and transforms how your interior looks and feels. This guide covers the right tools, the correct technique, what it actually costs, and when it makes sense to hand the job to a professional.
Cup holders and center consoles are the hardest-working surfaces in any vehicle. They collect spilled coffee, crumbled snacks, loose change, and skin oils every single day. Left alone, that residue hardens, stains, and starts to smell. Whether you're doing routine upkeep or detailing your car before a sale, a clean console signals that the vehicle has been cared for. First impressions start with what the driver touches most.
Contents
Before you touch a surface, gather your supplies. Using the wrong tools on plastic trim or rubber cup inserts causes scratches, surface hazing, or accelerated fading. The right gear makes the job faster, safer, and more effective from the first pass.
You don't need a professional kit to get excellent results. A microfiber cloth is non-negotiable — it lifts grime without scratching. A soft-bristle detailing brush or an old toothbrush handles the ribbed walls of cup holder wells and the gaps around button clusters. A small flathead screwdriver wrapped in a cloth clears out the seam where the cup holder meets the console panel.
For cleaning solution, a diluted all-purpose cleaner (APC) at roughly a 5:1 water-to-cleaner ratio is a solid starting point for most plastic surfaces. If your center console has leather or leatherette trim, use a pH-balanced leather cleaner instead. Avoid bleach, ammonia-based products, or strong solvents on any interior plastic — they cause clouding and brittleness over time. For a broader look at surface-specific interior products, the full car interior detailing guide covers each material type in depth.
A handheld vacuum with a crevice attachment cuts the debris-removal phase to under two minutes. Foam detailing swabs — the kind sold for electronics cleaning — are ideal for cup holder seams and button edges. Silicone cup holder liners, available for under $10, are worth every cent. They catch drips before they reach the well and pop out for easy rinsing. None of these are required, but each one makes routine maintenance noticeably faster.
The most common mistake is spraying cleaner directly into cup holders. Liquid pools at the bottom and can seep under trim panels or reach wiring beneath. Always apply your solution to the cloth or brush first — never to the surface directly. This single habit prevents most cleaning-related interior damage.
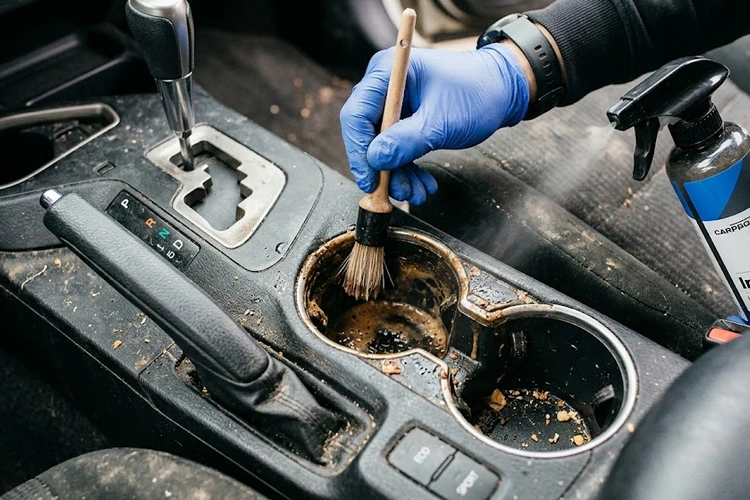
Start completely dry. Use a crevice tool to vacuum out crumbs, grit, and loose debris. If the cup holder has a removable insert — most modern vehicles use silicone or rubber liners — pull it out before doing anything else. Soak it in warm soapy water for five minutes, scrub with a brush, and rinse under a faucet. Cleaning these separately is far easier than scrubbing in a confined well.
For the console lid and surrounding panels, a quick dry-brush pass removes dust from vents and seams before any liquid is introduced. This step prevents turning dry, loose dust into a muddy smear — a mistake that adds cleaning time rather than saving it.
Dampen your detailing brush with diluted APC. Work it in a circular motion along the walls of the cup holder well, paying close attention to the ridges and ribs at the base — these accumulate the densest buildup. Wipe the loosened grime away with a microfiber cloth. Repeat the process until the cloth comes back clean.
Stubborn sticky residue from dried soda, energy drinks, or coffee responds well to a slightly stronger APC concentration or a dedicated interior spot cleaner. Let the solution dwell for 30 seconds before agitating. For persistent odors from old spills, an enzyme-based cleaner breaks down the organic source rather than masking it. The same enzyme approach works well for the broader odor issues covered in this guide on removing pet odor from car interiors.
Always work from the least aggressive cleaner first. Escalating to stronger solutions when needed protects your trim and prevents accidental discoloration on sensitive plastics.
The console lid, armrest, gear selector surround, and side panels are touched hundreds of times per week. They accumulate skin oils, sunscreen residue, and food grease at a rate that's easy to underestimate. Wipe these surfaces with a damp microfiber cloth and your APC solution. Pay extra attention to button gaps and the edges of the gear shift boot — these areas trap debris that accelerates wear on the surrounding trim.
Empty the storage compartment completely before cleaning the interior bottom. The corners collect fine grit that acts like sandpaper against stored items. For a full interior refresh session, pair this task with cleaning your car's trunk and storage areas — the methods transfer directly. Also clean the car speakers nearby while supplies are out; it keeps the session efficient.
After cleaning, apply a non-greasy interior dressing to plastic surfaces. It restores a matte or satin finish and adds a light layer of UV protection. Avoid dressings that leave a shiny or oily film — they attract dust rapidly and make frequently touched surfaces feel unpleasant. Excess interior moisture from wet cleaning can also contribute to fogging; the fix is covered in this article on preventing car windows from fogging up inside.
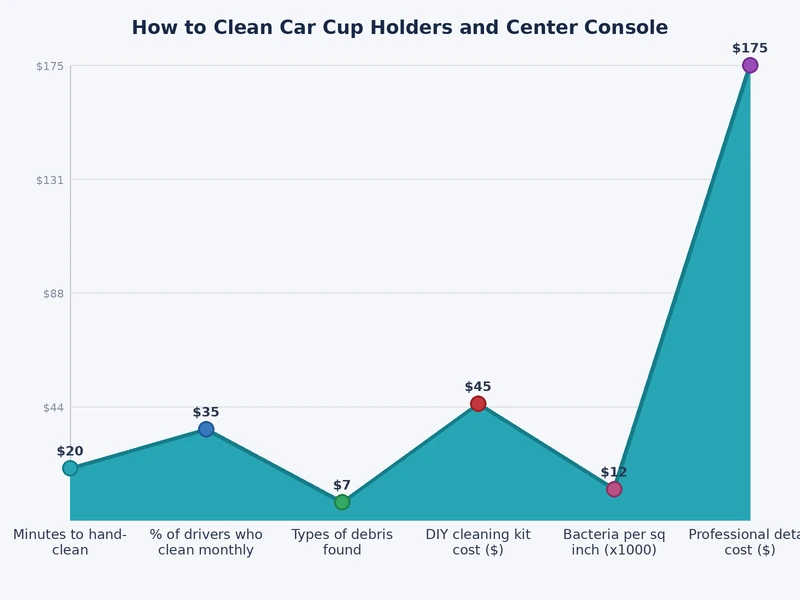
Cleaning cup holders and the center console is one of the most cost-effective interior maintenance tasks available. Here's a realistic breakdown of what each approach actually costs.
| Item | Estimated Cost | Notes |
|---|---|---|
| All-purpose cleaner (16 oz) | $8–$14 | Dilute 5:1 for interior plastic |
| Microfiber cloths (6-pack) | $10–$18 | Reusable; machine wash after use |
| Detailing brush set | $8–$20 | Soft-bristle; doubles for vents and trim |
| Interior dressing (8 oz) | $10–$16 | Matte finish recommended for consoles |
| Silicone cup holder liners | $6–$12 | Removable; protects original trim |
| Handheld vacuum (optional) | $25–$60 | One-time purchase; speeds up every session |
| Total (first-time setup) | $42–$80 | Supplies cover 15–25 cleaning sessions |
After the initial investment, each session costs almost nothing. Your supplies stretch across months of regular use. According to Consumer Reports, consistent interior upkeep ranks among the highest-return activities for preserving long-term vehicle value.
A full interior detail from a professional shop typically runs $100–$250 depending on vehicle size and condition. This usually includes vacuuming, surface wipe-down, and treatment of all interior materials. A focused console and cup holder service as a standalone add-on costs $20–$45 at most shops. If you're preparing a vehicle for a buyer, professional detailing can return several hundred dollars in perceived value — the full rationale is outlined in this guide to preparing a car for sale.
Both approaches have real merits. Your best choice depends on the severity of the contamination, how much time you have, and what standard you're cleaning to.
For routine maintenance — cleaning cup holders every two to four weeks — DIY is the clear choice. You control the products, the pressure, and the schedule. You can address a spill within hours rather than waiting for a shop appointment. You also develop hands-on familiarity with your vehicle's interior materials, which helps you catch early signs of wear or damage before they worsen.
Batching tasks amplifies the value further. Cleaning cup holders and the console while you condition door weatherstripping turns two short jobs into one efficient session. Most people find that a full interior refresh, done this way, takes under an hour.
Years of neglected buildup is a strong case for professional intervention. A professional has access to steam extractors and commercial-grade degreasers that outperform anything in a consumer kit. Mold or mildew — common after a cabin flood or a forgotten wet umbrella — warrants professional treatment, not DIY guesswork.
High-end vehicles with piano black trim, soft-touch plastics, or genuine leather consoles also benefit from professional care. The margin for error on these materials is narrow. The same logic applies when detailing a classic car — when the surfaces are irreplaceable, expertise is worth the cost.
Clean cup holders every two to four weeks under normal use. If you regularly carry drinks or food, a quick wipe-down each week prevents buildup from hardening into stubborn residue. Households with children or frequent passengers should lean toward more frequent cleaning.
Diluted dish soap works well for removable rubber or silicone inserts. Add a few drops to warm water, scrub with a brush, and rinse thoroughly. Avoid dish soap on plastic trim panels or leather surfaces — it can strip protective coatings and cause premature drying over time.
Let a slightly stronger dilution of all-purpose cleaner dwell on the residue for 30 seconds before scrubbing. For extreme buildup — dried soda syrup or energy drink residue — a foam swab soaked in 70% isopropyl alcohol breaks it down quickly without damaging most plastics.
Use a pH-balanced interior cleaner appropriate for your surface type and apply it to a microfiber cloth, not directly onto the trim. Avoid scrubbing glossy or soft-touch plastics — they scratch easily. Always test a new product in an inconspicuous area before using it on visible surfaces.
Yes. Silicone liners catch drips before they reach the cup holder well, are removable for rinsing under a faucet, and protect the original trim from permanent staining. Most sets cost under $12 and fit a wide range of vehicles. They significantly reduce how often you need to do a deep clean.
Steam cleaners are highly effective on cup holders and kill bacteria without chemicals. Keep the nozzle moving to avoid concentrating heat in one spot, which can warp soft plastics. Use low steam pressure on leather or soft-touch surfaces, and follow with a protective conditioner after the surface dries.
 |
 |
 |
 |

About Diego Ramirez
Diego Ramirez is a maintenance and care specialist who has been wrenching on cars since he was sixteen. He focuses on fluid changes, preventive care routines, paint protection, and the small habits that turn a five-year-old car into a fifteen-year-old car.
Get some FREE car parts & gear.. Or check out the latest free automotive manuals and build guides here.
Disable your ad blocker to unlock all the hidden deals. Hit the button below 🚗
| | | |