How to Clean Car Radiator Fins and Exterior

by Diego Ramirez

Blocked radiator fins reduce heat dissipation efficiency by as much as 30 percent, a figure that translates directly into elevated engine temperatures and accelerated wear on cooling system components. If you have noticed the temperature gauge climbing on warm days or during stop-and-go traffic, the exterior of your radiator may be the source of that problem. Knowing how to clean car radiator fins and the outer casing is one of the more accessible maintenance tasks available to any vehicle owner, and the results can be measurable within a single drive. This guide walks you through every level of the process, from a basic rinse to a thorough professional-grade clean. For broader context on the surrounding components, review our engine bay cleaning guide before you begin.

The radiator sits at the front of your vehicle and passes coolant (the liquid that absorbs heat from the engine) through a dense grid of thin metal fins and tubes. Road debris, insects, leaves, and oily grime accumulate on those fins over time, restricting the airflow that removes heat from the coolant. A clean radiator exterior supports proper engine temperature regulation, reduces the risk of overheating, and improves fuel efficiency in vehicles equipped with electric cooling fans.

Close-up of car radiator fins clogged with debris showing why cleaning car radiator fins is essential
Figure 1 — Radiator fins clogged with road debris, insects, and oily residue — a common condition that measurably reduces cooling efficiency.
Chart showing radiator cleaning frequency recommendations by driving environment and estimated efficiency improvement
Figure 2 — Recommended cleaning intervals by driving environment and the estimated cooling efficiency improvement observed after each clean.

Radiator Cleaning Levels: Surface vs. Deep Clean

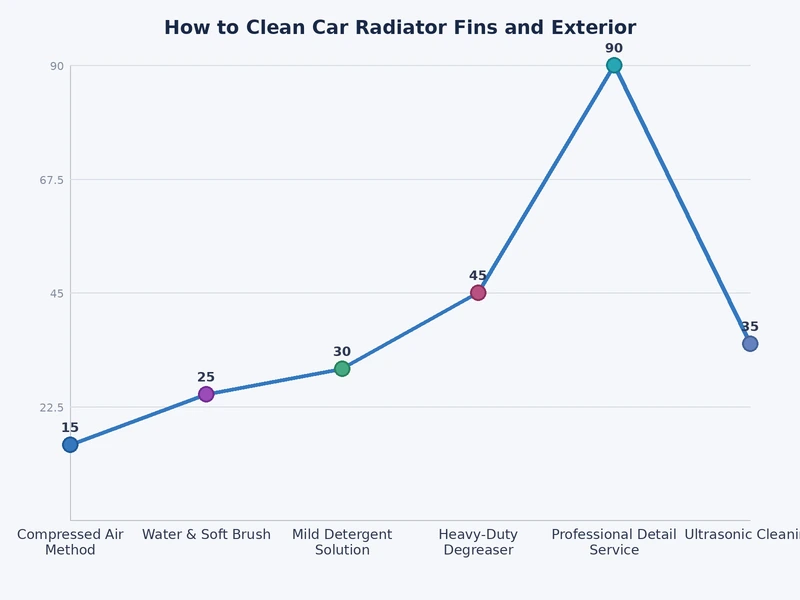
Not every radiator cleaning task requires the same level of effort or the same set of tools. Understanding the difference between a surface clean and a deep clean helps you choose the right approach for your vehicle's current condition and the environment in which you drive.

What Surface Cleaning Covers

A surface clean addresses the outermost layer of debris and is appropriate for vehicles that receive routine maintenance on a regular schedule. This level of cleaning involves the following steps:

  • Rinsing the radiator face with a garden hose or low-pressure sprayer to remove loose material
  • Removing insects, leaves, and light dust from the fin grid using a gentle water stream
  • Wiping down the accessible plastic and metal components on the outer casing with a damp cloth
  • Inspecting for bent fins, coolant residue, or visible leaks while the engine is fully cool

Surface cleaning is manageable in under 20 minutes and requires no specialized tools beyond a garden hose and a soft-bristle brush.

When Deep Cleaning Becomes Necessary

A deep clean is warranted when grime has worked its way into the fin grid or when the vehicle operates in harsh environments such as construction zones, coastal roads with salt-laden air, or areas with heavy seasonal insect activity. Signs that your situation calls for a deeper approach include:

  • A visible grease layer on the fins that a simple rinse does not remove
  • Persistent overheating after a surface cleaning has already been completed
  • Reduced air conditioning performance, since the AC condenser shares the same airflow path as the radiator
  • White or crusty deposits on the fin surface indicating dried coolant from a minor leak

If you have already noticed symptoms described in our guide on a car that overheats with the AC on, the radiator exterior is one of the first places you should inspect before moving on to other diagnoses.

Tools and Supplies at a Glance

Tool / Supply Surface Clean Deep Clean Notes
Garden hose with adjustable nozzle Required Required Low to medium pressure only; avoid jet settings
Soft-bristle brush Optional Required Natural or nylon bristles; never use wire bristles
Fin comb (straightening tool) Not needed Recommended Restores bent fins to correct alignment
Compressed air canister or compressor Optional Required Dislodges embedded debris from the rear side of the core
Radiator-safe degreaser Not needed Required Diluted, pH-neutral formulas are safest on aluminum
Microfiber towels Recommended Required Use for drying all accessible surfaces after rinsing
Plastic sheeting or bags Optional Recommended Protects nearby alternator and fuse box from water

Recognizing When Your Radiator Needs Attention

Routine visual checks allow you to catch radiator problems early, before they escalate into overheating events or costly repairs to the cooling system. Developing this habit takes only a few minutes each time you check your engine oil.

Visual Warning Signs

  • Visible debris mat: A layer of compressed insects, leaves, or dirt covering more than 20 percent of the fin surface is a clear indicator that cleaning is overdue.
  • Bent or crushed fins: Damaged fins restrict airflow even after a thorough cleaning, and a fin comb is the correct tool for straightening minor bends without causing further damage.
  • Oily film or dark residue: Grease migrating from the engine bay coats fins and significantly reduces the rate at which heat transfers from the coolant to the surrounding air.
  • White or rust-colored deposits: These indicate dried coolant from a slow leak somewhere in the system; our article on bad radiator cap symptoms covers one frequent cause of coolant seepage that is worth ruling out early.

Performance Indicators

  • Engine temperature gauge reading above the normal midpoint during moderate highway or city driving
  • Cooling fan running at maximum speed continuously, even at idle or in mild ambient temperatures
  • Air conditioning output that feels weaker than usual, which can result from a blocked condenser positioned directly in front of the radiator
  • A faint sweet odor near the front of the engine bay, which can indicate coolant evaporating off hot, debris-covered fins
  • A sharp acrid or burning smell that differs from the sweet coolant odor; our guide on a car that smells like burning plastic covers additional overheating scenarios that sometimes arise from components adjacent to the radiator

How to Clean Car Radiator Fins and Exterior: Step-by-Step

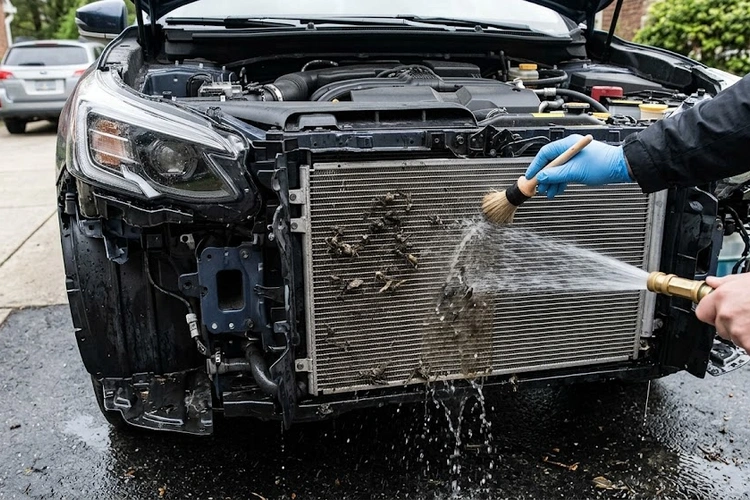
The following process applies to most passenger vehicles and light trucks. You must work on a fully cool engine only — never attempt to rinse or clean a hot radiator, as thermal shock can damage aluminum components and cause serious steam burns.

Preparing the Vehicle

  1. Allow the engine to cool completely — a minimum of two hours after the last drive, or overnight for the safest and most comfortable working conditions.
  2. Park on a level surface and engage the parking brake before opening the hood and beginning any work near the front of the vehicle.
  3. Remove large debris by hand — pull out any leaves, twigs, or insects that sit loosely in front of the radiator grille (the protective panel in front of the radiator fins) before applying any water.
  4. Cover sensitive components with plastic sheeting or resealable bags if your alternator, fuse box, or air intake opening is located close to the radiator in your vehicle's specific engine bay layout.
  5. Place absorbent mats beneath the front bumper to capture runoff water and displaced debris, which simplifies cleanup and keeps your driveway clean.

Cleaning the Fins

Pro Tip: Always direct your water spray from the engine side outward toward the front of the vehicle — this orientation pushes embedded debris out through the fins rather than compressing it deeper into the core.

  1. Apply a radiator-safe cleaner or diluted degreaser to the fin surface using a spray bottle, and allow the solution to dwell for three to five minutes so it can loosen embedded grime before you rinse.
  2. Rinse with low-pressure water from the engine side, directing the stream toward the front of the car to flush loosened debris outward through the fin grid and away from the core.
  3. Work a soft-bristle brush through the fin grid in straight vertical or horizontal strokes — never diagonal — to dislodge material from between individual fins without introducing new bends to the thin metal.
  4. Repeat the rinse cycle until the water running off the fin face is clear, free of discoloration, and no longer carries visible particles of debris with it.
  5. Straighten any bent fins with a fin comb sized to match your radiator's fins-per-inch rating, working from one end of the core to the other in short, deliberate passes.

The same low-pressure, two-pass washing technique outlined in our two-bucket car wash method guide applies here — controlled pressure and clean rinse water consistently produce better results than aggressive scrubbing.

Washing the Exterior Casing

  1. Wipe the plastic upper and lower radiator tanks with a microfiber cloth dampened with a mild all-purpose cleaner, using light pressure to avoid stressing the plastic fittings.
  2. Clean the mounting brackets, hose connections, and overflow reservoir with the same dampened cloth, paying close attention to crevices where grease and dirt tend to accumulate over time.
  3. Rinse all surfaces thoroughly to remove every trace of cleaner residue, as leftover chemical film can attract new debris and create a surface that is harder to clean on your next maintenance cycle.
  4. Dry accessible surfaces with a clean microfiber towel; our guide on how to dry a car without leaving water spots covers drying techniques that transfer well to engine bay surfaces and help you avoid mineral deposit buildup on plastic components.

Advanced Techniques and Pro Tips

Once you are comfortable with the core cleaning process, several additional methods can improve thoroughness, extend the interval between required cleanings, and address problems that a basic rinse cannot fully resolve.

Compressed Air and Fin Combs

  • Compressed air from the engine side: Directing a compressed air nozzle through the fins from the engine-facing side blasts out fine dust and dry insect matter that water pressure alone cannot dislodge from the innermost layers of the fin grid.
  • Fin comb sizing: Automotive radiators typically range from 12 to 20 fins per inch (FPI), so selecting a comb that matches your specific radiator prevents accidental damage to adjacent fins during the straightening process.
  • Vacuum assist technique: Holding a shop vacuum at the front face of the radiator while applying compressed air from the engine side captures displaced debris before it settles into the engine bay, reducing total cleanup time considerably.
  • Frequency of compressed air treatment: A compressed air pass every other cleaning cycle — particularly before the onset of summer heat — helps maintain consistent airflow through the fin grid between full wet cleanings.

Chemical Cleaners and Flush Considerations

  • Use only pH-neutral or radiator-specific exterior cleaners on aluminum fins; harsh alkaline degreasers can corrode the aluminum alloy over repeated applications and shorten the radiator's service life.
  • If you discover oil residue on the fins from an engine oil leak or a power steering fluid drip, our article on how to remove grease from car paint outlines several degreaser techniques that are equally effective on the painted and plastic components surrounding the radiator.
  • Exterior fin cleaning is entirely separate from an internal radiator flush (the process of replacing degraded coolant and dissolving mineral scale from inside the tubes); review how engine cooling radiators transfer heat internally before deciding whether an internal flush is also needed for your vehicle.
  • After completing any level of radiator cleaning, inspect the underbody beneath the front of the vehicle for signs of coolant pooling or surface rust formation; our guide on protecting your car underbody from rust explains preventive measures that complement a thorough cooling system maintenance routine.

Frequently Asked Questions

How often should you clean car radiator fins?

For most drivers, a surface cleaning every six months aligns well with standard seasonal maintenance intervals, while vehicles driven in dusty, coastal, or insect-heavy environments benefit from a cleaning every three months. A brief visual inspection each time you check your engine oil costs only a few seconds and helps you identify debris buildup before it has a measurable effect on cooling performance.

Can you use a pressure washer on radiator fins?

High-pressure washers are not recommended for radiator fins, as the concentrated stream bends or crushes the thin aluminum fins and permanently reduces the airflow through the core. A standard garden hose fitted with an adjustable nozzle set to a wide, low-pressure fan pattern provides sufficient cleaning force for most conditions and poses far less risk to the delicate fin geometry.

What happens if radiator fins get bent during cleaning?

Bent fins narrow the air channels between them and reduce the rate at which heat transfers from the coolant to the passing airstream, which contributes to higher operating temperatures over time. Minor bends are correctable with a fin comb matched to your radiator's fins-per-inch specification, but widespread or severe fin damage may require professional service or radiator replacement if the airflow restriction is significant enough to cause persistent overheating.

Final Thoughts

Cleaning your radiator fins and exterior is one of the highest-return maintenance tasks available to any vehicle owner, and it requires only basic tools along with a modest commitment of time and attention. Start with a thorough visual inspection today, gather the supplies outlined in the table above, and work through the step-by-step process on your next free maintenance morning. A clean radiator supports every other component in your cooling system, and the effort you invest now meaningfully reduces the probability of an overheating event down the road.

About Diego Ramirez

Diego Ramirez is a maintenance and care specialist who has been wrenching on cars since he was sixteen. He focuses on fluid changes, preventive care routines, paint protection, and the small habits that turn a five-year-old car into a fifteen-year-old car.

Get some FREE car parts & gear.. Or check out the latest free automotive manuals and build guides here.

Disable your ad blocker to unlock all the hidden deals. Hit the button below 🚗