by Diego Ramirez
Research confirms that a dust layer just 0.1mm thick can reduce a speaker's high-frequency output by up to 3 decibels — enough to noticeably dull the clarity of every track you play. If you want to know how to clean car speakers without causing damage, you're making a smart call before that buildup becomes a real problem. Most car owners never touch their speakers until they fail. You're not most car owners.
Dirty speakers cause real harm over time. Grime traps moisture against the cone and surround, breaking down the adhesive bond that holds everything together. Dust on tweeters scatters high-frequency waves before they reach your ears. Blocked grilles trap heat inside the speaker housing, accelerating voice coil wear. None of this is reversible once the damage sets in.
Keeping your car's interior in top shape goes beyond the seats and dashboard. Our complete guide on how to detail your car interior covers every surface in depth — speakers are part of that system, and they're more approachable to clean than most people think. This guide walks you through every cleaning method, from a fast 15-minute maintenance pass to a full deep clean, without ever putting your speakers at risk.
Contents

Your car is a sealed environment that recirculates the same air continuously. Every time you open a door, dust, pollen, and fine particulates flow in. Every time the blower fan runs, airborne debris circulates across every interior surface — including your speakers. Door-mounted speakers are especially exposed because they sit low, close to the footwell, where road dust is heaviest.
According to loudspeaker design principles documented on Wikipedia, speaker cones are engineered to move air efficiently — and that same movement pulls fine particles directly into the grille assembly. It's not a design flaw. It's physics. Understanding this helps you set a realistic cleaning schedule and stop being surprised by how fast buildup returns.
It's not just dust. Several distinct types of contamination accumulate on car speakers over time:
Each of these interacts differently with speaker materials. Mold actively digests organic adhesives and foam surrounds. Cigarette residue oxidizes paper and poly cones over time. Crumbs wedged inside grille mesh create micro-abrasion against the cone on every bass hit. Letting any of these accumulate unchecked accelerates the failure timeline.
Contaminated speakers have specific, identifiable sonic signatures. Dust coating tweeters rolls off treble frequencies, making the overall mix sound dark and congested. Debris lodged inside the voice coil gap produces a scratching or rattling sensation on certain bass notes. Blocked grilles reduce sensitivity, so you raise the volume — which increases thermal load on the coil. If your system sounds dull or produces intermittent noise at specific frequencies, dirty speakers are the first thing to check before you assume hardware failure.
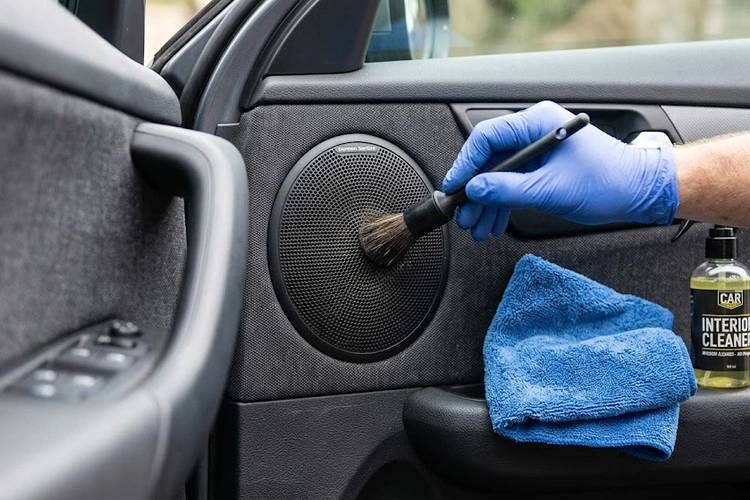
Learning how to clean car speakers correctly comes down to three principles: start dry, work outward, and never contact the cone. The right method uses items you already own or can source cheaply. The goal is to remove debris without pressing anything deeper into the cone or surround — which is the most common mistake people make.
Gather everything before you start. Using the wrong tool — even once — can puncture a cone or permanently scratch grille mesh.
Do not use paper towels — they shed fibers directly into the grille. Do not use acetone, bleach, or all-purpose spray cleaners. These chemicals degrade speaker surrounds and foam cones on contact. Stick to the list above and you eliminate most of the risk before you even start.
Follow these steps in order. Skipping steps or reversing the sequence risks pushing debris further in rather than out — the opposite of what you're trying to accomplish.
Pro tip: Always work with the audio system off and give the voice coil 10 minutes to cool after any recent playback — a warm coil generates a slight static charge that draws freshly disturbed dust particles back onto the cone.
Not every cleaning situation calls for the same level of effort. A routine monthly maintenance pass is a completely different job from cleaning speakers that have never been touched. Choosing the right approach saves time and protects your speakers from unnecessary handling stress.
Use basic cleaning for routine maintenance — every 4–6 weeks under normal conditions, more frequently if you drive unpaved roads or travel with pets. This method keeps grilles clear and prevents buildup from compacting into the mesh over time.
Basic cleaning covers:
Total time: 10–15 minutes. No moisture involved. Safe for all speaker types — paper cones, poly cones, woven fabric cones, and silk dome tweeters.
Deep cleaning is for visible contamination, sticky residue, or speakers that have gone years without any maintenance. It may involve removing the grille cover — if your vehicle design allows — for direct access to the cone assembly.
Before attempting this, identify your grille type. Most factory-installed grilles fall into one of three categories:
If you remove a grille, never touch the cone or surround with your fingers. Skin oils degrade paper and foam over extended contact. If you see debris directly on the cone surface, a single gentle pass of compressed air from 12 or more inches is your only safe option. Don't attempt to brush or wipe the cone directly.
Choosing the wrong method for your contamination type is the most common cleaning error people make. This table lays out each approach clearly so you can match the tool to the problem before you touch anything.
| Method | Best Used For | Safe on Cone? | Safe on Grille? | Risk Level |
|---|---|---|---|---|
| Compressed air | Loose dust, light debris | Yes — keep 8–12 in. away | Yes | Low |
| Soft detailing brush | Surface dust on grille covers | No — avoid all cone contact | Yes | Low |
| Dry microfiber cloth | Surface film and smears on grille | No | Yes | Low |
| Vacuum (low suction) | Post-brush debris collection | No — hover nozzle above grille | Yes | Low–Medium |
| Isopropyl alcohol (70%) | Sticky residue on grille covers only | Never | Yes — plastic and metal only | Medium |
| Soap and distilled water | Fully removed plastic grilles only | Never | Only if fully removed and off vehicle | High if misused |
| Foam or spray cleaners | Not recommended for any speaker use | Never | Not recommended | High |
Isopropyl alcohol at 70% concentration evaporates fast enough to be safe on hard grille surfaces. Avoid concentrations above 90% — higher purity leaves a residue that attracts new dust faster than untreated surfaces. Always apply alcohol to your microfiber cloth first, then wipe the grille. Never spray any liquid directly toward the speaker.
Most speaker damage from cleaning is completely preventable. These are the errors that turn a simple maintenance job into an expensive replacement you didn't need.
Water and speaker components are incompatible. Water warps paper cones, degrades foam surrounds, and creates the perfect environment for mold growth. If moisture reaches the voice coil, you risk corrosion on the terminals and short circuits in the winding. Use water only on fully removed, hard plastic grille covers — and dry them completely before reattaching.
A standard household vacuum generates enough suction to pull a paper cone inward, creating permanent creases in the material. A creased cone produces audible distortion on every playback — a problem that cleaning cannot fix. Use only handheld car vacuums or cordless detailing vacuums on their lowest setting, and hover the nozzle above the grille rather than pressing it against the surface.
The cone is the most fragile component in any speaker. Even light finger pressure creates creases. The oils in your skin degrade paper and fabric cone materials over time. If you see debris sitting on the cone, compressed air from a safe distance is your only safe option. Resist the urge to pick it off manually — no matter how easy it looks.
Grille mesh flexes inward under pressure. On tweeters and coaxial speakers, the cone often sits within a few millimeters of the grille surface. Inward grille flex means direct contact with the cone. Use light, outward brush strokes only, and keep vacuum nozzles completely off the grille surface.
All-purpose cleaners, furniture polish, and glass cleaners contain solvents and surfactants that deteriorate speaker surrounds on contact. Many also leave a residue layer that attracts and holds new dust faster than an untreated surface. Stick to isopropyl alcohol on grilles only, and nothing else on or near the cone assembly.
Overdriven or electrically stressed speakers can also produce a burning plastic smell that has nothing to do with contamination. If you notice that odor during or after a cleaning session, the issue is electrical — the voice coil is overheating — and cleaning won't solve it.
The most effective approach to speaker hygiene is preventing heavy buildup before it starts. A consistent maintenance routine costs far less effort than a single deep clean and keeps your audio quality steady between sessions.
Match your cleaning frequency to your actual driving conditions:
Write it in your phone calendar and treat it like an oil change reminder. The speakers that fail earliest are always the ones that never got any attention until something went audibly wrong.
High humidity accelerates mold growth on speaker surrounds and cone adhesives. If you live in a humid climate, use a small car dehumidifier or silica gel packs inside the vehicle. Keeping your window seals in good condition also matters — interior condensation signals a humidity problem that reaches every surface, including your speakers. If you're dealing with persistent fogging or interior moisture, our guide on how to stop car windows from fogging up covers the root causes and the fixes that actually work.
The cleaner your car's cabin in general, the less airborne particulate your speakers are exposed to. Regular carpet and seat vacuuming cuts the total dust load cycling through the blower system. This is especially true for rear deck and rear door speakers — loose cargo, carpet fibers, and trunk debris are constant contamination sources that most people overlook entirely.
Food particles are among the most stubborn debris types to remove from speaker grilles. Crumbs wedge into mesh and compact over time. Sugary liquids — even a small spill from a lid or straw — can migrate toward door-mounted speakers and leave adhesive residue that permanently bonds future dust in place. It's a simple habit change that protects more than just your speakers.
After each session, check every grille for flex, cracks, or bent mesh. A damaged grille no longer shields the cone from accidental contact with objects, clothing, or cargo. Replace any cracked or deformed grille before it allows direct physical impact on the cone — factory replacement grilles are inexpensive and widely available for most vehicles.
You can use a barely damp cloth on hard plastic grille covers, but never on the speaker cone or surround. Any moisture that reaches the cone, foam surround, or voice coil causes permanent damage. Wring out the cloth until it leaves no visible moisture, and dry the grille completely before reattaching it to the speaker.
For most drivers on paved roads without pets, every 4–6 weeks is the right interval. If you drive on unpaved surfaces, travel with animals, or park in dusty environments, clean every 2–3 weeks. After any water entry event — a leaking door seal, a flood, or a heavy rain with windows down — clean immediately and let the interior dry fully before use.
Yes, when used correctly. Hold the can upright at 8–12 inches from the grille, use short bursts only, and angle the airstream toward the grille edge rather than directly into the center. Never shake the can before use — liquid propellant can discharge with the air and wet the cone permanently, which causes irreversible warping on paper cones.
Water inside the speaker housing warps paper cones, degrades foam surrounds, corrodes voice coil terminals, and creates conditions for mold growth. Stop playing audio through the affected speaker immediately. Leave the vehicle in a warm, dry environment with the windows slightly open for 48–72 hours before testing. If distortion or noise persists after drying, the speaker likely needs replacement.
Some factory grilles are removable — either snap-fit or screw-mounted — and others are permanently bonded to the door panel. Use a plastic trim pry tool to test whether your grille releases before applying any real force. Permanently bonded grilles crack under pressure and cannot be repaired. Consult your vehicle's service manual or a model-specific forum before attempting grille removal for the first time.
If you introduced any moisture during the process, the cone or surround may still be slightly damp. Leave the vehicle in a warm area with windows slightly open for 24 hours and do not play audio through the affected speakers during that time. If muffling persists after full drying, check whether debris was pushed further into the grille during the cleaning process rather than out — a sign that the airflow direction was wrong.
The grille is a protective cover and can tolerate much more aggressive treatment — brushing, vacuuming, light alcohol application, even soap and water if it's fully removable. The speaker itself — the cone, surround, tweeter dome, and spider — can only be safely treated with compressed air from a distance. Never apply any liquid, cloth, or brush directly to the components visible behind or beneath the grille.
Clean speakers last longer, perform better, and protect an investment that most drivers don't think about until something breaks. Start with a compressed air and brush pass this week — it takes 15 minutes, costs nothing, and produces an immediate improvement in audio clarity. Then build a routine based on your driving conditions, and treat speaker maintenance as a standard part of every interior detail going forward.
 |
 |
 |
 |

About Diego Ramirez
Diego Ramirez is a maintenance and care specialist who has been wrenching on cars since he was sixteen. He focuses on fluid changes, preventive care routines, paint protection, and the small habits that turn a five-year-old car into a fifteen-year-old car.
Get some FREE car parts & gear.. Or check out the latest free automotive manuals and build guides here.
Disable your ad blocker to unlock all the hidden deals. Hit the button below 🚗
| | | |