by Diego Ramirez
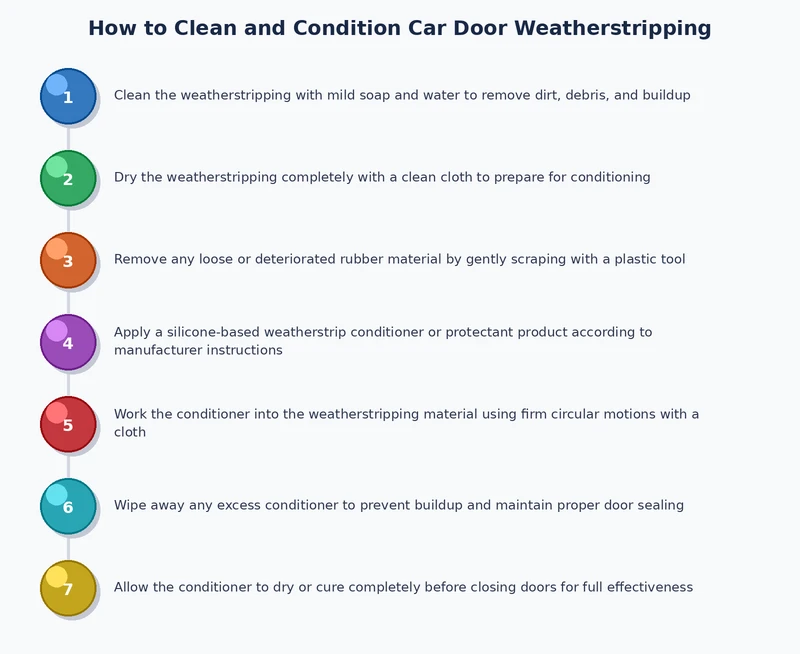
Cleaning and conditioning car door weatherstripping takes under 30 minutes and costs less than $15 in supplies, yet most owners postpone this task until the seals crack and fail. Knowing how to clean car door weatherstripping correctly extends EPDM seal lifespan by several years, preventing water intrusion, wind noise, and interior humidity problems before they escalate into costly repairs. Building this maintenance step into a regular car exterior detailing routine delivers some of the highest preventive-care returns of any quick weekend task.
EPDM rubber — the polymer compound used in virtually all modern automotive weatherstripping — degrades under UV radiation, ozone, road grime, and petroleum-based products. Once surface cracking penetrates the internal cell structure, no topical conditioner reverses that structural damage, which makes preventive cleaning and treatment the only viable long-term approach for keeping these seals performing correctly.
Contents
EPDM rubber is the automotive industry's standard compound for door seals, chosen for its resistance to temperature extremes, compression set, and moderate chemical exposure. The material handles severe winter cold and summer door-jamb heat without losing elasticity — but that resilience operates within defined chemical and environmental limits that most owners never consider. UV radiation progressively breaks down EPDM polymer chains, while atmospheric ozone — at concentrations common in urban and highway environments — attacks the surface molecular bonds directly.
Petroleum-based products cause the rubber to swell and then harden as volatile compounds evaporate, leaving a brittle residue embedded in the surface. Road salt is particularly destructive in cold-climate states, penetrating micro-cracks in the seal and accelerating oxidation throughout the rubber matrix. Drivers managing salt accumulation across the full vehicle exterior should coordinate their weatherstripping work with broader strategies for removing salt stains from car paint and body, since both surfaces face the same environmental assault during winter months.
Dirt and debris act as abrasives with every door closure, micro-scoring the seal surface through thousands of compression cycles annually. Those micro-scores trap additional contamination, which accelerates the degradation loop until the seal fails structurally.
Assembling the correct materials before starting prevents mid-task shortcuts that can damage rubber. The full supply list for a complete four-door vehicle treatment is compact and inexpensive:
Working one door at a time prevents cleaner from drying on the surface before removal, which leaves residue that interferes with conditioner absorption. Opening each door fully exposes the complete seal profile, including the folded corner sections that accumulate the most grime over a driving season. Applying diluted APC to the brush rather than spraying directly onto rubber gives better control and prevents overspray onto adjacent painted surfaces.
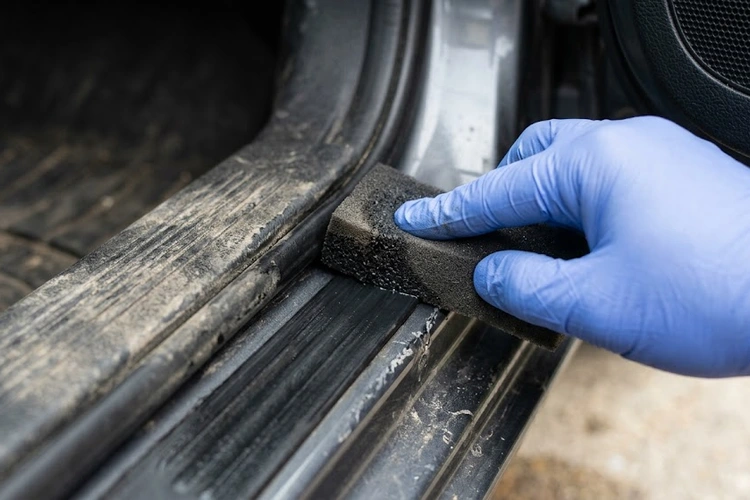
Scrubbing the full perimeter with circular strokes — including the hollow bulb section and the base channel where the seal meets the door sill — lifts contamination that surface wiping alone misses. After scrubbing, a damp microfiber removes loosened debris, followed immediately by a dry towel to eliminate all residual moisture before conditioning begins. Water trapped beneath conditioner prevents proper polymer penetration and significantly reduces the treatment's protective duration.
Applying conditioner sparingly with a foam applicator — worked into the full seal profile under light pressure — produces better penetration than a heavy coat. A thin, even application absorbs into the EPDM matrix more effectively, while excess product sitting on the surface attracts dust and airborne debris between treatments. Five minutes of absorption time followed by buffing with a clean, dry microfiber removes surface residue without pulling conditioner out of the rubber.
Applying conditioner to wet rubber is counterproductive — surface moisture acts as a barrier that prevents polymer penetration, leaving product sitting on top where it accumulates grime rather than protecting against it.
pH-neutral all-purpose cleaners at standard dilution ratios — typically 10:1 to 20:1 — are the safest general option for EPDM rubber across all vehicle types. Dedicated rubber cleaners from Chemical Guys, Meguiar's, and Griot's Garage are formulated to remove surface oxidation and embedded grime without attacking the polymer structure. Isopropyl alcohol at concentrations below 70% is acceptable for surface decontamination before conditioning, particularly for removing mold or mildew from seals on vehicles that have been stored for extended periods.
The folded corner sections of door weatherstripping collect disproportionate grime volumes because water and debris pool in those curves during normal driving conditions. A cotton swab or detailing cotton-tip applicator reaches these corners effectively when a standard brush is too wide to maneuver into the folded geometry. Wrapping a microfiber tightly around a plastic trim tool provides enough rigidity to clean the base mounting channel — a section that surface wiping consistently misses.
For vehicles where the B-pillar seals — the vertical strips between front and rear doors on four-door configurations — have begun pulling away from the mounting channel, cleaning the adhesive surface thoroughly before re-adhering with weatherstrip adhesive produces a far stronger bond than applying adhesive over contaminated rubber. Persistent wind noise at highway speeds is frequently misdiagnosed as a door alignment problem when degraded B-pillar seals are the actual cause. Drivers noticing interior fogging alongside seal gaps should also investigate solutions for stopping car windows from fogging up inside, since degraded weatherstripping is one of the primary drivers of elevated interior humidity.
Several persistent myths lead vehicle owners to apply exactly the wrong products to door seals, accelerating the very degradation they intend to prevent.
Consistent, scheduled maintenance is the only approach that keeps EPDM weatherstripping supple across a vehicle's full service life, regardless of climate or usage pattern. A seasonal schedule aligned with weather transitions provides comprehensive protection without requiring excessive time investment per session.
Annual inspection should cover all seals systematically: two door-frame seals per door on a standard four-door vehicle, plus the trunk or hatch perimeter seal and any sunroof drain channel strips. Catching a section that has begun to separate from its mounting channel early — before the adhesive fails completely — avoids the significantly higher cost of full weatherstripping replacement.
Weatherstripping maintenance is one of the few vehicle care tasks where DIY consistently outperforms professional service in both outcome quality and cost, since most detailing packages treat weatherstripping as a secondary line item rather than a dedicated procedure with proper product selection.
| Item | DIY Cost | Professional Cost | Notes |
|---|---|---|---|
| Dedicated rubber cleaner (32 oz) | $10–$18 | Included in service | One bottle covers 10+ full treatments |
| EPDM conditioner (16 oz) | $12–$22 | Included in service | 303 Aerospace or equivalent formula |
| Detailing brush set | $8–$15 | N/A | One-time purchase, multi-year use |
| Full weatherstripping service | $30–$55 amortized | $60–$120 per visit | Pro pricing varies significantly by market |
| Full weatherstripping replacement | $80–$200 parts only | $250–$650 installed | Preventive maintenance eliminates this cost |
The initial DIY product investment runs $30–$55 for a complete kit, with per-treatment costs dropping below $5 once supplies are stocked. Professional detailing packages that include weatherstripping treatment — where available — typically cost $60–$120, with no guarantee the technician uses a dedicated EPDM conditioner rather than a general-purpose protectant spray. The economic case for owner-performed maintenance is straightforward and decisive.
A full clean-and-condition treatment four times per year — once per season — provides adequate protection for most climates. Vehicles parked outdoors daily in high-UV environments or cold-weather regions with heavy road salt use benefit from conditioning every six to eight weeks during peak-exposure seasons.
Petroleum jelly is not suitable for EPDM weatherstripping. Like other petroleum-based products, it temporarily softens the rubber surface before the volatile components evaporate and leave behind a residue that accelerates hardening and cracking. EPDM-compatible silicone-free conditioners such as 303 Aerospace Protectant are the correct product category for this application.
Freezing occurs when the seal's polymer structure has lost sufficient flexibility to maintain a complete barrier at sub-zero temperatures, or when surface moisture is trapped at the seal-to-frame contact point before temperatures drop. A properly conditioned seal remains supple enough to resist adhesion; applying a light coat of EPDM conditioner before the first hard freeze of the season is the standard preventive measure.
 |
 |
 |
 |

About Diego Ramirez
Diego Ramirez is a maintenance and care specialist who has been wrenching on cars since he was sixteen. He focuses on fluid changes, preventive care routines, paint protection, and the small habits that turn a five-year-old car into a fifteen-year-old car.
Get some FREE car parts & gear.. Or check out the latest free automotive manuals and build guides here.
Disable your ad blocker to unlock all the hidden deals. Hit the button below 🚗
| | | |