by Joshua Thomas
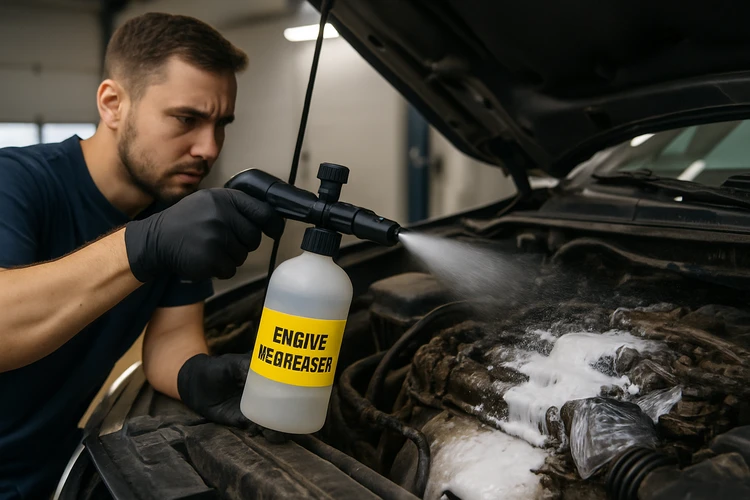
Knowing how to clean engine bay surfaces safely can extend the life of your vehicle and make routine maintenance far easier. A clean engine bay lets you spot leaks, worn hoses, and failing components before they become expensive repairs. Whether you're prepping for a sale or simply keeping up with good car care habits, a thorough engine bay cleaning is worth doing a few times a year. Before you grab the hose, though, there are important steps to follow so you don't damage sensitive electrical parts or void any warranties.
This guide walks you through everything — from the right products to a safe, step-by-step process — so you can tackle this job with confidence. If you maintain other fluids as part of your routine, check out our guide on how to add transmission fluid for another essential under-the-hood task.
Contents
Most drivers focus on washing the exterior, but the engine bay collects grease, road grime, oil residue, and debris that can cause real problems over time. Built-up grease can retain heat, accelerating wear on rubber hoses and plastic components. Oil and grease on electrical connectors can cause corrosion, leading to intermittent faults and hard-to-diagnose electrical issues.
A clean bay also makes it much easier to spot a fresh oil leak, a cracked coolant hose, or a fraying belt. According to the U.S. Department of Energy, proper vehicle maintenance — which includes keeping key components clean and inspectable — directly contributes to fuel efficiency and longevity. If you've recently noticed warning lights, a dirty engine bay can mask the source. For example, knowing the signs of a bad alternator is easier when you can visually inspect the alternator without layers of grime obscuring the connections.
Rushing into an engine bay cleaning without preparation is the fastest way to cause damage. Follow these precautions every time.
Never clean a hot engine. Thermal shock — pouring cold water on hot metal — can crack components, warp plastic covers, and damage seals. After driving, wait at least 30 to 60 minutes before starting. The engine should be warm enough to loosen grease but cool enough to touch safely. On warm days, two hours is a safer margin.
Water and electronics are a dangerous combination. Before any liquid touches the engine bay, use plastic bags or plastic wrap secured with rubber bands to cover the following:
Disconnect the negative battery terminal for added protection if you plan to use more than a light rinse. This is especially important on modern vehicles with many sensors and control modules.
Having the right supplies on hand makes the job faster and safer. Here's a quick reference:
| Item | Purpose | Notes |
|---|---|---|
| Engine degreaser | Break down grease and oil | Water-based formulas are safest for painted surfaces |
| Soft-bristle brushes (2–3 sizes) | Scrub crevices and surfaces | Toothbrush for tight spots |
| Garden hose with spray nozzle | Rinse degreaser and loosened grime | Avoid pressure washers; use low pressure only |
| Microfiber towels | Dry surfaces after rinsing | Several needed; avoid leaving moisture |
| Plastic bags & rubber bands | Protect electrical components | Gallon zip-lock bags work well |
| Carburetor cleaner (optional) | Stubborn carbon deposits | See our best carburetor cleaners guide |
| Plastic/rubber protectant | Condition hoses and trim after cleaning | Prevents cracking and fading |
| Safety gloves and eyewear | Personal protection | Degreasers can irritate skin and eyes |
Avoid household cleaners like dish soap on engine bays — they can strip protective coatings from plastic covers and degrade rubber hoses over repeated use. Use products formulated specifically for automotive engines.
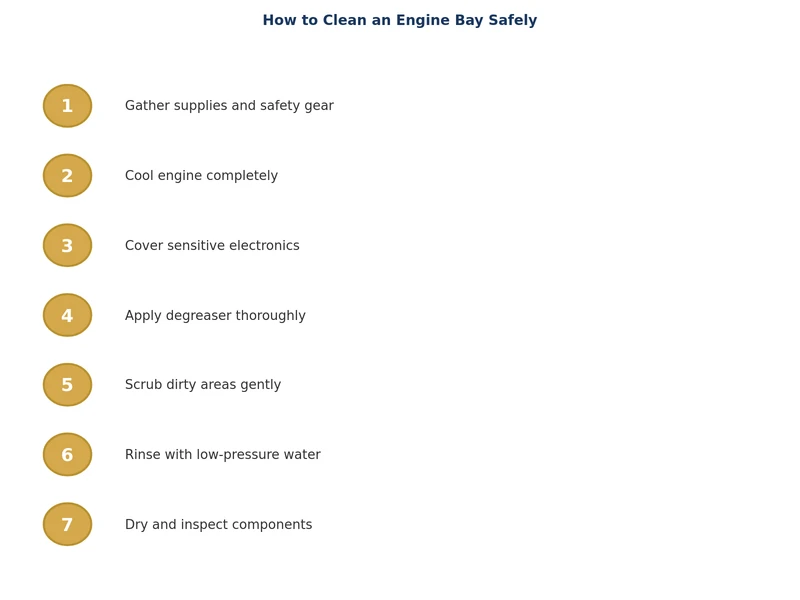
Once your tools are ready and the engine is cool, follow this sequence for a safe, effective clean.
Before anything else, bag or wrap every electrical component listed in the safety section above. Tuck bags firmly and secure them well — water has a way of finding gaps. Remove any large debris by hand: leaves, twigs, and dirt that have collected near the firewall or around the battery tray. A dry paintbrush or compressed air can dislodge loose debris without introducing moisture.
Spray engine degreaser generously across the engine bay, focusing on areas with visible grease buildup — typically around the valve cover, along hose connections, and near the base of the engine block. Let the degreaser dwell for five to ten minutes according to the product's instructions. Do not let it dry completely.
Use your brushes to work the degreaser into crevices, around hose clamps, and along the underside of the hood. A medium-stiff brush handles most surfaces well, while a smaller detail brush or old toothbrush tackles tight spots around sensors and wiring clips. For stubborn carbon buildup on fuel system components, a dedicated carburetor cleaner can cut through deposits that general degreasers leave behind.
Use a garden hose on a low-pressure setting to rinse the engine bay thoroughly. Start at the top and work downward so dirty runoff flows away from already-cleaned areas. Avoid directing the spray directly at any covered electrical components — rinse around them carefully.
After rinsing, use microfiber towels to blot and dry as much of the bay as possible. Remove the protective bags from electrical components. Run the engine for five to ten minutes to evaporate any remaining moisture — this is an important step that many people skip. The heat from the engine drives out moisture from connectors and tight spaces where towels can't reach.
Even experienced DIYers make these errors — avoid them to protect your vehicle.
Once the engine bay is clean and dry, apply a plastic and rubber protectant to hoses, covers, and plastic components. This restores a clean appearance, prevents UV cracking on rubber, and makes future cleanings easier since grime won't bond as strongly to conditioned surfaces.
Inspect the bay while everything is clean and visible. Look for oil seepage around the valve cover gasket, coolant residue near hose connections, and any cracks in vacuum lines. A clean engine bay turns every visual check into a meaningful inspection rather than a guessing game through layers of old grease.
Aim to clean the engine bay every six to twelve months as part of a regular maintenance schedule. Vehicles in dusty climates or those driven hard may benefit from quarterly cleaning. Pairing this with other maintenance tasks — like fluid checks — keeps your car in reliable condition and catches developing issues early.
No. Pressure washers force water into electrical connectors, sensors, and sealed bearings at high velocity, which can cause electrical faults and corrosion. Use a standard garden hose on a low or medium setting instead. Gentle water pressure is all you need when combined with a quality degreaser and brush work.
Most vehicles benefit from an engine bay cleaning every six to twelve months. If you drive frequently in dusty or muddy conditions, or if you notice significant grease buildup, cleaning every three to four months is reasonable. Regular cleaning makes it much easier to spot leaks and failing components early.
It's a good precaution, especially if you plan to use significant amounts of water. Disconnect the negative terminal first, protect electrical components with plastic bags, and reconnect after the engine bay is fully dry. For a light cleaning with minimal water, disconnecting the battery is optional but still recommended.
Water-based engine degreasers are the safest choice for most vehicles because they won't damage painted surfaces, rubber hoses, or plastic covers. For heavy carbon and grease buildup on fuel system components, a dedicated carburetor cleaner can provide extra cutting power. Always follow label instructions and avoid letting any product dry on surfaces.
A slightly warm engine can help loosen grease, but it should never be hot. Wait at least 30 to 60 minutes after driving before cleaning. Hot metal and cold water create thermal shock that can crack plastic components and damage seals. When in doubt, let the engine cool for a full hour before starting.
After rinsing and towel-drying, run the engine for five to ten minutes to evaporate any remaining moisture trapped in connectors and tight spaces. Then apply a plastic and rubber protectant to hoses, covers, and trim pieces. Finish with a visual inspection for oil leaks, cracked hoses, and any components that need attention.
 |
 |
 |
 |
About Joshua Thomas
Joshua Thomas just simply loves cars and willing to work on them whenever there's chance... sometimes for free.
He started CarCareTotal back in 2017 from the advices of total strangers who witnessed his amazing skills in car repairs here and there.
His goal with this creation is to help car owners better learn how to maintain and repair their cars; as such, the site would cover alot of areas: troubleshooting, product recommendations, tips & tricks.
Joshua received Bachelor of Science in Mechanical Engineering at San Diego State University.
Get some FREE car parts & gear.. Or check out the latest free automotive manuals and build guides here.
Disable your ad blocker to unlock all the hidden deals. Hit the button below 🚗
| | | |