by Joshua Thomas
Knowing how to clean a reusable engine air filter is one of the most cost-effective maintenance skills a car owner can develop. Unlike disposable paper filters that get tossed after a single use, reusable filters — like those made by K&N, aFe, or Spectre — are designed to be washed, re-oiled, and reinstalled dozens of times over a vehicle's life. A clean filter keeps airflow unrestricted, protects your engine from debris, and can improve throttle response. If you're already thinking about other intake-related maintenance, check out our guide on how to clean a mass air flow sensor, since a dirty MAF sensor often compounds the problems caused by a clogged filter.

Contents
Reusable performance air filters use layers of oiled cotton gauze or foam to trap airborne particles. Over time, dust, pollen, and road grime accumulate in those layers, restricting airflow to the engine. A severely clogged filter forces the engine to work harder to pull in air, which can reduce fuel economy and throttle response.
According to the U.S. Environmental Protection Agency, keeping air intake components clean is a basic step toward maintaining engine efficiency. A well-maintained reusable filter can outlast the vehicle itself when cleaned on schedule — making it both an economical and environmentally responsible choice.
Before you start, gather everything so you're not hunting for supplies midway through the process. Having the right products matters — using the wrong chemicals can damage the cotton gauze media or strip the protective oil coating permanently.
Brand-name cleaning kits (K&N 99-5000, aFe MagnumFLOW kit) include a water-based cleaner and the correct re-oiling solution in one package. They're calibrated for the specific media used in those filters. DIY alternatives like diluted dish soap can work in a pinch but may leave residue that attracts dust faster or degrades the gauze bonding over time. For best results, use the kit designed for your filter brand.
| Item | Purpose | Notes |
|---|---|---|
| Filter cleaning spray | Loosens and lifts trapped debris | Use brand-specific formula when possible |
| Filter oil | Restores electrostatic particle-trapping layer | Apply after filter is fully dry |
| Low-pressure water source | Rinse cleaner and debris away | Garden hose or faucet — never a pressure washer |
| Soft brush (optional) | Dislodge caked-on debris from pleats | Use very lightly; avoid scrubbing |
| Clean lint-free towels | Pat-dry the housing and filter sealing surfaces | Do not use on the filter media itself |
| Nitrile gloves | Protect hands from cleaner and oil | Optional but recommended |
The full process takes about 30–45 minutes of active work, plus up to 24 hours of drying time. Plan ahead so your vehicle isn't out of commission longer than necessary.
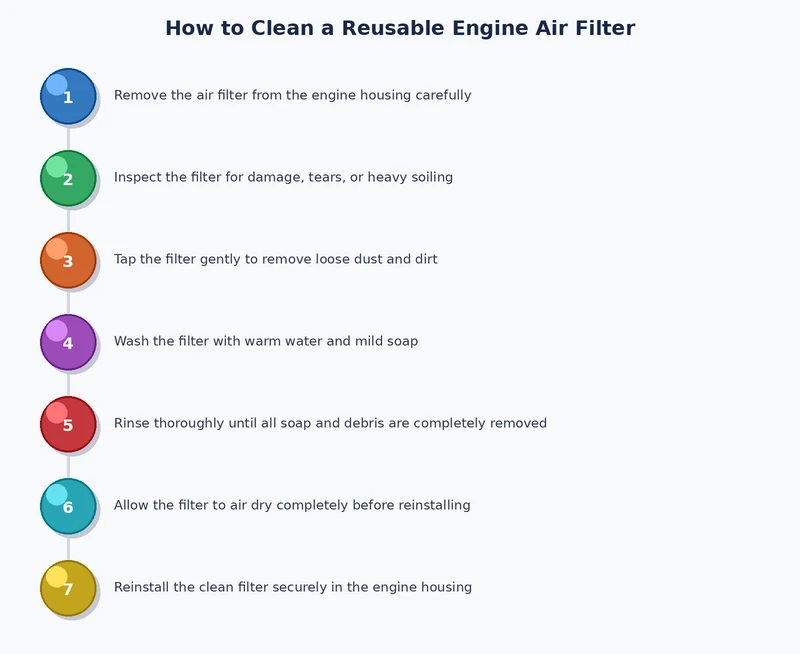
Open the hood and locate the airbox. On most vehicles, the airbox is secured with spring clips or a few screws. Loosen the intake hose clamp connecting the airbox to the throttle body, then lift out the filter. Before cleaning, hold the filter up to a light source. If you can see light through the pleats relatively easily, the filter may only need a light cleaning. If the media appears dark and clogged, it needs a full wash. Also inspect the rubber sealing gasket around the filter frame — cracks or deformation mean it's time to replace the filter entirely, no matter how clean the media looks.
While the airbox is open, wipe out any visible debris from inside the housing with a dry cloth. Avoid letting loose dirt fall into the intake opening — plug it temporarily with a clean rag.
Spray the filter cleaner generously on both sides of the filter, working it into the pleats. Allow it to soak for 10 minutes — this dwell time is what breaks down the oily residue holding dust particles in place. Do not let the cleaner dry on the filter.
Rinse from the clean side (inside out) using low-pressure water. This pushes debris outward the same direction it entered, rather than forcing it deeper into the media. Continue rinsing until the water runs clear. Gently flex the filter frame while rinsing stubborn sections — this opens the pleats and helps water reach packed debris.
This is the step most people rush, and it's the one that causes the most damage. Shake out excess water gently, then set the filter in a warm, dry location with good airflow. Do not use compressed air, a heat gun, or a hair dryer — forced heat can shrink or warp the cotton gauze media. Allow the filter to air-dry completely, which typically takes 12–24 hours depending on humidity.
Once fully dry, apply filter oil evenly along each pleat. With squeeze-bottle oil, work bead by bead across each pleat, then let the oil wick in for 20 minutes. With aerosol oil, hold the can 3–4 inches away and apply a light, even coat. After wicking, check for light or white spots — these are under-oiled areas. Touch them up before reinstalling. Over-oiling is equally problematic: excess oil can coat the mass air flow sensor, which is why we recommend reading about how to clean a throttle body if you notice rough idle after reinstalling a freshly oiled filter.
Most manufacturers recommend cleaning every 15,000–25,000 miles under normal driving conditions. If you frequently drive on dirt roads, in dusty environments, or behind large trucks, inspect the filter every 10,000 miles. Urban stop-and-go driving clogs filters faster than highway miles due to the concentration of particulates at low speeds.
For a broader view of filter maintenance schedules, see our detailed guide on how often to change a car air filter, which covers both disposable and reusable types with recommended intervals by vehicle use case.
Even experienced DIYers make errors when servicing reusable filters. These mistakes can reduce filter lifespan, damage the engine, or create new problems that are more expensive to fix than a replacement filter.
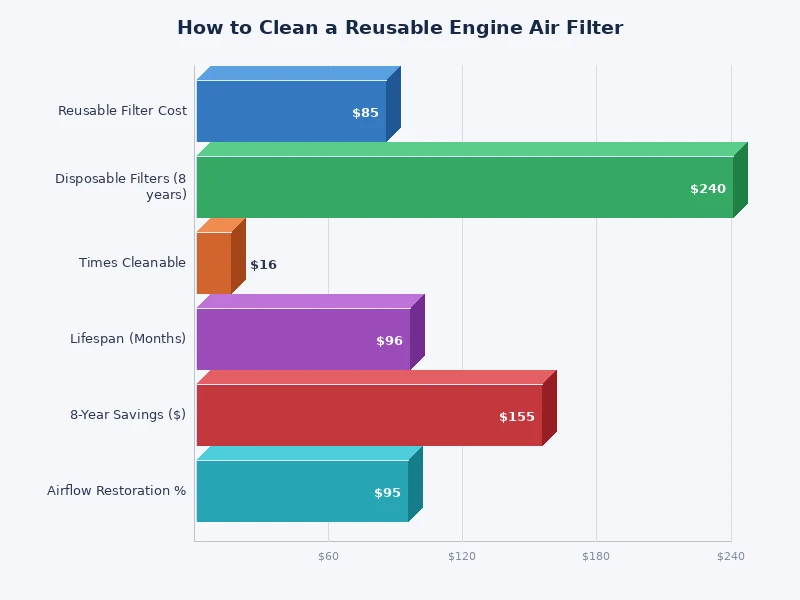
If you're still weighing whether a reusable filter is the right long-term investment for your vehicle, this breakdown covers the key trade-offs. Both types have legitimate roles depending on your driving habits, budget, and how hands-on you want to be with maintenance. For related maintenance decisions involving cost and longevity, the same logic applies when comparing options like synthetic oil vs conventional oil.
| Factor | Reusable Filter | Paper Filter |
|---|---|---|
| Upfront cost | $40–$80 | $8–$25 |
| Long-term cost | Low (cleaning kit ~$15) | Higher (replace each interval) |
| Airflow | Higher flow rate | Moderate |
| Filtration efficiency | Good (varies by brand) | Excellent (high particle capture) |
| Maintenance required | Yes — clean and re-oil | No — replace and discard |
| Environmental impact | Lower (reusable for years) | Higher (landfill waste each cycle) |
| Ideal for | Performance builds, high-mileage vehicles | Stock vehicles, low-maintenance owners |
Cleaning a reusable engine air filter is a straightforward DIY task that rewards patience. The most important steps are letting the filter dry completely before oiling it, applying the right amount of oil, and inspecting the housing and gasket while you have everything apart. Done on schedule, this 30-minute service keeps your engine breathing cleanly and your reusable filter performing as intended for years.
Under normal driving conditions, clean a reusable filter every 15,000 to 25,000 miles. If you regularly drive on dusty roads or unpaved surfaces, inspect it every 10,000 miles and clean it whenever it looks visibly clogged or discolored.
Diluted dish soap can remove surface grime in a pinch, but it may leave a residue that attracts dust more quickly and can degrade the adhesive bonding the gauze layers over time. A dedicated water-based filter cleaner from the filter manufacturer is the safest and most effective option.
Allow 12 to 24 hours of air-drying at room temperature before applying oil or reinstalling. Humidity, airflow, and temperature all affect drying time. Never use a heat gun, hair dryer, or compressed air — these can warp or tear the gauze media.
Excess oil migrates into the intake tract and coats the mass air flow sensor, which can cause the engine to run rich, trigger a check engine light, or produce rough idle. Apply oil in thin, even passes and allow it to wick for 20 minutes before checking for light spots.
Reusable cotton gauze filters typically offer higher airflow than stock paper filters, which can produce modest gains in throttle response — especially on modified or high-displacement engines. The primary benefit for most daily drivers is long-term cost savings and reduced waste, not dramatic power increases.
No. A damp filter cannot absorb filter oil properly, and residual moisture entering the intake can cause misfires or inaccurate MAF sensor readings. Always wait until the filter is completely dry — when in doubt, give it a few more hours before reinstalling.
 |
 |
 |
 |
About Joshua Thomas
Joshua Thomas just simply loves cars and willing to work on them whenever there's chance... sometimes for free.
He started CarCareTotal back in 2017 from the advices of total strangers who witnessed his amazing skills in car repairs here and there.
His goal with this creation is to help car owners better learn how to maintain and repair their cars; as such, the site would cover alot of areas: troubleshooting, product recommendations, tips & tricks.
Joshua received Bachelor of Science in Mechanical Engineering at San Diego State University.
Get some FREE car parts & gear.. Or check out the latest free automotive manuals and build guides here.
Disable your ad blocker to unlock all the hidden deals. Hit the button below 🚗
| | | |