by Joshua Thomas
If you want a flawless polish finish, you must first learn how to decontaminate car paint properly. Skipping this step means polishing over embedded iron particles, tar, and industrial fallout — grinding those contaminants deeper into the clear coat instead of removing them. The result is swirl marks, micro-scratches, and a finish that looks worse after polishing than before. Decontamination is the foundation of any serious paint correction job, and it only takes about an hour to do it right.
This guide walks through every stage of the decontamination process, from the initial wash to the final clay bar pass, so your paint surface is perfectly clean and ready for a dual action polisher or hand polish.

Contents
Paint contamination is invisible to the naked eye in most cases, but you can feel it. Run a clean fingertip across a freshly washed panel. If it feels rough or gritty rather than smooth, the surface is contaminated. Polishing over that texture drives abrasive particles — iron shards, brake dust, road grime — across the clear coat, creating thousands of tiny scratches.
Paint contamination refers to any foreign material that has bonded to or embedded in the clear coat. Unlike loose surface dirt that washes away, these particles grip the paint and cannot be removed with soap and water. Automotive paint is a porous system with a primer layer, base coat, and clear coat, and all three can trap contaminants over time. Decontamination strips those particles before abrasive polishing begins.
Different contamination types require different removal methods:

Gather everything before you start. You do not want to stop mid-process with iron remover sitting on a dry panel.
| Product / Tool | Purpose | Notes |
|---|---|---|
| pH-neutral car wash soap | Pre-wash to remove loose dirt | Avoid dish soap — see why dish soap damages paint |
| Iron fallout remover spray | Dissolves embedded iron particles | Color-changing formula (turns purple) is easiest to use |
| Tar and adhesive remover | Lifts bitumen, tar, sap, and bugs | Solvent-based; rinse quickly after dwell time |
| Clay bar kit | Mechanical removal of bonded surface contaminants | Use with clay lubricant, never dry |
| Clay lubricant or quick detailer | Lubricates surface during clay process | Can also use soapy water in a spray bottle |
| Microfiber towels (at least 6) | Drying, wiping, and panel wipe-down | Use dedicated towels per product to avoid cross-contamination |
| Two-bucket wash system | Prevents dragging dirt back onto paint | One wash bucket, one rinse bucket with grit guards |
| Isopropyl alcohol (IPA) wipe | Removes residual oils before polishing | 70% IPA diluted 1:1 with distilled water |
Work in a shaded area or indoors. Direct sunlight causes chemical products to dry too fast, reducing their effectiveness and risking water spots or surface damage.
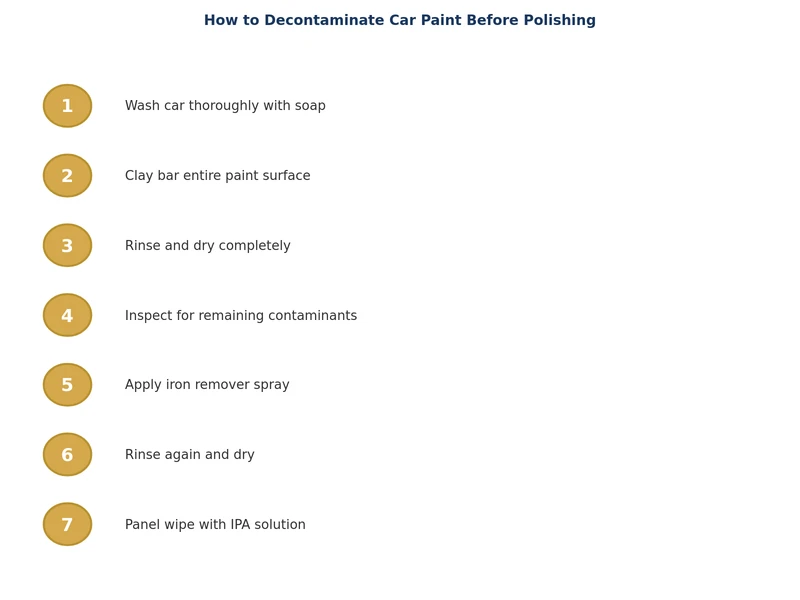
Begin with a thorough two-bucket hand wash using pH-neutral soap. This removes loose dirt, bird droppings, and surface grime that would otherwise contaminate your clay bar or prevent chemical removers from reaching the paint. Rinse the car completely and inspect each panel under raking light before moving on.
Mist iron remover over one panel at a time. Watch for the color-change reaction — purple or reddish-brown bleeding indicates iron particles dissolving. Allow a dwell time of 3–5 minutes. Do not let it dry. Rinse thoroughly with a strong stream of water. Repeat on panels with heavy fallout (typically the lower half of the car and wheel arches).
Spray tar remover onto affected areas — focus on lower rocker panels, bumpers, and behind wheel arches. Allow 1–2 minutes of dwell time, then wipe gently with a microfiber towel. Do not scrub. Rinse the panel. Repeat if tar streaks remain. Tar remover is solvent-based, so work quickly and keep it off rubber trim.
This is the most important mechanical step in the decontamination process. Flatten a 50g piece of detailing clay into a 2-inch disc. Mist the panel with clay lubricant, then glide the clay in straight, overlapping passes — never circular. You will feel and hear the surface smooth out as the clay picks up bonded contaminants. Fold the clay regularly to expose a clean surface. If you drop the clay, discard it — ground contamination will scratch the paint. Learn the full process in our guide on how to clay bar a car.
After claying, wipe the panel with a clean microfiber towel. Run the plastic bag test: place your hand inside a clean plastic bag and drag it across the paint. If it now glides without friction, the surface is ready. Dry the car completely, then wipe every panel with a diluted IPA solution to strip any remaining oils, wax residue, or lubricant before polishing.
These two methods are complementary, not interchangeable. Chemical decontamination (iron remover + tar remover) dissolves particles that have chemically bonded to the clear coat. Clay bar removes particles that are physically embedded or stuck to the surface. Used in sequence, they address the full range of contamination types.
Some detailers skip iron remover if the car looks clean. This is a mistake. Iron fallout is largely invisible — it oxidizes below the surface and only becomes visible during the color-change reaction. Always run the chemical step first, then follow with clay to capture anything remaining.
Once decontamination is complete, your paint is in its most vulnerable state. The clear coat is clean, porous, and unprotected. Move directly to polishing — do not leave the car sitting overnight without protection. After polishing, apply a paint sealant, carnauba wax, or ceramic coating as soon as possible to protect the work you have done.
Decontamination is not just a pre-polishing step. Performing it twice a year as part of a regular care routine prevents contamination from building up to a level where it causes permanent paint damage. Pair it with a consistent wash routine and your paint will maintain its depth and gloss long-term.
Decontaminate your paint at least twice a year — typically before spring and autumn detail sessions. If you live near a rail yard, industrial area, or drive frequently on highways, consider decontaminating every three months. You can also check by feel: if the paint feels rough after washing, it is time for iron remover and clay.
You can complete the chemical stages — iron remover and tar remover — without a clay bar, but the result will be incomplete. Clay bar removes physically bonded particles that chemicals cannot dissolve. Skipping clay means polishing over residual contamination. Clay mitts and synthetic clay pads are faster alternatives if you do not want to use traditional bar clay.
Yes. New cars shipped via rail or boat accumulate iron fallout during transit. Many also arrive with dealer-applied wax or protective coatings that need to be stripped before applying your own protection. Run an iron remover test on a new car — if it bleeds purple, contamination is already present.
Polishing over contaminated paint causes micro-scratches and swirl marks. The abrasive in the compound rolls embedded iron particles and grit across the clear coat, creating damage that is often worse than the original issue. Decontamination must always precede any mechanical paint correction.
Yes, iron remover is safe on all factory paint colors including black, white, and metallics when used correctly. Allow the product to dwell for no more than 5 minutes and rinse thoroughly. Do not allow it to dry on the surface. Avoid contact with raw aluminum, bare metal, and some matte finishes — always check the product label.
No. Iron remover is a chemical that dissolves ferrous particles. Clay bar is a mechanical tool that lifts a broader range of bonded contaminants including tar residue, industrial fallout, and paint overspray. They address different types of contamination and should always be used together for a complete decontamination before polishing.
 |
 |
 |
 |
About Joshua Thomas
Joshua Thomas just simply loves cars and willing to work on them whenever there's chance... sometimes for free.
He started CarCareTotal back in 2017 from the advices of total strangers who witnessed his amazing skills in car repairs here and there.
His goal with this creation is to help car owners better learn how to maintain and repair their cars; as such, the site would cover alot of areas: troubleshooting, product recommendations, tips & tricks.
Joshua received Bachelor of Science in Mechanical Engineering at San Diego State University.
Get some FREE car parts & gear.. Or check out the latest free automotive manuals and build guides here.
Disable your ad blocker to unlock all the hidden deals. Hit the button below 🚗
| | | |