by Diego Ramirez
During a routine detailing session last spring, our team pulled a vehicle into the bay and discovered wheel wells packed with compacted road grime, brake dust, and dried mud — months of accumulation baked on by heat. The wheels themselves wore a brown film that standard car wash soap could not touch. That session was a clear reminder of how quickly neglect in this area compounds, and how much effort a proper recovery demands.
Understanding how to clean car wheels and wheel wells properly is one of the most impactful skills in any car care routine. Brake dust, iron deposits, tar, and road salt accumulate aggressively in these areas, corroding finishes and degrading protective coatings with every mile. Our team treats wheel cleaning not as an afterthought but as a dedicated, systematic step — one that pairs naturally with a broader professional exterior detail. For anyone already working through alloy wheel maintenance, this guide goes deeper, covering wheel wells, advanced product selection, proven technique sequences, and long-term protective strategy.

Contents
Brake dust is primarily composed of carbon residue, metal shavings, and adhesive binders shed from brake pad material. These particles land on hot wheel surfaces and bond almost immediately. Over time, the layer acts as a primer for additional contamination — road tar sticks to brake dust, iron particles embed into it, and moisture accelerates oxidation beneath. The result is not merely cosmetic. Etching and micro-pitting can compromise protective clear coats on polished, painted, or powder-coated wheels in as little as a season of neglect.
Wheel wells face a different but equally aggressive assault. Mud, salt, and gravel pack into plastic liners and against bare metal surfaces, trapping moisture in place. On vehicles driven in regions with heavy road salt application, this retained moisture is a direct driver of premature rust in wheel arch areas. Our team has documented this deterioration pattern on vehicles as young as three model years old — in every case, wheel well maintenance had been skipped entirely.
Most people run their wheels through a standard car wash and consider the job done. Standard car wash soap does not break down iron deposits, and it does not dissolve brake dust polymer bonds. Without a dedicated cleaning session every four to six weeks, these layers harden and adhere more aggressively — requiring progressively stronger chemistry and more mechanical effort to remove. Our team considers each missed cleaning cycle as a compounding liability. Small in isolation. Significant over a vehicle's lifetime.
Pro Tip: Our team never cleans wheels while they are hot from recent driving. Heat causes wheel cleaner to flash-evaporate before it can dwell and react, leaving behind concentrated residue that can etch sensitive finishes. Always allow wheels to cool fully before applying any chemical product.
A basic wheel cleaning routine addresses the visible face of the wheel using a pH-neutral wheel cleaner, a soft wheel brush, and a standard garden hose rinse. Performed consistently, this approach removes surface brake dust and loose grime effectively. It is suitable for vehicles used primarily in city driving with no track exposure or off-road use. The wheel well in this routine typically receives only a rinse — adequate for maintenance between deep cleans, but insufficient as a standalone strategy.
Basic cleaning essentials include:
A full deep clean is required when brake dust has become embedded, when the vehicle has experienced winter road salt exposure, after any off-road driving, or as part of a seasonal rotation. This process covers the wheel face, barrel, spoke faces and backs, lug nut recesses, wheel well liner surface, and the bare metal behind the liner where rust initiates.
The deep clean toolkit adds significantly over the basic approach:
Our team always follows a deep clean with a protective sealant application. A quality wheel sealant dramatically reduces future brake dust adhesion and cuts cleaning time in half on subsequent sessions. The difference between a sealed wheel and an unsealed one is apparent within two weeks of normal driving.
Wheel cleaning products fall into three broad categories: acid-based, alkaline-based, and pH-neutral. Each has a specific application, and selecting the wrong type causes real damage. Our team's position is direct: pH-neutral iron removers are the correct choice for the overwhelming majority of wheel types and use cases. Acid-based cleaners are reserved for heavily contaminated bare or brushed aluminum — never for polished, anodized, or powder-coated finishes. Using an acid cleaner on a clear-coated wheel is one of the most common ways home detailers cause permanent damage.
| Product Type | Best For | Avoid On | Dwell Time | Recommended Frequency |
|---|---|---|---|---|
| pH-Neutral Wheel Cleaner | All finish types, routine maintenance | Nothing — universally safe | 1–3 minutes | Every wash session |
| Iron Fallout Remover | Embedded brake dust, iron particles | Raw aluminum (risk of staining) | 3–5 minutes | Monthly or after heavy use |
| Acid-Based Cleaner | Bare or brushed aluminum, heavy oxidation | Polished, anodized, painted, powder-coated | 30–60 seconds maximum | Rarely; targeted spot use only |
| Alkaline Degreaser | Wheel wells, heavy grease and packed mud | Sensitive clear coats and painted surfaces | 2–4 minutes | Seasonal or post off-road driving |
| Tar and Adhesive Remover | Road tar deposits, adhesive residue | Rubber trim and window seals | 1–2 minutes | As needed |
Tool selection is as important as product selection. Stiff nylon brushes are appropriate for wheel wells and unpainted metal surfaces — they are not appropriate for gloss-finished wheel faces. Stiff bristles on polished alloy leave hairline scratches that catch reflected light and require polishing to remove. For wheel faces, our team uses soft natural-bristle or microfiber brushes exclusively. Long-reach barrel brushes with flexible handles allow thorough cleaning behind spokes and in the inner barrel without removing the wheel.
Pressure washers used at 1200–1800 PSI are effective for pre-rinsing loose contamination before chemical application and for a thorough final rinse afterward. Higher pressure risks forcing water past wheel bearing seals and stripping protective coatings from painted surfaces. Our team uses a pressure washer as a pre-treatment and post-rinse step — not as a primary cleaning tool in place of chemistry and agitation.
Post-winter cleaning is, in our experience, the single most important deep clean of the year. Road salt and de-icing chemicals accumulate in wheel wells, behind brake dust layers, and in every crevice of the wheel structure. These residues are hygroscopic — they actively attract and retain moisture, accelerating corrosion in wheel arches, on brake hardware, and on the inner barrel surface. A thorough post-winter session using alkaline degreaser in the wheel well and iron remover on the wheel face clears these deposits before warm-weather temperatures accelerate oxidation.
The same principle applies to vehicles operated near coastlines, where airborne salt deposits accumulate on wheel surfaces without any road contact at all. Our team recommends the post-winter deep clean as part of a broader seasonal maintenance cycle — one that also addresses underbody washing and chassis protection before summer heat sets in.
Wheels are among the first components a prospective buyer evaluates. Pitted, stained, or grime-coated wheels reduce perceived vehicle value immediately and give the impression of broader neglect. A complete deep clean before listing — including wheel well degreasing, iron treatment, and a finished sealant coat — is one of the highest-return detailing investments available. Our team has observed this single step shift buyer perception noticeably on otherwise equivalent vehicles.
Track days generate extreme brake dust loads in a compressed time period. After any track session, our team performs an immediate iron fallout treatment before deposits can bake further into the finish. Waiting even 24 hours allows iron particles to begin embedding at a molecular level, making removal significantly more labor-intensive. The same logic applies to extended stop-and-go highway driving — low-speed heavy-traffic conditions generate disproportionate brake dust relative to total distance traveled.
After hundreds of documented cleaning sessions across a wide range of vehicle types and wheel finishes, our team has catalogued the same errors appearing repeatedly. The most damaging is incorrect brush selection — a stiff nylon brush on a gloss-finished alloy wheel produces hairline scratches that are difficult to polish out and immediately visible in direct light. The second most common is allowing iron remover to dry on the wheel surface. Iron removers turn purple as they react with ferrous particles; left too long, this reaction leaves a stain on light-colored finishes that requires abrasive correction.
Additional recurring mistakes observed in the field:
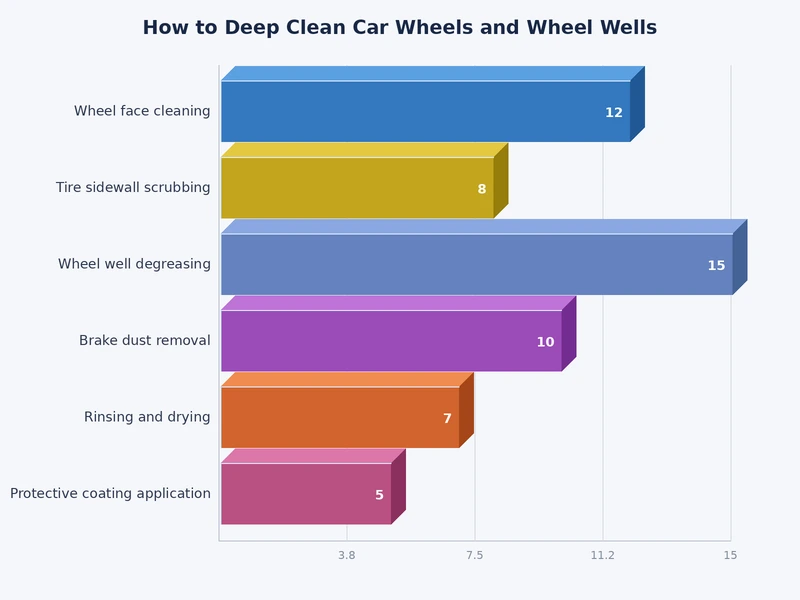
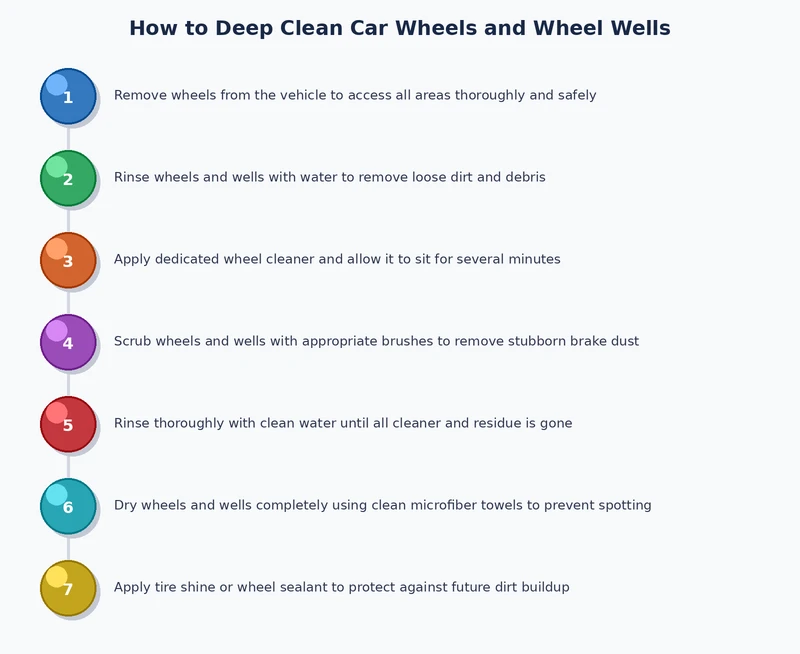
Our team's preferred sequence for how to clean car wheels and wheel wells: pre-rinse with a pressure washer, apply iron remover and allow full dwell time, agitate with appropriate brushes working from center spoke faces outward, rinse thoroughly, apply alkaline degreaser to wheel wells and agitate with a stiff brush, final pressure rinse, dry with a dedicated microfiber towel, and finish with a wheel sealant. This complete sequence requires approximately 20 to 30 minutes per corner on a vehicle with heavy accumulation.
One technique that consistently outperforms all alternatives is the two-bucket method applied specifically to wheels — one bucket holding the cleaning solution, one holding plain rinse water. Brushes are rinsed in the rinse bucket before returning to the cleaning bucket. This single step prevents transferring concentrated brake dust back onto the wheel surface mid-clean, which is the primary source of self-inflicted scratching during the agitation phase.
Protecting wheels after a deep clean follows the same chemistry principles that apply to paint protection. The discussion of carnauba wax vs. synthetic wax is directly relevant to wheel coatings — our team recommends synthetic polymer sealants over natural carnauba for wheel applications due to significantly higher heat resistance and longer effective durability under continuous brake dust exposure.
Our team recommends a full deep clean every four to six weeks for most vehicles operating under normal conditions. Vehicles exposed to winter road salt, heavy stop-and-go traffic, or track driving benefit from more frequent sessions — at minimum after each significant exposure event. A surface wash with pH-neutral cleaner during every regular car wash prevents heavy buildup from forming between dedicated deep clean sessions.
pH-neutral iron removers are safe on painted, powder-coated, polished, and anodized aluminum wheels. Acid-based iron removers are not safe on most finished wheel surfaces and should be reserved strictly for bare or heavily oxidized brushed aluminum. Our team always recommends identifying the wheel's finish type before selecting any chemical — manufacturers typically document this in the vehicle's owner documentation or the wheel manufacturer's care guide.
An alkaline degreaser applied with a dedicated stiff-bristle nylon brush is the most effective approach for plastic wheel well liners. Our team allows a two-to-four minute dwell time before agitating thoroughly into seams and mounting points where grime packs most densely, then rinses with a pressure washer. Finishing with a UV-protective plastic dressing after cleaning prevents liner degradation and makes subsequent cleaning sessions easier by reducing grime adhesion.
Deep cleaning car wheels and wheel wells is a straightforward discipline when approached with the right products, the correct sequence, and consistent scheduling. Our team recommends treating the next scheduled wash as the starting point — gather a pH-neutral iron remover, an alkaline wheel well degreaser, and appropriate brushes, then work through the complete sequence outlined in this guide. The improvement in both appearance and long-term wheel preservation is immediate, and the protective sealant applied at the end ensures the next session demands far less effort.
 |
 |
 |
 |

About Diego Ramirez
Diego Ramirez is a maintenance and care specialist who has been wrenching on cars since he was sixteen. He focuses on fluid changes, preventive care routines, paint protection, and the small habits that turn a five-year-old car into a fifteen-year-old car.
Get some FREE car parts & gear.. Or check out the latest free automotive manuals and build guides here.
Disable your ad blocker to unlock all the hidden deals. Hit the button below 🚗
| | | |