by Diego Ramirez
Studies from automotive industry surveys show that truck owners average roughly 15,000 more miles per year than sedan drivers, meaning truck interiors absorb far more grime, dust, and embedded debris than most detailing guides are written to address. Understanding how to detail a truck interior correctly makes a measurable difference in long-term comfort, cabin air quality, and resale value across all the hard-use surfaces that define a working cab. Our team has worked through hundreds of these jobs, from mud-caked construction trucks to weekend haulers buried in pet hair and road-trip residue, and the process consistently demands a more systematic, zone-by-zone approach than a standard car interior requires. Anyone building their detailing skills will find the foundational framework in our car detailing for beginners guide a useful starting point before applying the truck-specific workflow covered here.
Contents
Trucks are asked to do more than passenger cars, and the interior surfaces reflect that reality in ways that accumulate quickly over time. Construction workers, landscapers, and tradespeople bring in silica dust, wood chips, and chemical residue on a daily basis, and those particles embed themselves into seat seams, dashboard vents, and carpet backing faster than occasional vacuuming can address. Even among non-commercial truck owners, the combination of towing, hauling, and off-road driving creates an aggressively dirty interior environment that responds poorly to the light-duty cleaning products most people keep on hand. The larger floor area and more pronounced surface textures in a truck cab give debris more places to lodge and more surface area for odor-causing compounds to colonize.
Most modern trucks combine textured hard plastic, rubberized coatings, and either cloth or leather seating, and each of those materials behaves differently under cleaning chemicals and mechanical agitation. Applying an all-purpose cleaner (APC) at full concentration to a matte plastic dashboard panel causes streaking and can degrade the surface texture with repeated use. Our team always dilutes APC solutions according to the material — typically 10:1 for general interior surfaces and 4:1 for heavily soiled areas like floor liner channels and door sill plates. According to Wikipedia’s overview of automotive detailing, interior work involves cleaning and restoring all non-metallic surfaces, which in a modern truck cab can include dozens of distinct material types requiring individual product decisions.
A thorough truck detail requires a broader product kit than a standard car job simply because of the variety of surfaces involved in a typical cab. Our team reaches for a pH-neutral APC, a dedicated leather or fabric conditioner matched to the seat type, a matte-finish plastic and vinyl dressing, a streak-free glass cleaner, and an enzyme-based odor eliminator for any cab that has carried working dogs, livestock, or spilled food. Skipping the odor eliminator is one of the most common shortcuts our team sees in DIY jobs, and it is almost always the reason a freshly cleaned cab still smells stale within a week.
Detailing brushes do more work in a truck cab than any spray product because they reach areas that cloths cannot. Our kit includes three brush sizes — a large soft-bristle brush for dashboard vents and instrument cluster bezels, a medium stiff-bristle brush for floor mat channels and door sill grooves, and a small precision brush for seat stitching and tight trim gaps. A wet/dry shop vacuum with a crevice attachment handles the oversized debris that standard car vacuums cannot fully extract from extended-cab rear floors and under-seat storage bins. Microfiber towels rated at 300–400 GSM (grams per square meter, a measure of thickness and absorption) are the standard in our kit because they lift residue rather than redistributing it across surfaces.
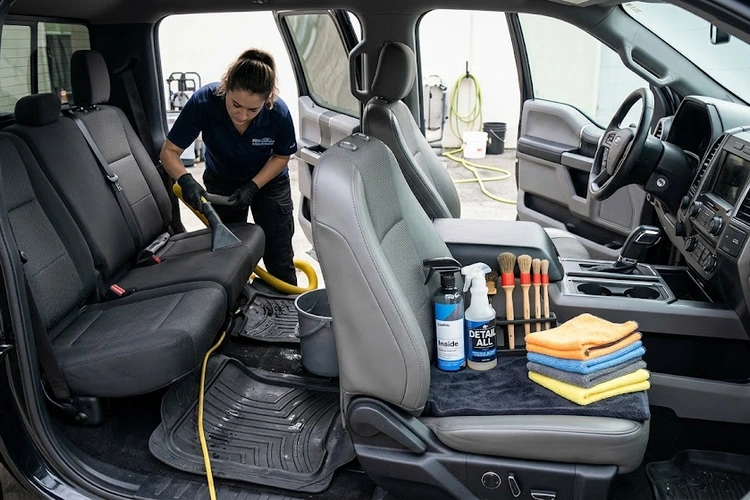
The most important rule our team applies on every truck detail is removing all loose debris before any cleaner contacts a surface. Working a damp cloth over a panel that still holds grit or dried mud grinds those particles into the material and creates micro-scratches on plastic dash components and seat fabric alike. The sequence that consistently produces the best results starts with pulling and shaking out all floor mats, vacuuming every surface including under seats and inside storage compartments, and doing a dry microfiber wipe of the dashboard and door panels before any spray is introduced.
Pro tip: Our team always vacuums headliner fabric on the lowest suction setting with a brush attachment — high suction pulls headliner adhesive loose on high-mileage trucks, causing sag that is difficult and expensive to reverse.
After vacuuming, our team works from the ceiling downward, which prevents freshly cleaned lower surfaces from being contaminated by falling debris from higher areas during the process. The headliner receives a light mist of upholstery cleaner and a gentle pass with a soft brush, while the dashboard, steering wheel, and instrument cluster are cleaned using diluted APC on a folded microfiber cloth. Door panels follow — with close attention to the armrest pocket, which collects remarkable concentrations of sticky residue in working trucks over relatively short periods. Seats are cleaned last in the sequence because debris dislodged from overhead and lateral surfaces inevitably settles downward, making a second pass necessary on seats that are cleaned too early in the workflow.
Rubber floor liners in trucks trap a compressed layer of grit and retained moisture that cloth mats cannot match for sheer volume of embedded material. Our team removes rubber liners and scrubs them with a stiff brush and diluted degreaser, then rinses and allows full air-drying before reinstalling — a drying step that most people skip in the interest of time, which reliably causes odor to return within days. The door sill plates (the trim strips along the lower edge of each door opening) are among the most overlooked surfaces in any truck detail, despite being the area every occupant contacts physically every single time they enter or exit the vehicle.
The center console and cup holder area accumulates a concentrated layer of spilled beverages, dust, and small debris that our team has found has the single largest impact on a client’s overall impression of interior cleanliness. Our detailed breakdown in the cup holder and center console cleaning guide covers the specific brushes and extraction techniques that work best across different console designs. For trucks carrying animals regularly, managing cabin odor adds a necessary step that surface cleaning alone cannot address — our guide on removing pet odor from a car interior applies directly to truck cabs, where the larger floor area gives odor-causing bacteria significantly more surface area to colonize.
The most damaging error our team encounters in self-performed truck details is applying products at incorrect concentrations or on incompatible surface types. Using a high-gloss vinyl dressing on the steering wheel creates a slick surface that reduces driver grip — a genuine safety concern that extends well beyond cosmetic outcomes. Spraying protectant directly onto hard plastic panels rather than onto an applicator pad causes uneven buildup in recessed areas and leaves a blotchy finish that is more difficult to correct than the original soiling. Our team always tests new products on a small, inconspicuous area first, which prevents costly surface damage on trucks with specialty matte trim coatings that react unpredictably to standard glossing products.
A truck can appear thoroughly detailed while still retaining a persistent musty or chemical smell because odors live inside porous materials — seat foam, carpet backing, and headliner fabric — not only on the visible surface layer. Applying a fragrance product over embedded odors masks the problem briefly but allows the organic compounds causing the smell to continue breaking down beneath the surface and resurface within days. Enzyme-based cleaners break down those odor-causing compounds at the molecular level, which is why our team uses them as a standard step on any truck that has carried livestock, wet dogs, or food before the job is declared complete.
| Common Mistake | What Goes Wrong | The Correct Approach |
|---|---|---|
| Full-strength APC on dashboard | Streaking and surface degradation over time | Dilute 10:1 for general interior surfaces |
| High-gloss dressing on steering wheel | Reduced grip; genuine safety hazard | Use matte dressing applied to an applicator pad |
| Skipping enzyme odor treatment | Odors return within days of cleaning | Treat all porous surfaces with enzyme cleaner |
| Cleaning seats before overhead surfaces | Debris falls onto already-cleaned seating | Always work from ceiling downward |
| Reinstalling wet rubber floor liners | Trapped moisture causes mold growth and persistent odor | Allow full air-dry before reinstalling |
The most effective long-term strategy for truck interior upkeep is performing brief, consistent cleanup passes that prevent the accumulation that makes a full detail feel like an overwhelming undertaking. Our experience shows that a five-minute weekly routine — removing loose debris, wiping the dashboard and console with a dry microfiber towel, and clearing door pocket storage — reduces the time required for a full quarterly detail by roughly half. For trucks seeing heavy winter use, our recommendations in the winter car maintenance guide include interior-specific steps that address salt transfer from boots and moisture buildup on floor surfaces throughout the colder months.
Most truck owners benefit from a thorough interior detail every 90 days, with a deeper semi-annual session that includes seat foam treatment, headliner cleaning, and door seal conditioning. Our team recommends incorporating the process covered in our guide on cleaning and conditioning car door weatherstripping into every semi-annual detail, since the rubber seals on truck doors take constant heavy traffic from occupants and cargo loading. For owners preparing a vehicle for sale, interior condition is the single largest factor in a buyer’s first impression of perceived value, and our car preparation for sale guide provides a comprehensive checklist covering both interior and exterior steps that make a measurable difference in final sale price.
A thorough truck interior detail takes our team between three and five hours depending on cab size, soil level, and whether odor treatment is required — extended-cab and crew-cab configurations with rear seating consistently add at least an additional hour to the total process time.
Our team uses a diluted upholstery cleaner applied with a medium-bristle brush, working in small overlapping sections, followed immediately by extraction using a wet/dry vacuum or a dry microfiber towel pressed firmly into the fabric to lift suspended dirt before it re-deposits into the fibers.
Most household cleaners contain fragrances, optical brighteners, or surfactant concentrations that are too aggressive for automotive-grade materials — our team avoids them entirely in favor of purpose-formulated interior detailing products that are pH-balanced and tested specifically on automotive surface coatings and adhesives.
Working through a truck interior detail with the right products, correct dilution ratios, and a disciplined top-to-bottom sequence produces results that are immediately noticeable and hold up well between sessions. Our team recommends starting with the vacuum-and-dry-wipe phase this weekend, even without committing to a full detail, simply to assess which zones in the cab have accumulated the most material and which surfaces need the most attention first. Building the brief weekly maintenance habit alongside the quarterly full-detail schedule is the most reliable path to a truck interior that holds its condition, its smell, and its resale value over the long haul — and the investment in the right supplies pays back many times over across the life of the vehicle.
 |
 |
 |
 |

About Diego Ramirez
Diego Ramirez is a maintenance and care specialist who has been wrenching on cars since he was sixteen. He focuses on fluid changes, preventive care routines, paint protection, and the small habits that turn a five-year-old car into a fifteen-year-old car.
Get some FREE car parts & gear.. Or check out the latest free automotive manuals and build guides here.
Disable your ad blocker to unlock all the hidden deals. Hit the button below 🚗
| | | |