by Joshua Thomas
A door ding is one of the most frustrating things that can happen to your car. Someone swings their door open in a parking lot, and suddenly your otherwise perfect panel has a small dent staring back at you. The good news: learning how to fix a door ding yourself is entirely achievable with the right tools and a bit of patience. Most minor dings don't require paint work, meaning you can restore your panel at home for a fraction of what a body shop charges.
Before you grab a repair kit, it helps to understand what you're dealing with. Door dings are typically shallow, circular dents with no paint damage. They differ from deeper collision dents in that the metal has been displaced but not creased. This distinction matters because it determines which repair method will actually work. For a broader overview of dent removal techniques, check out our guide on how to remove dents from a car without painting.
Contents
Not every dent is a good candidate for DIY repair. Spending five minutes assessing the damage before you buy any tools will save you time and money.
Run your finger lightly over the ding. If the paint is intact — no chips, cracks, or scratches — you're in the best possible position for a no-paint repair. If there's paint damage, you'll need to address that separately. Cracked or chipped paint requires touch-up work that goes beyond simple dent pulling. Minor surface scratches alongside a ding can sometimes be handled with polish; see our article on how to remove scratches from car paint at home for that part of the process.
Shallow dings — those less than about 3mm deep — are excellent DIY candidates. Deeper dents, dents on body lines or creases, and dings near panel edges are much harder to repair without professional equipment. Also consider the panel material: steel doors respond differently than aluminum panels, which are more prone to work-hardening and tearing if over-manipulated.
There are three practical DIY approaches, each suited to different situations. Choosing the right one depends on the ding's location, depth, and whether you can access the back of the panel.
PDR is the gold standard for fixing door dings. A technician — or a patient DIYer — uses specialized rods and picks to push the dented metal back into its original position from behind the panel. No filler, no paint, no sanding. The result is invisible when done correctly. PDR works best on shallow dings in the middle of flat panel sections where backside access is possible.
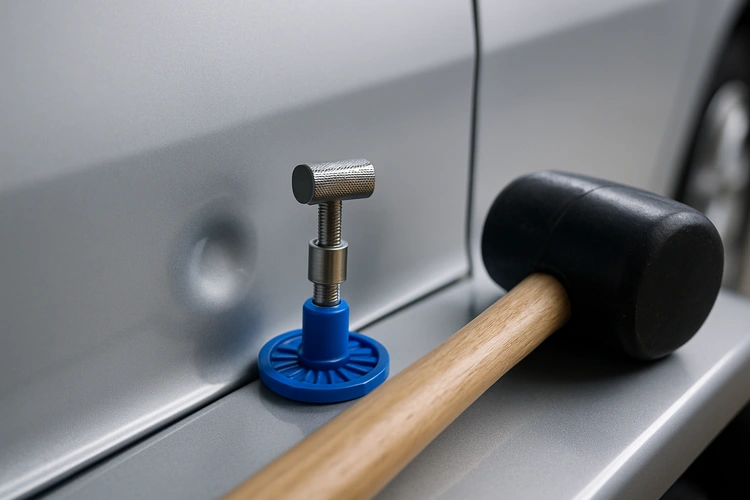
When you can't reach the back of the panel, a glue pull kit is your next best option. A plastic tab is glued to the center of the ding, then a slide hammer or bridge puller is used to draw the metal outward. This method is widely used by professional PDR technicians and is available in consumer-grade kits for under $40. The technique requires careful application — too much force and you'll over-pull, creating a high spot that's harder to correct than the original ding.
Door dings on plastic bumper covers and cladding sometimes respond to heat alone. Pouring hot (not boiling) water over the dent softens the plastic, allowing you to push it back by hand from behind. This does not work on metal panels. It's best suited for shallow pops on flexible plastic trim.
Having the right equipment makes a significant difference. Here's a comparison of what each method requires:
| Method | Key Tools | Approx. Cost | Skill Level | Best For |
|---|---|---|---|---|
| PDR (rod and pick) | PDR rod set, tap-down hammer, LED light board | $30–$80 | Intermediate | Flat panel dings with backside access |
| Glue pull | Glue gun, pull tabs, slide hammer or bridge puller | $25–$50 | Beginner–Intermediate | Dings without backside access |
| Hot water | Kettle, rubber gloves | $0 | Beginner | Shallow plastic bumper dents |
| Dry ice / compressed air | Dry ice block or compressed air can | $5–$15 | Beginner | Very shallow dings in warm conditions |
According to the National Highway Traffic Safety Administration, minor cosmetic damage that doesn't affect structural integrity or safety systems can be repaired at the owner's discretion without affecting roadworthiness. This means a well-executed DIY door ding repair is perfectly acceptable for most vehicles.
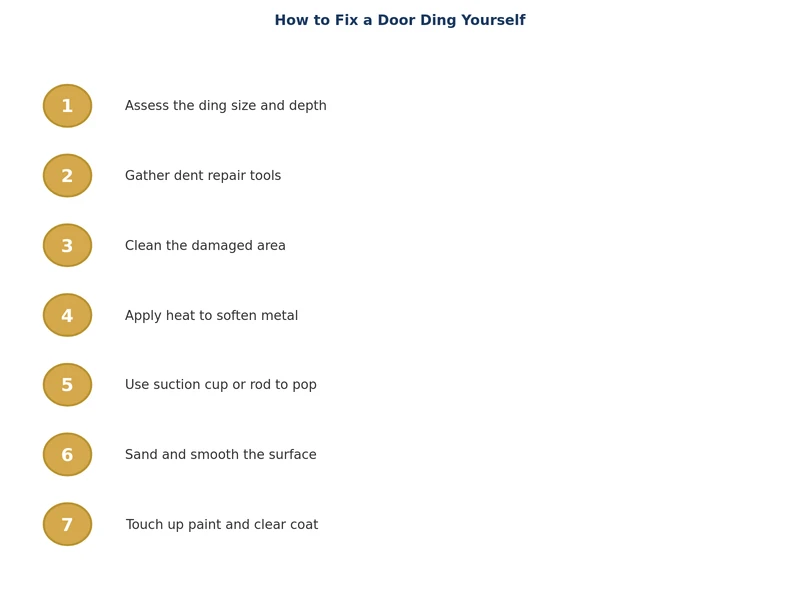
This walkthrough covers the PDR rod method, which gives the cleanest result for accessible metal-panel dings.
Wash and dry the panel thoroughly. Even small particles of grit can scratch the paint as you work. Work in a shaded area or indoors — direct sunlight makes it harder to read the reflections you'll use to guide your repairs. Set up an LED light board or use a fluorescent shop light; reflecting it off the panel lets you see the exact contour of the dent clearly.
Remove the door panel trim to expose the inner door structure. Most door panels are held by plastic clips around the perimeter and one or two screws hidden behind covers. Use a plastic trim removal tool to pop the clips without cracking them. Inside, you'll find the metal door skin separated from the structural frame by some open space. You may need to peel back a plastic moisture barrier — do this carefully so you can re-stick it when finished.
Identify where your PDR rod needs to enter and how it lines up with the ding. Shine a light inside the door and look from the outside to confirm alignment. This is the most time-consuming part of the process, but getting it right determines the quality of the final result.
Insert the appropriate PDR rod through the door's access hole and position the tip directly behind the lowest point of the ding. Apply slow, steady upward pressure — you're not jabbing or hammering, you're coaxing the metal back. Watch the reflection in your light board to monitor progress. The ding will gradually reduce in depth.
As the ding levels out, you may see a small high spot where you slightly over-pushed. Use a tap-down tool — a blunt-tipped hammer with a nylon face — to gently knock that high point back down. Work in small increments, alternating between pushing from behind and tapping from the front, until the panel is flat. Once complete, re-stick the moisture barrier, reinstall the door panel, and polish the area lightly.
Knowing when to call a professional saves you from turning a small problem into a larger one. DIY PDR is realistic for single shallow dings on flat sections. Multiple dings, deep creases, aluminum panels, or damage near body lines are situations where a trained PDR technician will produce a noticeably better result.
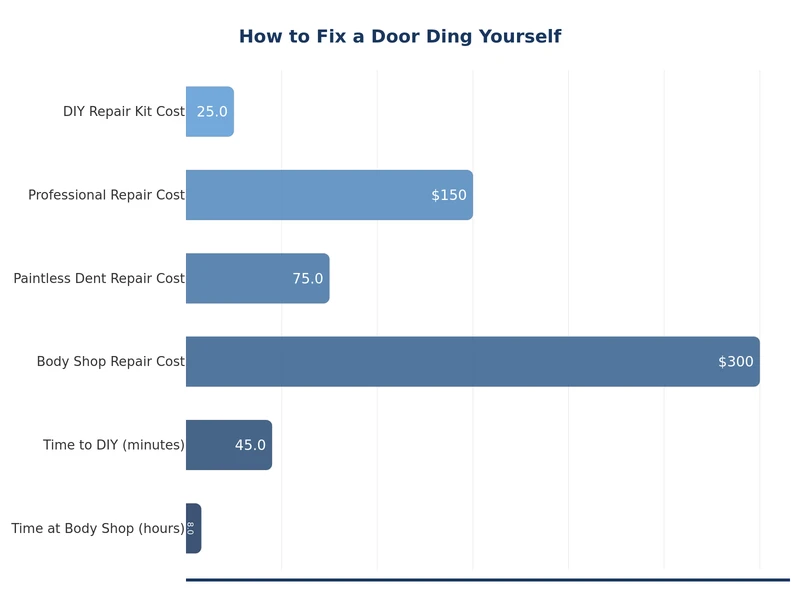
Professional PDR for a single door ding typically costs $75–$150 at a reputable shop. A full body shop repair involving filler and paint can run $300–$600 or more for the same panel. The DIY route, by comparison, costs $25–$80 in tools — tools you'll keep for future use. If your car's paint has started showing other wear alongside the ding, it may be worth bundling the repair with a paint correction session. Our guide on how to restore faded car paint without repainting walks through paint correction options that pair well with a freshly repaired panel.
The best repair is the one you never need. A few habits go a long way toward keeping your panels dent-free:
For very shallow dings on plastic bumper cladding, hot water and hand pressure sometimes work. For metal panels, however, you'll need at minimum a glue pull kit to get a clean result. Attempting to fix a metal door ding without proper tools often makes the damage worse.
Press a straight edge or ruler across the dent. If the depth is more than about 3–4mm, or if the dent sits on a body crease or panel edge, DIY PDR becomes significantly harder. Creased metal is much more difficult to work out cleanly than a smooth, round ding.
A well-executed PDR repair that leaves no trace is essentially invisible to buyers and appraisers. A poor repair — one with a remaining high spot, tool marks, or damaged paint — can actually lower value more than leaving the original ding. If you're unsure of your skills, a professional PDR job is worth the cost before selling.
The adhesive used in PDR glue pull kits is designed to release cleanly from automotive paint without leaving residue. Any remaining glue comes off with isopropyl alcohol. As long as you avoid using super glue or construction adhesive — which can damage clear coat when removed — the process is safe for factory paint.
A first-time repair typically takes two to three hours including panel removal, repair, and reinstallation. With practice, simple dings can be addressed in under an hour. The most time-consuming step is removing and reinstalling the door panel trim correctly.
Yes, but the process is two-part. Fix the dent first using PDR or a glue pull, then address the paint chip separately with touch-up paint matched to your vehicle's color code. Attempting to fill the paint chip with body filler before fixing the dent will result in an uneven surface.
 |
 |
 |
 |
About Joshua Thomas
Joshua Thomas just simply loves cars and willing to work on them whenever there's chance... sometimes for free.
He started CarCareTotal back in 2017 from the advices of total strangers who witnessed his amazing skills in car repairs here and there.
His goal with this creation is to help car owners better learn how to maintain and repair their cars; as such, the site would cover alot of areas: troubleshooting, product recommendations, tips & tricks.
Joshua received Bachelor of Science in Mechanical Engineering at San Diego State University.
Get some FREE car parts & gear.. Or check out the latest free automotive manuals and build guides here.
Disable your ad blocker to unlock all the hidden deals. Hit the button below 🚗
| | | |