by Joshua Thomas
A chip or crack in your windshield can appear out of nowhere — a stray pebble on the highway, a temperature swing overnight, or a careless door slam. Before you panic about a costly replacement, know this: learning how to fix a cracked windshield yourself is entirely possible for small damage. With the right resin kit and a little patience, you can stop a chip from spreading and restore optical clarity in under an hour. This guide walks you through everything — from assessing the damage to finishing touches — so you can handle it confidently at home.
While you're keeping your car in top shape, it's also worth checking your windshield wiper blades — worn blades can smear the very repair you just made. And if road debris has also nicked your paint, see our guide on how to fix paint chips on your car for a matching DIY approach.
Contents
Yes — but only for certain types of damage. The windshield is a laminated safety glass with two glass layers bonded by a plastic interlayer. Most DIY resin kits work by filling the air pocket left by the impact with optical resin, which bonds to the glass and restores structural integrity. The repair won't be invisible, but it will be significantly less noticeable and, more importantly, will stop the crack from growing.
Not all cracks are created equal. Understanding your damage type helps you decide whether a DIY fix is realistic.
According to the National Highway Traffic Safety Administration (NHTSA), the windshield contributes up to 30% of a vehicle's structural rigidity in a rollover. That's why knowing the repair threshold matters — not just for clarity, but for safety.
General rule: if the damage fits within a dollar bill and is not in the driver's direct line of sight, you can repair it. Anything longer than 6 inches, deeper than the first glass layer, or directly in the line of sight needs professional replacement.

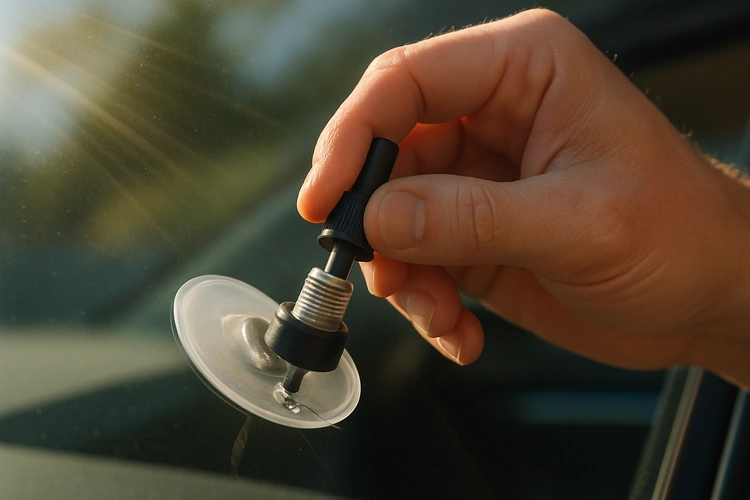
You don't need a professional's toolkit. A basic windshield repair kit from an auto parts store costs between $10 and $30 and contains everything required. Popular brands include Rain-X, Permatex, and Blue-Star.
You'll also want: a sunny day (or UV lamp), clean microfiber cloths, and about 45–60 minutes of uninterrupted time.
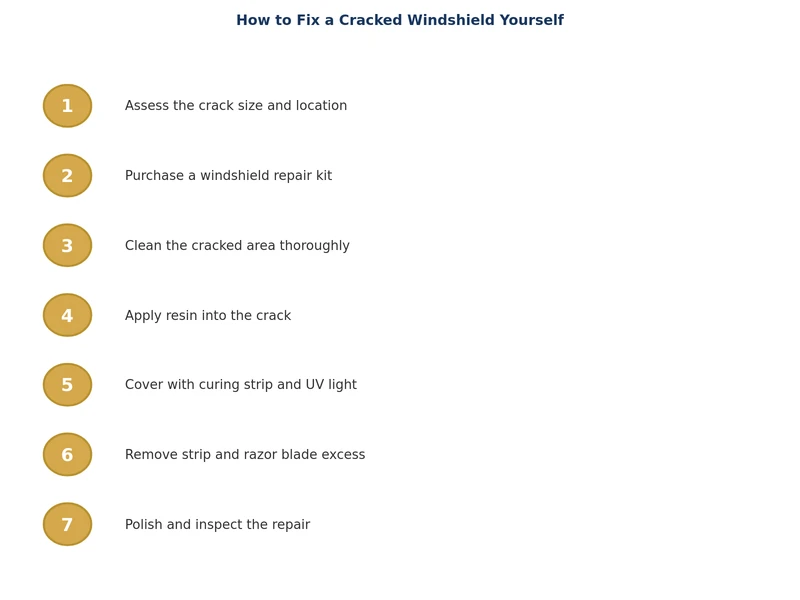
Follow these steps carefully. Rushing any phase — especially curing — is the most common reason DIY repairs look poor.
Here's how the most popular DIY windshield repair kits compare on the features that matter most:
| Kit | Price (approx.) | Damage Types | UV Cure Time | Repairs per Kit | Best For |
|---|---|---|---|---|---|
| Rain-X Windshield Repair | $10–$13 | Chips, bull's-eye, star | 5 min | 1 | Quick single repair |
| Permatex Windshield Repair | $12–$15 | Chips, cracks up to 1" | 5–10 min | 1 | Small cracks |
| Blue-Star Windshield Repair | $20–$25 | All common types | 10 min | 2 | Multiple repairs, best clarity |
| Mookis Windshield Repair | $15–$18 | Chips, star, half-moon | 5 min | 2 | Budget multi-pack |
| Clearshield Pro | $28–$32 | All types up to 2" | 8 min | 3 | Professional-quality finish |
Even with a quality kit, a few technique details separate a near-invisible repair from a cloudy smudge.
Keeping the rest of your car's exterior protected goes hand in hand with windshield care. Our guide on how to protect car paint covers waxing, sealants, and coatings that can also help preserve trim and rubber seals around the glass.
DIY repair has real limits. Don't attempt a home fix if:
Professional windshield repair typically costs $60–$100; full replacement ranges from $200 to $600 depending on the vehicle and glass type. Many insurance policies cover repair at no cost under comprehensive coverage — call your insurer before paying out of pocket.
Also worth noting: road debris that cracks your windshield can just as easily damage body panels. If you've noticed chips alongside the glass damage, see our guide on how to remove rust from car body panels to address any metal damage before it spreads.
Yes, for chips and cracks smaller than 6 inches that are not in the driver's direct line of sight. DIY resin kits are widely available and effective for most common impact damage types including bull's-eyes, star breaks, and chips.
Most repairs take 45–60 minutes from start to finish, including prep, resin injection, and UV curing. Allow an additional 24 hours before washing the car to let the resin fully cure and bond.
Not completely. A repaired chip will be significantly less noticeable and the resin will stop it from spreading, but some faint outline may remain under certain lighting angles. The goal is structural integrity and clarity improvement, not perfection.
An unrepaired crack will almost always spread, especially under temperature changes, vibration, or pressure. What starts as a small chip can become a full-length crack requiring costly replacement within days or weeks.
Many comprehensive auto insurance policies cover windshield chip repair at no cost — sometimes with no deductible. Check with your insurer before paying out of pocket, as a repair claim typically won't raise your rates.
No. DIY kits are designed for impact chips and cracks up to about 1–2 inches depending on the kit. For longer cracks, especially those near the edges or in the line of sight, professional replacement is the only safe option.
 |
 |
 |
 |
About Joshua Thomas
Joshua Thomas just simply loves cars and willing to work on them whenever there's chance... sometimes for free.
He started CarCareTotal back in 2017 from the advices of total strangers who witnessed his amazing skills in car repairs here and there.
His goal with this creation is to help car owners better learn how to maintain and repair their cars; as such, the site would cover alot of areas: troubleshooting, product recommendations, tips & tricks.
Joshua received Bachelor of Science in Mechanical Engineering at San Diego State University.
Get some FREE car parts & gear.. Or check out the latest free automotive manuals and build guides here.
Disable your ad blocker to unlock all the hidden deals. Hit the button below 🚗
| | | |