by Diego Ramirez
Have you ever noticed small raised blisters on your car's paint and wondered whether you can fix paint bubbling on a car without booking it into a body shop? The answer is yes in most cases — but the repair only holds if you correctly identify what is driving the problem before you reach for sandpaper. Paint bubbling signals that moisture, rust, or an adhesion failure has broken the bond between the paint and the metal beneath it, and the damage spreads outward the longer you leave it untreated.
Whether you have a single blister near a door seam or a cluster developing across a quarter panel, your repair approach should match the depth and severity of what is actually happening beneath the surface. If you have already looked into how to apply touch-up paint to your car, you will recognize several of the core preparation and application steps involved in this repair. This guide covers the causes of paint bubbling, how to read severity correctly, which repair methods fit which situations, the most damaging mistakes to avoid, and the prevention habits that keep bubbles from coming back.
Contents
Before you start sanding or priming anything, you need to understand what actually created the bubble in the first place, because treating the symptom without fixing the root cause means the blister will return within months. Paint bubbling happens when something disrupts the adhesive bond between the paint film and the substrate beneath it, and there are three primary causes that account for the overwhelming majority of cases you will encounter on everyday vehicles.
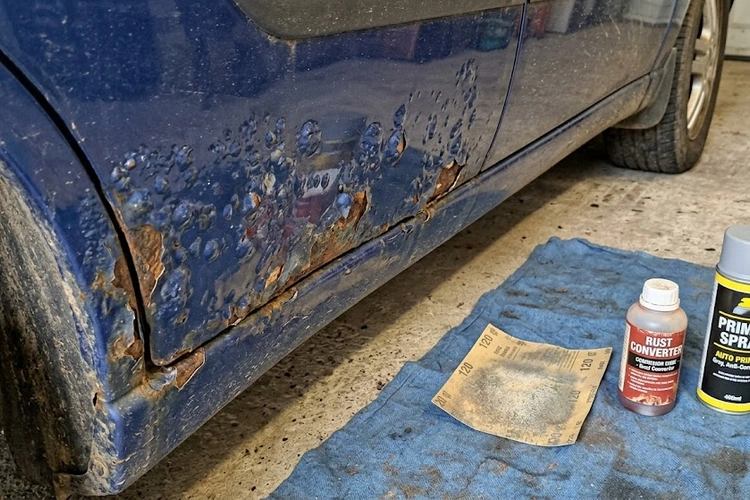
Rust is the most common cause of paint bubbling, particularly on older vehicles and on cars that regularly see salted roads during winter months. When moisture reaches bare metal through a chip, scratch, or porous primer, it begins oxidizing the steel beneath the paint, and the resulting iron oxide physically expands as it develops and grows. According to Wikipedia's overview of rust and corrosion, iron oxide can expand to several times the volume of the original metal it replaces, which explains why even a small entry point can generate a surprisingly large blister in a relatively short period of time.
Road salt accelerates this process substantially by increasing the electrical conductivity of the moisture layer sitting on the metal surface, which speeds up the electrochemical reaction that produces rust. Surface contamination from salt and grime creates exactly the moisture-retention conditions that allow corrosion to begin working beneath the paint long before any bubbling becomes visible from the outside.
Bubbling does not always involve rust — it can result from a paint job applied over a damp surface, in high-humidity conditions, or without adequate curing time between coats. The trapped moisture has nowhere to escape, and heat from direct sunlight gradually forces it outward through the paint film, producing blisters that tend to be smaller and more evenly distributed than rust-driven bubbles. These failures are especially common on repainted used vehicles where the original shop conditions during the repair were not carefully controlled or properly documented.
Grease, wax residue, silicone, and even fingerprint oils can prevent paint from bonding correctly to the primer or metal beneath it, leading to localized adhesion failures that show up as bubbles weeks or months after the paint was first applied. The initial repair often looks clean and smooth, and the failure only becomes visible later as thermal cycling stresses the bond and gradually forces it apart from the substrate below. Knowing how to remove grease from car paint before any paint work begins eliminates one of the most frequent and entirely preventable causes of adhesion-related bubbling.
Accurately reading how serious a bubble is before you commit to a repair approach saves you from either over-engineering a simple fix or under-treating a problem that will return within weeks. Get the severity assessment wrong in either direction, and you end up spending more time and money than the repair should have cost you. Spend a few minutes diagnosing what you are dealing with before ordering materials or making any decisions about professional help.
A surface-level bubble is slightly soft and springy when you press it gently with your finger, and the paint around its edges remains firmly intact without cracking or lifting away from the panel. These are typically early-stage adhesion failures or moisture blisters, and they respond well to a DIY sanding and priming approach without any metal treatment required. A structural bubble, by contrast, feels hard or crunchy when pressed, shows cracking at the edges where the paint is separating and lifting, and often reveals rust-stained or discolored metal when you carefully pierce through the surface film.
Pro Tip: Press the bubble firmly with your fingernail — if the edges crack rather than flex, you are almost certainly dealing with active rust beneath the surface that must be fully removed before any new paint is applied over it.
Paint bubbling concentrates in specific zones that receive the most moisture exposure, road debris impact, and structural flexing stress during normal driving conditions. Knowing where to look makes early detection significantly more reliable during your regular wash routine. Focus your inspections on these high-risk areas:
Choosing the right method for fixing paint bubbling on your car comes down to one central question: is there active rust involved, or is this purely a surface adhesion failure? That single answer determines whether you can address the problem yourself over a weekend or whether the job requires professional metalwork and a controlled spray environment to produce a result that actually lasts.
| Factor | DIY Repair | Professional Repair |
|---|---|---|
| Best suited for | Surface adhesion failures, small blisters with no rust involvement | Rust-through, structural metal damage, panel-wide or recurring blistering |
| Typical cost | $20–$80 in materials | $300–$1,500+ per panel depending on rust depth and panel size |
| Time required | 4–8 hours spread across two days to allow curing | 1–3 shop days including color matching and full drying |
| Expected longevity | 2–5 years with thorough surface preparation throughout | 5–10+ years, often backed by a workmanship warranty |
| Risk if done incorrectly | Bubble returns within weeks if any prep steps are skipped | Low — the shop carries the liability of redoing substandard work |
If your diagnosis confirms the bubble is a surface adhesion issue with no rust present beneath the paint, you can address it yourself with the right materials and adequate patience for the preparation and curing phases. Work through these steps in order and resist the urge to skip ahead or compress the drying stages:
Removing old wax from the repair area and a reasonable perimeter around it before you begin is a step many DIYers skip under time pressure. Learning how to remove old wax buildup from car paint properly ensures the primer bonds to a clean surface rather than sitting on a wax residue layer that will cause the repair to lift again within months.
When rust is involved, the repair scope changes entirely, and cutting corners at this stage leads to the bubble returning in a more advanced and expensive state. A reputable body shop approaches rust-driven paint bubbling by working through this sequence of steps:
Warning: Painting directly over rust without removing it will not stop the corrosion — it hides the problem until the bubble returns, typically larger and far more costly to address the second time around.
The most expensive paint bubble repairs are usually ones that have already been attempted and failed before the car reached a professional, because each failed attempt introduces new contamination and makes the surface harder to treat correctly the next time. These are the mistakes worth understanding before you commit to any repair approach of your own.
Inadequate surface preparation before applying primer is by far the most common reason a paint bubble repair fails and returns within weeks or months of being completed. If you sand down the bubble but leave behind any rust residue, moisture, or surface contamination, the new paint layer will fail in the exact same spot for the exact same reason the original coating failed in the first place. Budget significantly more time for the preparation phase than for the actual paint application — the durability of the entire repair is determined during prep, not during the paint step at the end.
Using the two-bucket car wash method to clean the panel before you begin the repair removes loose contaminants and road film that would otherwise contaminate the bare metal during sanding, which is especially important near rubber trim and molding edges where old wax and detailing product residue tends to accumulate and hide.
Mixing paint products from different chemical systems — applying lacquer over enamel, or using a non-etching aerosol primer over bare metal — creates incompatibility reactions that cause the new paint to lift, wrinkle, or blister again within weeks of application. Always confirm that your primer, basecoat, and clear coat are either from the same product family or are explicitly rated as compatible by their respective manufacturers before you commit to a specific combination of materials for the repair job.
Repairing the bubble you can see while ignoring the surrounding paint is a common oversight that leads to a repeat visit to the same panel within a season or two. Bubbles rarely appear in complete isolation — when one area of the paint film has failed, the surrounding layers are often already under stress and will develop into visible blistering within a few months under normal driving and weather conditions. Inspect and lightly sand at least six inches beyond the visible bubble boundary, and address any soft spots, hairline cracks, or barely-lifting edges you find within that zone before applying primer to the affected area.
Preventing paint bubbling from recurring is mostly a matter of removing the conditions that allow moisture and road debris to reach the metal beneath the paint, and catching small chips early before they become the entry points for the next round of blistering. These habits require no specialized equipment and fit naturally into a regular car care routine that you likely already have in place.
Washing your car regularly removes road salt, mud, and other corrosive contaminants before they have time to work through the clear coat and primer into the metal beneath the paint film. The drying step matters just as much — water pooling in panel seams, door sills, and around window trim creates ongoing moisture exposure in precisely the areas most vulnerable to paint bubbling. Building a habit of drying your car properly after washing without leaving water spots reduces the sustained moisture contact that allows rust to begin forming beneath the paint surface between washes.
During each wash, spend a few minutes scanning the lower panels, wheel arches, and any previously repaired areas for new chips or early-stage bubbles that have not yet broken through the paint surface. Catching a chip while it is still fresh and treating it immediately with properly prepared primer and touch-up paint is far less work than dealing with a full blister repair several months later once moisture has already reached the bare metal and begun oxidizing the steel beneath it.
The areas most prone to rust-driven paint bubbling are often the areas you cannot easily see — the undercarriage, inner fender liners, and rocker panel interiors where road moisture collects and sits undisturbed between wash cycles. Understanding how to protect your car's underbody from rust gives you a clear framework for addressing those hidden high-risk zones before damage migrates upward and creates the blistering you can see from outside the car on the painted body panels.
On the visible paint surfaces, these targeted protective measures significantly reduce the risk of new bubbles forming in the zones that take the most punishment from road conditions:
 |
 |
 |
 |

About Diego Ramirez
Diego Ramirez is a maintenance and care specialist who has been wrenching on cars since he was sixteen. He focuses on fluid changes, preventive care routines, paint protection, and the small habits that turn a five-year-old car into a fifteen-year-old car.
Get some FREE car parts & gear.. Or check out the latest free automotive manuals and build guides here.
Disable your ad blocker to unlock all the hidden deals. Hit the button below 🚗
| | | |