by Diego Ramirez
Roughly one in five vehicles crossing the 100,000-mile mark develops a loose or cracked heat shield, making the rattling heat shield fix one of the most consistently misdiagnosed underbody repairs in the exhaust category. The sound starts as a faint metallic buzz at idle and escalates into a persistent shimmy at highway speeds, and our team has watched countless drivers spend real money on unnecessary diagnostics when the actual culprit was a $6 hose clamp and twenty minutes of floor time. Heat shields are stamped-steel or aluminum deflectors positioned over the catalytic converter, exhaust manifold, and muffler to protect fuel lines, floorboards, and interior panels from dangerous radiated heat.
Staying on top of this kind of repair connects directly to overall vehicle health, which is why our vehicle maintenance resource hub keeps returning to exhaust system inspections as a core routine. A shield that rattles today can drop completely tomorrow, dragging on the road surface and turning a minor annoyance into a genuine driving hazard — and our team takes that risk seriously.
Contents
Before reaching for a wrench, our team always spends five minutes listening carefully to the rattle, because the acoustic signature tells a precise story about where the failure actually lives. A heat shield rattle is characteristically metallic and tinny — distinct from the deeper thud of a loose exhaust hanger or the rhythmic clunk of a worn CV joint — and it tends to peak at specific RPM bands where harmonic resonance sets the loose shield vibrating most aggressively. Most heat shield rattles are loudest between 1,500 and 2,500 RPM and quiet down at sustained highway cruise, which is a reliable diagnostic fingerprint that separates shield failures from most other underbody noise sources. Our team applies the same RPM-correlation method when diagnosing other vehicle noises — the systematic sound-analysis approach we use for a squeaky drive belt applies directly here, since both failures have distinct acoustic windows that narrow down the failure point before any physical inspection begins.
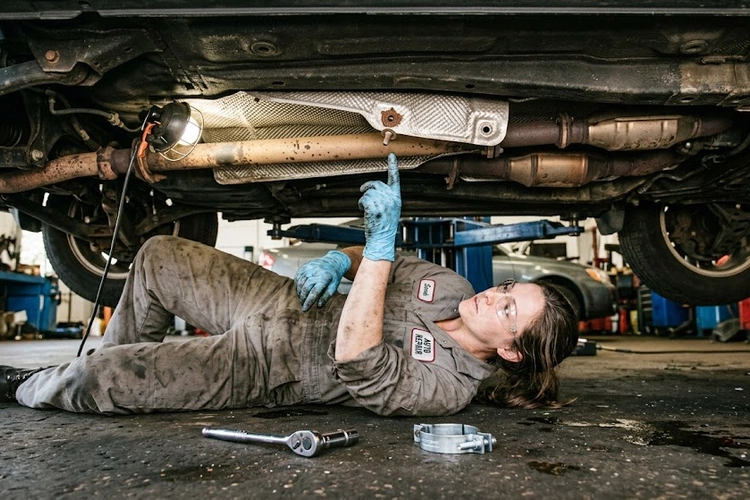
Once the engine cools fully — and our team waits at least 90 minutes after the last drive — a cold inspection with a flashlight reveals everything needed for an accurate diagnosis. The most common failure points are the mounting tabs, which are small stamped-steel ears welded to the shield's perimeter that accept 8mm or 10mm bolts; these tabs frequently rust through on vehicles in salt-belt states, leaving the entire shield suspended by friction alone. Our team also looks for stress cracks across the shield's face, delamination on multi-layer aluminum units, and any evidence that the shield has been contacting the exhaust pipe directly, which shows up as bright wear marks on the pipe surface where the two components have been abrading against each other.
For a straightforward tab-repair job, our standard kit includes a floor jack and jack stands rated for the vehicle's weight, a 3/8-inch drive ratchet with 8mm and 10mm sockets, penetrating oil (PB Blaster is our firm recommendation), stainless steel hose clamps in 2-inch and 3-inch sizes, and self-tapping sheet metal screws in M6 diameter. Budget hardware stores carry all of this for under $20 total, and the job requires no specialized equipment beyond what any serious home mechanic already owns and keeps on the shelf.
Never attempt to work under a vehicle supported only by a floor jack — a rattling heat shield fix requires the vehicle to be stable on rated jack stands before anyone goes underneath.
Our team lifts the vehicle from the designated jacking points, sets it on jack stands at the pinch welds, and sprays all visible heat shield hardware with penetrating oil before attempting removal — seized 8mm bolts are the number-one time thief on this job and often require a full 15-minute soak to break free cleanly. When mounting tabs are intact but bolts have stripped out, self-tapping screws one size larger than the original provide a solid repair that outlasts the factory hardware on most vehicles without any additional reinforcement needed. When tabs have rusted completely away, the cleanest fix involves wrapping a pair of stainless hose clamps around the shield body and the adjacent exhaust pipe, pulling the shield snug against its intended position, and tightening to 40–50 in-lb so the shield cannot shift under thermal cycling. For shields with significant crack damage, the exhaust system layout on most platforms permits a direct replacement shield for under $40 at any parts retailer, and installation mirrors the removal process in reverse with no surprises.
Our team inspects heat shields every 15,000 miles as part of a standard undercarriage walkthrough, which takes about ten minutes and catches corrosion at the surface-rust stage rather than the full tab-penetration stage where replacement becomes unavoidable. The catalytic converter shield deserves particular attention at every oil change interval, since it lives in the highest-temperature zone of the entire exhaust path and experiences more extreme thermal cycling than any other shield on the vehicle. Our approach to differential fluid maintenance follows the same inspection-first discipline — everything under the vehicle gets a thorough look before fluids get touched, and heat shields always go on that checklist.
After completing any heat shield repair, our team applies a thin coat of high-temperature anti-seize compound to all exposed fastener threads and follows up with a rattle-can application of high-temp exhaust paint rated to at least 1,200°F on the shield body itself. This adds perhaps five minutes to the job and meaningfully extends the repair lifespan, particularly in regions where road salt exposure runs from November through March and accelerates oxidation dramatically. Vehicles that see regular highway driving at sustained speeds benefit most from this treatment, since sustained exhaust flow raises under-shield temperatures considerably above what stop-and-go driving produces.
The rattling heat shield fix is genuinely one of the more affordable exhaust repairs on any vehicle, and our team has never spent more than $45 on parts for a DIY job regardless of the vehicle platform. The table below reflects realistic costs across the three most common repair scenarios our team encounters in the field.
| Repair Scenario | Parts Cost | Time Required | Skill Level |
|---|---|---|---|
| Hose clamp wrap (loose shield, tabs missing) | $5–$12 | 20–30 min | Beginner |
| Self-tapping screw replacement (stripped bolts) | $8–$15 | 30–45 min | Beginner |
| Full shield replacement (cracked or rusted through) | $25–$45 | 45–75 min | Intermediate |
Taking this job to a shop typically runs $80–$150 in labor for a simple hose clamp or hardware fix, and $150–$250 for a full shield replacement once parts and shop labor combine, based on current market rates our team has tracked across multiple regions. Our clear recommendation is to handle this at home unless the vehicle requires simultaneous catalytic converter work, since that overlapping labor scenario is the one case where shop pricing produces genuine savings for the owner.
On vehicles with 120,000–180,000 miles in northern states, our team consistently finds that the catalytic converter heat shield has lost at least two of its three mounting tabs to rust penetration, while the surviving tab holds the shield at an angle that amplifies vibration rather than damping it against the exhaust housing. In these cases, a full hose-clamp wrap combined with a new stainless self-tapper through the surviving tab produces a repair that outlasts the vehicle's remaining service life without issue. The same corrosion forces that attack heat shield tabs attack every neighboring ferrous fastener under the car, so our team always treats a heat shield job as a prompt to inspect exhaust hangers and flange bolts while everything is already accessed.
Vehicles that sit unused for extended periods develop a particularly aggressive form of heat shield corrosion, since condensation accumulates inside the exhaust system and creates an acidic environment that attacks steel from the inside out — our guide on maintaining a car that sits long-term covers the full spectrum of storage-related degradation, and heat shield tab failure consistently ranks in our top five findings. After returning a stored vehicle to regular service, our team always performs a cold undercarriage inspection before the first extended highway drive, because a shield that sounded acceptable at idle can drop loose under sustained vibration at 65 mph when the resonance characteristics change with speed.
Our team considers any heat shield repair a strong DIY candidate when the shield body itself is structurally sound and only the mounting hardware has failed — this covers the majority of cases our team encounters, probably 70% or more across all vehicle types and age ranges. If a cold visual inspection shows the shield sitting roughly in its correct position but with obvious play when pushed firmly by hand, the hose clamp method is nearly always the right call and takes less time than a typical oil change. The job requires no lifting of major components, no dealing with pressurized systems, and no specialized torque specifications beyond hand-tight plus a quarter turn on the clamp hardware.
Our team routes jobs to a professional shop when the catalytic converter itself is implicated in the failure — specifically when a shield has been contacting the converter body long enough to damage the ceramic substrate, which produces a rattling sound from inside the converter body rather than from the sheet-metal shield surface. That internal rattling pattern has a different character than a loose shield: it persists steadily at idle, doesn't change meaningfully with RPM variation, and often arrives alongside a sulfur smell or a check-engine light throwing catalyst efficiency codes. Our team treats catalyst substrate damage as a non-negotiable shop job, since the repair involves a component with significant emissions compliance implications and requires proper diagnostic equipment to assess accurately.
A loose heat shield isn't immediately catastrophic in most cases, but our team strongly recommends addressing it within a week or two, since a fully detached shield can drag on the road surface and create a hazard for surrounding traffic. The larger concern is thermal: a missing shield allows dangerous radiated heat to reach fuel lines and floorboards directly, which creates a fire risk on any vehicle with even minor fuel system seepage.
Our team has completed this repair on flat ground using a floor jack and rated jack stands many times over, and the job is entirely manageable without lift access for most vehicles. Sedans sit lower than trucks and SUVs but the repair doesn't require overhead access — a quality creeper and a solid flashlight handle the situation cleanly and safely when the vehicle is properly supported on stands.
A properly installed stainless hose clamp repair holds for years in our team's experience — our team has inspected vehicles two and three years after this specific fix with no movement or measurable degradation in clamp position. Stainless hardware doesn't rust, and the clamp tension tends to increase slightly as thermal cycling compresses the contact surfaces, making the repair effectively self-tightening over its service life.
A loose or missing heat shield has no direct effect on engine performance or fuel economy under normal operating conditions, since it plays no role in combustion or exhaust flow restriction. The risk is indirect: sustained heat exposure to nearby fuel lines, brake lines, and wiring harnesses causes progressive degradation that eventually does compromise both performance and safety — which is exactly why our team treats this as a priority repair rather than a deferred cosmetic item.
 |
 |
 |
 |

About Diego Ramirez
Diego Ramirez is a maintenance and care specialist who has been wrenching on cars since he was sixteen. He focuses on fluid changes, preventive care routines, paint protection, and the small habits that turn a five-year-old car into a fifteen-year-old car.
Get some FREE car parts & gear.. Or check out the latest free automotive manuals and build guides here.
Disable your ad blocker to unlock all the hidden deals. Hit the button below 🚗
| | | |