Car Care ›
by Joshua Thomas
Last spring, our team was working through a batch of project cars when we pulled a door trim panel and found a fist-sized void where solid metal should have been — the kind of through-panel rot that starts as a tiny bubble and quietly consumes everything underneath for years before anyone notices. Learning how to repair rust holes in car body panels is one of those skills that pays dividends immediately, because professional bodywork quotes for rust repair can run well into four figures even on modest damage. Our team has consistently found that with the right materials — including a quality product from our guide to the best car body fillers — most cosmetic panel repairs are genuinely within reach for a methodical home mechanic.
Contents
According to Wikipedia's overview of rust formation, the oxidation of iron is a self-reinforcing electrochemical process where the iron oxide byproduct itself wicks in additional moisture, accelerating the corrosion rate as the damage grows. Factory automotive steel receives zinc phosphate primer and e-coat layers precisely to interrupt this cycle, but any chip or scratch that breaches the coating creates an initiation site that the atmosphere exploits immediately. Our team has watched winter road salt compress a minor paint chip into a perforation within a single season on vehicles stored outdoors without adequate protection.
Moisture-trapping geometry is the common thread among the areas our team sees fail first on aging vehicles:
Keeping wheel arches clear of compacted debris is one of the simplest habits anyone can adopt, and our team recommends pairing arch inspections with a regular wheel cleaning routine — the reviews in our best wheel cleaner guide include products well suited to blasting out packed mud and road film from arch liners before they trap moisture against the metal.
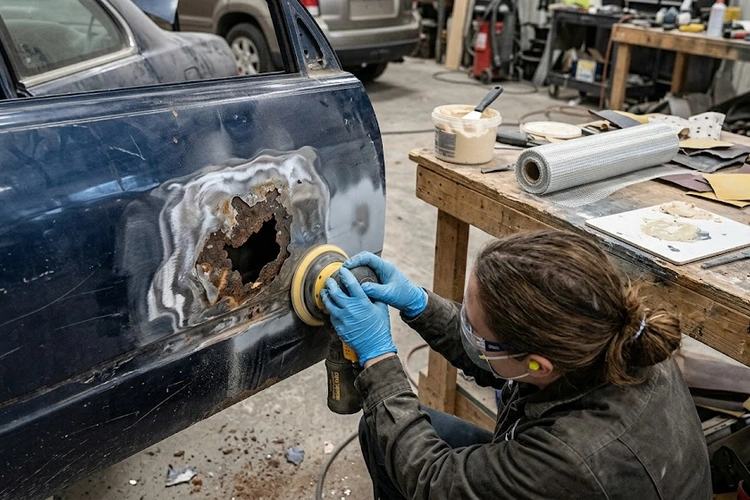
Surface rust presents as a reddish discoloration under bubbling or blistering paint, and at this stage the underlying metal is largely intact, with only the topcoat and e-coat compromised. Penetrating rust has consumed the full panel thickness and typically shows as a soft, flaking area when probed with a pick tool, or as an actual void if the degradation is advanced enough. Our team's consistent recommendation is that most people incorporate a thorough underbody probe inspection — using a flashlight and a screwdriver — into every seasonal service interval, because catching corrosion at the surface stage cuts remediation cost and effort by more than half compared to dealing with through-metal damage.
Pro tip: Our team always probes suspect paint bubbles with a pick tool before ordering materials — if the metal collapses inward under light pressure, the damage is through-panel and a mesh or patch backing is non-negotiable, not optional.
Paint damage on other exterior surfaces follows a similar progression to rust initiation, and our team's analysis in the windshield cracking causes article parallels the rust discussion — small environmental breaches compound quickly when left unaddressed, whether in glass or in steel panels.
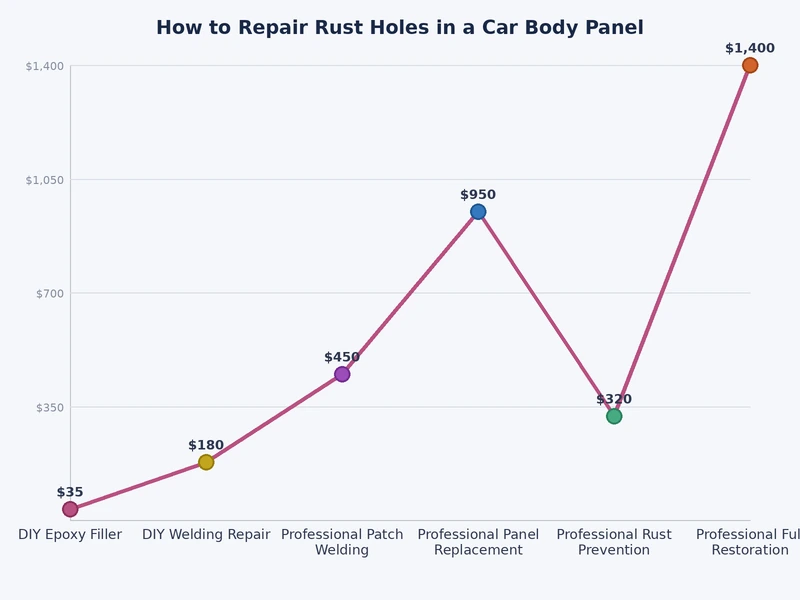
The backing method selected before filling a rust hole determines whether the repair lasts two years or a decade, and our team has worked through all three primary approaches across a wide range of panel types and damage sizes. The table below reflects our collective experience with each method's practical trade-offs:
| Method | Best Hole Size | Skill Level | Durability | Approximate Cost |
|---|---|---|---|---|
| Fiberglass mesh + body filler | Up to 2 inches | Beginner | Moderate (3–6 years) | $20–$45 |
| Aluminum patch panel | 2–6 inches | Intermediate | Good (5–10 years) | $40–$90 |
| Welded steel patch | Any size, structural areas | Advanced | Excellent (permanent) | $80–$250+ |
For most non-structural cosmetic panels — door skins, front fenders, and quarter panels — the fiberglass mesh approach delivers results that most people find more than adequate, provided the surrounding metal is solid and prep work is thorough. Our full-kit inventory includes body filler, self-etching primer, 80/120/220/400-grit sandpaper, fiberglass cloth or mesh tape, rust converter, and a guide coat spray can for revealing low spots before color goes on.
The foundational principle in any approach to how to repair rust holes in car panels is that no filler product bonds reliably to active rust — all compromised metal must be removed before any product contacts the surface. Our team starts every repair by cutting back with a rotary cut-off wheel or aviation snips until clean, bright metal is visible on every edge, then treating the exposed area and all adjacent pinholes with a phosphoric acid-based rust converter and allowing full cure — typically 30 to 60 minutes.
With treated bare metal ready, our team cuts a fiberglass mesh patch sized to overlap the hole by at least one inch on every side, then mixes body filler to the manufacturer's specified hardener ratio and presses the mesh firmly into the first wet coat to create a keyed, dimensionally stable backing. A second and third skim coat — each applied after the previous layer reaches a firm-but-not-fully-cured state — builds the surface to slightly proud of the surrounding panel, leaving material for block sanding flush. Our experience is consistent: a rigid flat sanding block on this stage produces dramatically flatter results than a soft pad, and the extra time invested in achieving a genuinely level surface before primer goes on eliminates the filler shadow that shows through paint in raking light.
Just as our guide on how to use a tire plug kit emphasizes that proper plug seating is more important than speed, the same patience principle applies to body filler — the material needs to be worked correctly on the first application rather than piled on and sanded back aggressively.
Self-etching primer — also called acid-etch or direct-to-metal primer — creates a chemical bond with bare steel that standard sandable primer cannot replicate, and our team treats it as mandatory rather than optional on any repair that exposes bare metal or treated rust surfaces. After etching primer has cured, a guide coat applied in a contrasting color reveals low spots in the filler work that need additional skim coats before color is laid down. Color-matched aerosol rattlecan paint, while not a concours solution, delivers acceptable cosmetic results when applied in four to six light coats with proper flash time between each pass.
Anyone considering a paint protection film or vinyl wrap over a repaired panel should account for the fact that adhesion over body filler requires fully cured primer and an absolutely dust-free surface, and our team's experience with post-repair wrap applications suggests that a 72-hour primer cure window produces the most reliable bond before wrap installation.
A completed rust repair restores cosmetic integrity, but the underlying vulnerability — moisture finding a path through compromised paint — persists unless the vehicle's entire protective envelope is addressed simultaneously. Our team's tiered approach starts with a thorough decontamination wash, followed by application of a high-quality ceramic coating across all exterior panels, which creates a hydrophobic barrier that slows the progression of minor chips and scratches before they can initiate new corrosion cycles. For vehicles stored outdoors in coastal or high-humidity regions, pairing a ceramic treatment with one of the best car covers available adds a physical barrier against moisture, environmental fallout, and UV degradation that coatings alone cannot fully address.
Our team also recommends periodic underbody inspection and fresh rubberized undercoating on seams and pinch welds after any rough road use that may have disturbed factory coverage. Those evaluating coating options will find a thorough comparison in our graphene vs. ceramic coating analysis — both technologies offer genuine rust-prevention benefits when applied to a properly prepared surface, with graphene variants generally showing improved hydrophobic retention in our long-term testing.
Body filler applied without a fiberglass mesh or metal backing provides structurally reliable results only on voids up to roughly half an inch in diameter — anything larger requires a keyed substrate that gives the filler something rigid to bond against, and our team uses mesh tape on every hole beyond pinhole scale to prevent cracking under panel flex.
Our team regularly completes durable, cosmetically clean repairs on non-structural panels using fiberglass mesh and body filler with no welding equipment involved, and most people working in a home garage can achieve professional-looking results on door skins and fenders with this approach, provided prep work removes all active rust thoroughly before any filler is applied.
In our team's experience across multiple climates, a properly executed mesh-backed filler repair with self-etching primer and quality topcoat holds up for between three and seven years, with longevity increasing significantly when a protective ceramic coating or PPF is applied over the repaired area after paint cure.
Phosphoric acid rust converters chemically neutralize iron oxide and transform it into iron phosphate — a stable, paintable compound — rather than simply slowing the reaction, and our team treats converter application as a mandatory step, though it is not a substitute for cutting back all visibly rotted metal before any product is applied.
Rust can reinitiate in a repaired area if moisture finds access through a topcoat crack, a filler micro-void, or if adjacent metal with latent rust was not fully treated during the original repair, which is why our team always extends rust converter treatment well beyond the visible damage boundary and addresses every pinhole in the surrounding panel.
Self-etching primer — formulated with phosphoric acid to chemically key into bare steel — provides adhesion that standard sandable primer cannot match on metal surfaces, and our team applies it as the mandatory first coat over any bare metal or rust-converted surface before any body filler skim coat or topcoat goes on.
Wheel arch repairs are consistently more demanding in our experience because the area faces continuous abrasion from road debris and trapped moisture, requiring rubberized topcoat or underbody coating for durability rather than standard paint, while door panel repairs in sheltered locations are more forgiving and respond well to standard body filler and color-matched rattlecan finishing.
 |
 |
 |
 |
About Joshua Thomas
Joshua Thomas holds a Bachelor of Science in Mechanical Engineering from San Diego State University and has spent years applying that technical foundation to hands-on automotive work — from routine maintenance to full mechanical repairs. He founded CarCareTotal in 2017 to give car owners the kind of clear, practical guidance that helps them understand what is happening under the hood and make smarter decisions about upkeep and repairs. At CarCareTotal, he oversees editorial direction and covers automotive fundamentals, maintenance guides, and troubleshooting resources for everyday drivers.
Get some FREE car parts & gear.. Or check out the latest free automotive manuals and build guides here.
Disable your ad blocker to unlock all the hidden deals. Hit the button below 🚗
| | | |