by Joshua Thomas
A slow tire leak is one of those problems that sneaks up on you. You notice the tire looks a little low, add some air, and a few days later it's low again. Learning how to fix a slow tire leak yourself can save you a trip to the shop and keep you safer on the road. Whether it's a nail, a faulty valve stem, or a bead leak, most slow leaks are fixable with basic tools and a bit of patience. Before you start, it's also worth knowing how to check your tire pressure so you can confirm the leak and verify your repair.
Slow leaks are deceptive because the tire may hold air for days before going noticeably flat. That makes them easy to ignore — but they shouldn't be. An underinflated tire wears unevenly, reduces fuel economy, and can fail suddenly at highway speeds. According to the National Highway Traffic Safety Administration (NHTSA), tire failures contribute to thousands of crashes each year, many of which are preventable with basic maintenance.
Contents
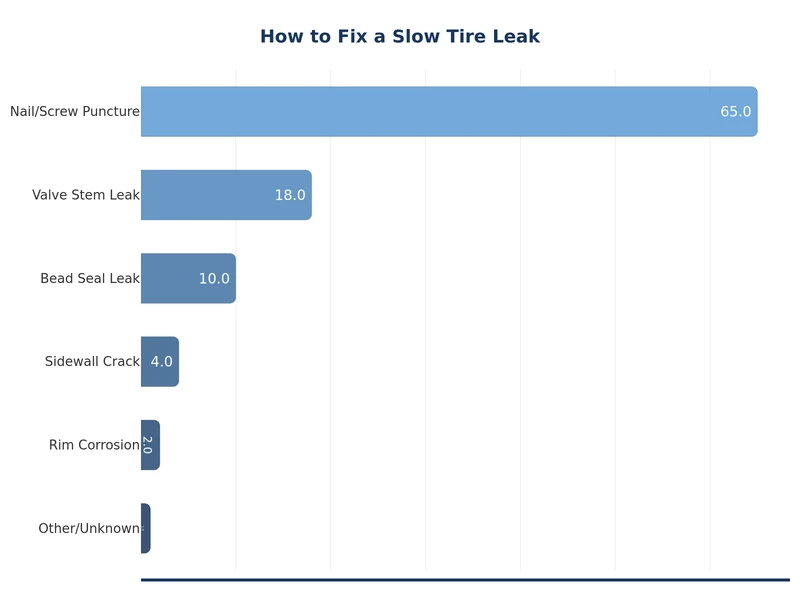
Before you fix a slow leak, you need to understand what's causing it. Not all tire leaks come from punctures — several other factors can cause gradual air loss.
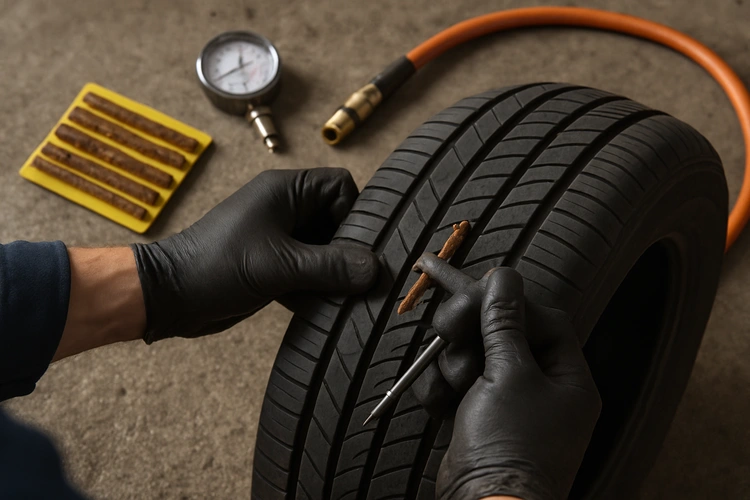
The most common cause. A nail or screw embeds in the tread, and rather than causing an immediate flat, it seals itself partially against the rubber. Air escapes slowly around the object. As long as the object stays in place, the tire may hold pressure for days before going noticeably low.
The valve stem is the small rubber or metal fitting you use to inflate the tire. Rubber stems crack and harden over time, especially with heat exposure. The valve core inside can also loosen. Even a tiny gap allows a consistent slow leak — sometimes just 1–2 PSI per week.
The tire bead is the edge that seats against the wheel rim. Corrosion on the rim, a bent rim from a pothole, or improper mounting can prevent a complete seal. Bead leaks are common on older vehicles and those that have had a tire changed incorrectly. They're harder to spot and often require professional dismounting to fix properly.
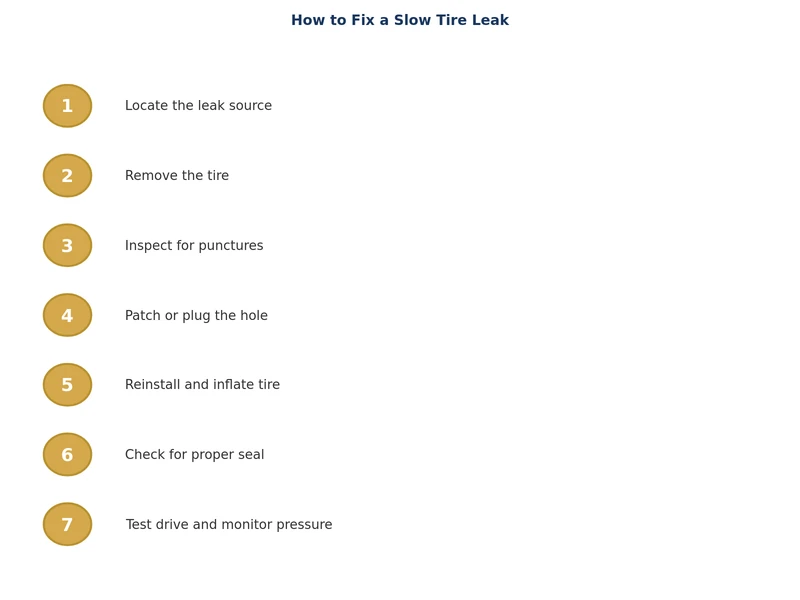
Diagnosing a slow leak is the most important step. Don't attempt a repair until you've confirmed exactly where the air is escaping.
Mix dish soap with water in a spray bottle. Inflate the tire to the recommended PSI, then spray the entire surface — tread, sidewalls, and the valve stem. Watch closely for bubbles. Even a slow leak will produce a steady stream of small bubbles at the source. Mark the spot with chalk or a marker before deflating.
Remove the wheel and submerge sections of the tire in a tub or bucket of water. This works well for finding bead leaks and small sidewall punctures that are harder to locate with the spray method. Look for a chain of bubbles rising from the surface. Rotate the tire slowly through the water for full coverage.
Once you've located the source, choose the right repair method. The approach depends on where the leak is and what caused it.
For tread punctures from nails or screws, a plug-patch combo is the industry-standard repair. A plug alone (the string-type insert sold at auto parts stores) is considered a temporary fix. A patch alone doesn't seal the hole through the tread. The correct repair involves removing the tire, cleaning the puncture from the inside, applying a vulcanizing patch, and inserting a rubber stem through the tread. This is what tire shops perform as a proper repair. If you're doing it yourself, plug-only kits are widely available and adequate as a temporary measure to get you to a shop. For a complete DIY guide on handling tire emergencies, see how to change a flat tire.
Steps for a plug repair (temporary):
If the leak is at the valve stem, the fix is inexpensive. First, try tightening the valve core with an inexpensive valve core tool — sometimes a loose core is all it is. If the rubber stem itself is cracked or the leak persists, the entire stem needs replacement. This requires removing the tire from the rim, so most drivers have a shop do it during a rotation or other service. A new valve stem costs under $5 in parts.
Products like Slime or Fix-a-Flat inject a liquid sealant through the valve stem. The sealant coats the inside of the tire and plugs small punctures as the tire rotates. This is strictly a temporary fix — it's messy, can throw off wheel balance, and some shops charge extra to clean it before a proper repair. Use it only when you're stranded and can't remove the wheel. Sealants generally work on punctures up to 1/4 inch in diameter.
Not all repair methods are equal. Use this table to choose the right approach for your situation:
| Repair Method | Best For | Durability | DIY Friendly | Approx. Cost |
|---|---|---|---|---|
| Plug-Patch Combo | Tread punctures (nails, screws) | Permanent | Shop recommended | $15–$30 at shop |
| Plug Only (string) | Tread punctures — temporary | Temporary | Yes | $5–$10 kit |
| Valve Core Tightening | Loose valve core | Permanent | Yes | Under $5 |
| Valve Stem Replacement | Cracked or damaged valve stem | Permanent | Requires tire removal | $5–$15 at shop |
| Bead Reseating + Sealant | Rim corrosion, bead leaks | Varies | No — shop only | $20–$50 |
| Liquid Sealant (Slime) | Emergency temporary fix | Temporary only | Yes | $8–$15 |
Not every slow leak can or should be repaired. There are situations where replacement is the only safe option.
Replace the tire if:
If you're uncertain, have a tire professional inspect it. A $30 repair is not worth risking a blowout. Understanding the broader context of tire and brake maintenance together can help — check out our post on how to inspect and replace brake pads for a complete picture of wheel-end safety.
You can't avoid every nail on the road, but you can reduce the likelihood of slow leaks and catch them early.
Consistent maintenance is the best defense. The same discipline that keeps you on top of tire condition applies across your vehicle — small issues caught early rarely become expensive ones.
The most common sign is a tire that repeatedly needs air without an obvious flat. If you're adding air every few days or weeks and there's no visible damage, you likely have a slow leak. Use a pressure gauge to track the rate of loss and compare across all four tires.
Only for short distances and only if the tire is still near the recommended pressure. Driving on an underinflated tire generates excess heat and can damage the sidewall structurally — damage that won't be visible from the outside. Address the leak as soon as possible rather than repeatedly topping up the air.
A plug alone is considered a temporary repair by most tire manufacturers and the NHTSA. A proper permanent repair requires dismounting the tire and applying a plug-patch combination from the inside. Plugs can last a long time without failing, but they don't meet the standard for a safe permanent repair.
A DIY plug repair takes about 15–20 minutes. A shop repair using a proper plug-patch typically takes 30–45 minutes including dismounting, patching, remounting, and balancing. Valve stem replacement is similar in time since it also requires dismounting the tire.
Not reliably. Occasionally a tiny puncture in the tread will seal temporarily due to rubber deformation around the object, but this is not permanent. The object can shift, the hole can enlarge, and the leak will resume. Never assume a slow leak resolved on its own without a proper inspection.
A standard plug-patch repair typically costs $15–$30 at most tire shops. Valve stem replacement usually runs $10–$20 including labor. Bead leak repairs involving rim resurfacing can cost $30–$60 depending on the severity of the corrosion. Many shops offer free inspections to diagnose the source before quoting a repair.
 |
 |
 |
 |
About Joshua Thomas
Joshua Thomas just simply loves cars and willing to work on them whenever there's chance... sometimes for free.
He started CarCareTotal back in 2017 from the advices of total strangers who witnessed his amazing skills in car repairs here and there.
His goal with this creation is to help car owners better learn how to maintain and repair their cars; as such, the site would cover alot of areas: troubleshooting, product recommendations, tips & tricks.
Joshua received Bachelor of Science in Mechanical Engineering at San Diego State University.
Get some FREE car parts & gear.. Or check out the latest free automotive manuals and build guides here.
Disable your ad blocker to unlock all the hidden deals. Hit the button below 🚗
| | | |