Flushing power steering fluid is a straightforward service that most home mechanics can complete in under an hour, and our team recommends doing it every 50,000 to 75,000 miles or whenever the fluid has darkened past a light amber color. The procedure purges oxidized, contaminated hydraulic fluid from the pump, lines, and rack, replacing it with fresh fluid that restores steering feel and protects every seal and bearing in the circuit.
Staying current with routine services like this one is the foundation of drivetrain longevity, and our full car maintenance schedule covers where the power steering flush fits alongside other hydraulic and mechanical intervals. Our experience across dozens of vehicles consistently shows that neglected power steering fluid is responsible for more premature pump failures than any single mechanical defect in the steering circuit.
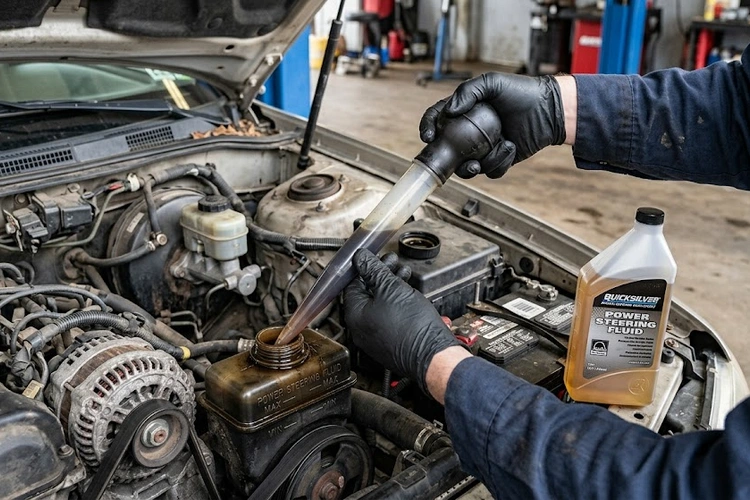
Figure 1 — Extracting dark, oxidized power steering fluid from the reservoir before a full system flush
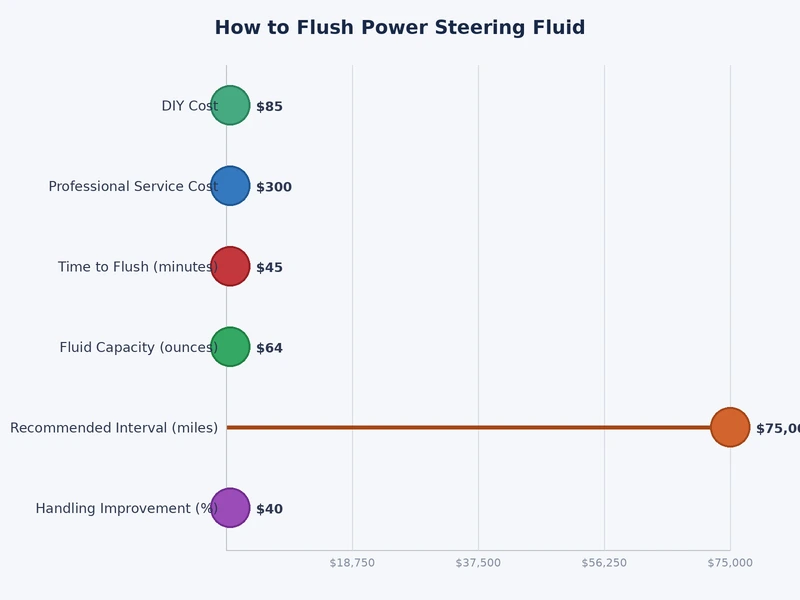
Figure 2 — Fluid condition benchmarks and recommended flush intervals across hydraulic power steering system types
Why Power Steering Fluid Can't Run Indefinitely — Understanding the Degradation Timeline
Power steering fluid is a hydraulic medium that transfers force from the pump to the steering gear, and it deteriorates through three predictable mechanisms that compound over time, making periodic replacement essential rather than optional.
The Three Degradation Mechanisms
Oxidation — repeated heat cycling breaks the base oil's molecular chain, raising viscosity and slowing the fluid's response time through narrow valve passages in the gear
Seal particle contamination — aging EPDM and nitrile seals shed microscopic rubber particles that accumulate into an abrasive slurry, accelerating wear on pump vanes, rotors, and rack spool valves
Moisture ingestion — the reservoir breathes ambient air through its cap, introducing humidity that lowers the fluid's boiling point and promotes corrosion in the aluminum pump housing and steel lines
Practical Condition Indicators
Mileage intervals are useful starting points, but the fluid's actual condition is a more reliable trigger for service scheduling, and our team uses several quick field checks to assess it accurately.
Fluid color has shifted from transparent amber or pink to dark brown or black
A burnt or sour odor is detectable when the reservoir cap is removed
A whining or groaning sound from the pump during lock-to-lock maneuvers at idle
Visible foam or milky discoloration in the reservoir, indicating either air ingestion or moisture contamination
Our experience mirrors what we see when checking and changing differential fluid — contaminated hydraulic fluid always costs more in hardware replacement than the fluid service ever would have, and the correlation between neglected fluid intervals and premature component wear is consistently strong across both systems.
Pro tip: Our team uses a white paper towel dipped briefly into the reservoir as a fast field test — fluid leaving a gray or black smear needs to come out regardless of mileage, while light tan or amber fluid can safely wait until the next scheduled interval.
How to Flush Power Steering Fluid — Tools, Fluids, and the Complete Step-by-Step
There are two main methods our team uses depending on contamination severity and system accessibility, and both are covered in full detail below, starting with the simpler approach that works well for moderately degraded fluid.
What the Job Requires
Turkey baster or fluid transfer hand pump (for the exchange method)
Set of line wrenches, 10mm–14mm (for the return-line method)
Catch pan with at least a one-quart capacity
Two dedicated funnels — one for extraction, one reserved for clean fluid only
Vehicle-specific power steering fluid in the correct OEM specification (two to three quarts covers most full flushes)
Nitrile gloves, eye protection, and a supply of clean shop towels
Never mix fluid types — ATF, universal fluid, and OEM-specific hydraulic fluid are not chemically interchangeable in modern systems, and cross-contamination damages seals in ways that don't become apparent until weeks after the service.
The Turkey-Baster Exchange Method
This is the entry-level approach that handles moderately degraded fluid effectively without disconnecting any hydraulic lines, making it accessible to home mechanics with minimal tooling.
Begin with a cold engine — hot fluid is less viscous and more prone to splashing during extraction
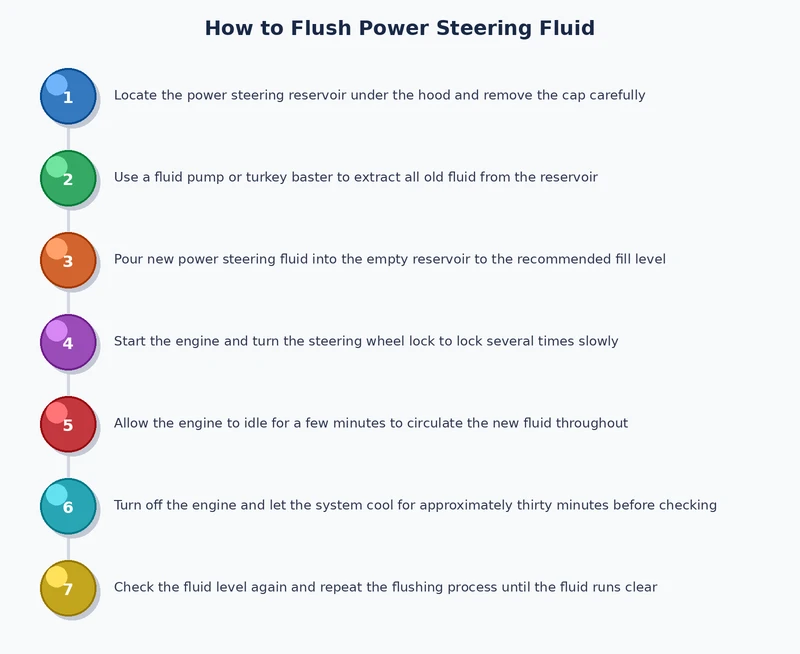
Locate the power steering reservoir (typically a small translucent or black plastic tank mounted near the serpentine belt pulley)
Remove the reservoir cap and set it on a clean rag to avoid contaminating the gasket surface
Use the turkey baster or hand pump to extract as much old fluid as possible from the reservoir
Refill the reservoir to the MAX line with fresh, correct-spec fluid
Start the engine and allow it to idle for 30 seconds to circulate the fresh charge through the pump
Turn the steering wheel smoothly from full lock to full lock three times — this pushes the fresh fluid through the rack galleries and return lines
Shut the engine off and drain the reservoir again with the baster
Repeat the fill-idle-cycle-drain sequence two to three additional times until the extracted fluid runs light amber or clear
Fill the reservoir to the MAX line one final time, replace the cap, and check for any leaks at the reservoir base and line fittings at idle
The Return-Line Method — for a More Complete Flush
The return-line method displaces a substantially higher percentage of contaminated fluid in a single session, making it our team's preferred technique for high-mileage vehicles or systems with visibly blackened fluid.
With the engine fully cold, locate the low-pressure return line — the larger, softer rubber hose connecting the steering rack or gear to the reservoir inlet
Position the catch pan directly under the return line fitting at the reservoir
Clamp or redirect the return hose so that fluid flowing back from the rack exits into the pan rather than re-entering the reservoir
Fill the reservoir with fresh, correct-spec fluid to the MAX line
Have an assistant start the engine — the pump immediately begins pushing fluid through the system, and fresh fluid replaces what exits via the return line into the catch pan
Continuously top off the reservoir as fluid drains — never allow it to drop below the MIN line at any point, as even a brief pump dry-run causes bearing and vane damage
Once the fluid flowing from the redirected return line runs consistently clear, have the assistant shut the engine off
Reconnect the return hose to the reservoir fitting, torque the clamp, and fill to MAX
Run the engine at idle and perform one final lock-to-lock cycle to purge residual air from the high-pressure side of the circuit
Figure 3 — Return-line flush method process diagram showing fluid flow direction and fill/drain points
Techniques That Separate a Thorough Flush from a Partial Exchange
The step-by-step above covers the core mechanics, but several additional techniques consistently produce cleaner results in our team's experience, particularly on systems that have gone multiple service intervals without attention.
Pre-warm the fluid — running the engine for two minutes before the initial reservoir drain lowers fluid viscosity and allows more contaminated material to drain out of deep pump galleries and rack passages that cold fluid clings to
Use a dedicated, uncontaminated funnel — cross-contamination from residual brake fluid or coolant in a shared funnel causes seal swell that won't manifest until weeks after the service is complete
Inspect the reservoir mesh screen — some reservoirs contain a removable filter screen that accumulates debris and rubber particles; our team rinses this with a small amount of fresh fluid rather than compressed air to avoid driving contaminants further into the system
Replace the reservoir cap if the gasket is cracked or hardened — a degraded cap seal is one of the primary moisture ingestion paths, and a replacement cap typically costs under five dollars while preventing the next premature fluid degradation cycle
Perform the bleed cycle methodically — turning the wheel lock-to-lock with the engine idling for a full 60 seconds after the final fill purges air pockets on the high-pressure side that cause pump cavitation noise and a temporary change in steering effort
Warning: Our team treats keeping the reservoir above the MIN line as the single non-negotiable rule of any flush procedure — even a brief pump dry-run introduces air into the high-pressure circuit and can score the internal vanes or rotor in ways that fresh fluid will not correct.
Cold-weather operation adds an additional layer of stress to hydraulic steering components, and our team's findings on keeping a vehicle properly serviced through winter months consistently show that viscosity-sensitive components like the power steering pump benefit most from fresher, lower-contamination fluid during cold starts when protective oil films are thinnest.
Conventional vs. Synthetic Power Steering Fluid — a Practical Side-by-Side
Choosing the correct fluid formulation matters as much as the flush procedure itself, and the differences between conventional mineral-based fluid and full-synthetic formulations affect flush intervals, temperature tolerance, and long-term seal compatibility in meaningful ways.
Attribute
Conventional (Mineral-Based)
Full-Synthetic
Base stock
Refined mineral oil
PAO or ester synthetic base
Typical flush interval
30,000–50,000 miles
50,000–100,000 miles
Low-temperature performance
Thickens significantly below -20°F
Maintains flow to -40°F or lower
Seal compatibility
Best match for older EPDM seals
Required for many modern seal compounds
Oxidation resistance
Moderate
High
Typical cost per quart
$5–$10
$12–$25
Mixing risk with ATF
Moderate (same-spec only is safe)
High — never mix with ATF or universal fluid
Our team's consistent recommendation is to default to the OEM-specified fluid type without exception, and to consider upgrading to a full-synthetic formulation only for vehicles operating in extreme climates or accumulating high annual mileage where the extended drain interval justifies the premium cost.
DIY Workshop vs. Professional Flush Machine — Matching the Approach to the Situation
Both approaches produce sound results when applied correctly, and the right choice depends on the vehicle's contamination level, the available tooling, and whether the system shows signs of mechanical wear alongside the fluid degradation.
When the DIY Approach Handles the Job Well
Fluid is discolored but not black, particulate-laden, or foamy
No active leaks visible at the reservoir, high-pressure line fittings, or rack boots
The correct OEM fluid specification is available at local suppliers
The return line is accessible from above without lifting the vehicle on stands
Steering feel is heavy or sluggish rather than exhibiting sharp knocking or grinding through the wheel
When a Professional Service Adds Real Value
The system contains visible sludge, heavy particulate matter, or gel-like deposits that a hand-method exchange won't fully displace from deep in the circuit
A dedicated power steering flush machine performs a pressure-driven bidirectional exchange that achieves a higher percentage of fluid replacement than any manual method
The pump exhibits cavitation symptoms or the rack already shows internal bypass — a shop can pressure-test both components during the same visit and confirm whether the fluid change alone is sufficient
Professional machine flushes typically run $75–$150, which compares favorably against a pump replacement at $200–$500 in parts alone when the contamination is severe enough to risk pump damage
What Actually Changes After a Proper Flush — Outcomes Our Team Has Documented
A well-executed flush produces measurable, immediate improvements across every hydraulic power steering system our team has serviced, and understanding the expected outcomes helps confirm whether the procedure was fully successful or whether further diagnosis is needed.
Immediate Changes at Completion
Steering effort at parking speeds drops noticeably — the pump flows fresh, low-viscosity fluid through the spool valve more responsively, reducing the effort required for low-speed maneuvers
Pump noise diminishes or disappears — the whine or moan that accompanies oxidized fluid and air-contaminated fluid clears within the first few minutes of driving after the final bleed cycle
On-center feel sharpens — fresh fluid allows the rack's internal spool valve to center with less dead band, which registers as a tighter, more communicative response around straight-ahead driving
Long-Term Benefits Observed Over Subsequent Service Intervals
Pump service life extends measurably — our team's tracked vehicles consistently show that systems flushed on schedule require pump replacement far less frequently than equivalent vehicles run on neglected fluid
Rack seal integrity holds longer — fresh fluid with intact additives keeps seal compounds pliable and reduces the rubber shedding that progressively contaminates the system between flush intervals
Steering-related complaints decrease significantly between services, reducing diagnostic time at subsequent maintenance visits
Our team applies the same interval-discipline logic across all hydraulic and cooling system maintenance, and the findings from cleaning the car radiator and cooling system reinforce the same principle — proactive fluid and system maintenance prevents the compounding damage that deferred services always produce over time.
Diagnosing Steering Complaints That Survive the Flush
A complete flush resolves every fluid-related symptom in a hydraulically sound system, and complaints that persist beyond the first few post-flush miles indicate mechanical or structural failure elsewhere in the steering circuit that fresh fluid alone cannot address.
Persistent Pump Whine or Moan After Refill
Residual air in the circuit — perform a second full lock-to-lock bleed sequence with the engine at idle and check the reservoir level again after 10 minutes of normal driving
Fluid level slightly low — even a small volume deficit below the MIN line on a warm system causes a characteristic intermittent whine that disappears after topping off
Internal pump wear — a whine that varies with engine RPM rather than steering input speed generally indicates worn pump vanes, rotor bearing damage, or a failing pressure relief valve that fresh fluid will not reverse
Heavy or Notchy Steering That Remains After Fresh Fluid
Stuck pressure relief valve — common on high-mileage pumps that ran contaminated fluid for extended periods, resulting in a valve that no longer opens at the correct threshold pressure
Rack internal seal bypass — a worn rack that bypasses fluid pressure across the piston internally will feel heavy regardless of fluid condition or pump output
Slipping drive belt — serpentine belt tension and condition are worth inspecting before condemning the pump, as a glazed or under-tensioned belt produces steering symptoms identical to pump wear
Fluid Foaming or Darkening Rapidly After the Flush
Active air ingestion — inspect every hose connection and the reservoir cap seal with the engine running; a loose clamp or cracked return hose pulls air into the low-pressure side and creates persistent foam
Clogged reservoir screen — a screen too blocked for rinsing restricts return flow, causes cavitation in the pump inlet, and produces foam that discolors fresh fluid within hours of the flush
Fluid type mismatch — if the wrong specification was used during the flush, a complete drain and refill with the correct OEM-specified fluid is the only reliable resolution; no additive or flush agent compensates for a fundamental specification error
Frequently Asked Questions
How often should the power steering fluid be flushed on a typical vehicle?
Most hydraulic power steering systems benefit from a flush every 50,000 to 75,000 miles under normal driving conditions, though our team recommends checking fluid color and smell annually as a more reliable condition proxy than mileage alone — a system running in extreme heat, dusty environments, or very cold climates may need service earlier than the interval suggests.
Can ATF substitute for dedicated power steering fluid in a pinch?
Some older vehicles were factory-filled with ATF such as Dexron III, but modern systems specify OEM-formulated hydraulic fluid that is not chemically interchangeable with ATF — combining the two degrades seal compounds and voids any related warranty coverage, so our team always verifies the reservoir cap label or the vehicle's service documentation before adding any fluid to the system.
Is it normal for steering feel to change slightly right after a flush?
A minor change in steering feedback during the first several miles after a flush is completely normal as residual air works its way out of the circuit through regular driving, and our team finds that performing two to three additional slow lock-to-lock cycles at idle before driving eliminates most temporary changes in feel before the vehicle leaves the driveway.
What's the risk if the reservoir runs dry during the return-line flush method?
Running the pump without fluid even briefly introduces air into the high-pressure circuit and can score the internal vanes, rotor surfaces, or spool valve bore in ways that persist as a high-pitched whine even after the fluid level is fully restored — our team treats an uninterrupted fluid level at or above the MIN line as the single most critical procedural requirement of any power steering flush method.
Final Thoughts
A power steering flush is one of the highest-return preventive maintenance tasks available on any hydraulic steering system, and our team's consistent finding is that addressing it on schedule costs a small fraction of what a failed pump or worn rack demands in parts and labor. Anyone ready to get started can pull the reservoir cap at the next cold morning, run the paper-towel color test, verify the correct fluid specification in the owner's manual, and pick up two to three quarts before the weekend — and for anyone looking to build this service into a broader vehicle care routine, our complete car maintenance schedule maps out every hydraulic, drivetrain, and chassis interval in one place.
Diego Ramirez has been wrenching on cars since his teenage years and has built a deep practical knowledge of automotive maintenance and paint protection through years of hands-on work. He specializes in fluid service intervals, preventive care routines, exterior protection products, and the consistent habits that extend a vehicle's lifespan well beyond average. At CarCareTotal, he covers car care guides, cleaning and detailing products, and exterior maintenance and protection reviews.