by Diego Ramirez
Roughly 40 percent of front-wheel-drive vehicles show measurable CV axle wear before 80,000 miles, according to industry repair data. That statistic surprises most drivers — until a clicking noise on turns or a shudder at highway speed forces the issue. Learning how to check cv axle condition early is one of the most cost-effective maintenance habits a driver can build. A failed axle does not stop working quietly. It transfers stress to the wheel bearing, the transmission, and adjacent suspension components, turning a straightforward fix into a multi-part repair.
CV axles — short for constant velocity axles — transfer torque from the transmission to the drive wheels at a consistent speed, regardless of suspension travel. Wikipedia's overview of constant-velocity joints explains the underlying mechanical principle clearly. On a front-wheel-drive or all-wheel-drive vehicle, two CV axles carry the full load of acceleration and steering simultaneously. That dual demand accelerates wear — especially when the protective boot cracks and grease escapes.
Worn suspension components increase axle stress by allowing excessive travel during cornering and braking. Drivers dealing with rough handling alongside axle symptoms should review the guide on 7 Signs Your Shocks and Struts Need Replacing for related context. For a broader foundation on keeping drivetrain components healthy, the great pointers for maintaining your vehicle category is a reliable resource.
Contents
A CV axle rarely fails without warning. Most failures follow a predictable sequence: boot cracks, grease escapes, contamination enters, metal grinds against metal. Recognizing the early signals allows drivers to address the problem at the boot stage — before joint replacement becomes unavoidable.
A clicking or popping sound during low-speed turns is the most diagnostic CV axle symptom. The noise appears because a worn outer joint loses the clearance needed to articulate smoothly at high steering angles. The sound intensifies when the wheel is at full lock. A tight U-turn in a parking lot is an effective informal test. If the clicking disappears during straight-line driving, the outer CV joint is the confirmed culprit.
Vibrations during acceleration — particularly between 45 and 65 mph — point to a damaged inner CV joint. Unlike the outer joint, which handles steering articulation, the inner joint manages plunge movement as the suspension compresses. A worn inner joint transmits uneven rotational force that manifests as a shudder through the floorboard and steering column. Drivers frequently misattribute this to wheel imbalance or tire wear. Checking tire condition first rules out the simpler cause.
Dark grease splattered on the inside of the wheel well or across the back face of the wheel is a direct indicator of boot failure. CV joint grease is thick, black, and petroleum-based. It coats surrounding surfaces in a distinctive fan pattern as the axle rotates. Once the boot tears, contamination enters within miles of normal driving. Catching a cracked boot before grease loss begins prevents joint replacement entirely — a reboot costs a fraction of a full axle assembly.
Pro tip: A torn CV boot does not always show damage from above. Inspect the underside of each boot with a flashlight — longitudinal cracks near the clamp are easy to miss without elevating the vehicle.
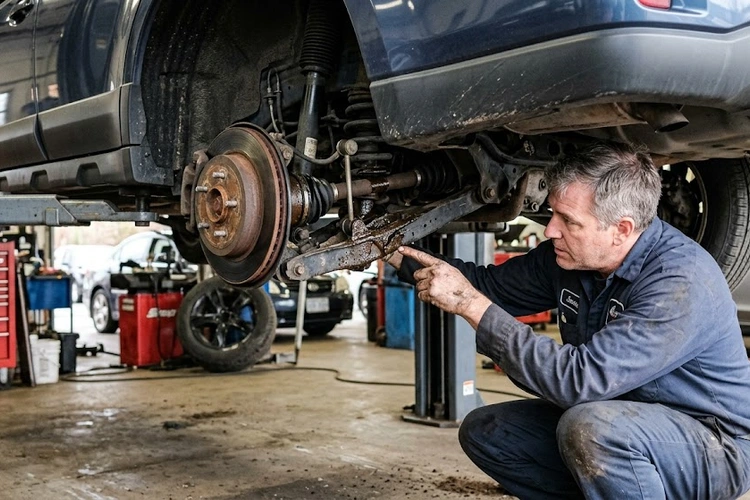
A thorough how to check cv axle inspection requires minimal equipment. Most items are already present in a basic home garage. The goal is to access the axle safely and examine all joint surfaces without disassembly.
Safety glasses protect against debris dislodged during undercar work. A creeper or foam pad makes extended ground-level inspection practical on concrete. Wheel chocks placed front and rear on the non-lifted axle are mandatory — not optional. The full inspection takes five to fifteen minutes per side once the vehicle is elevated. Rushing the process produces false negatives and missed cracks.
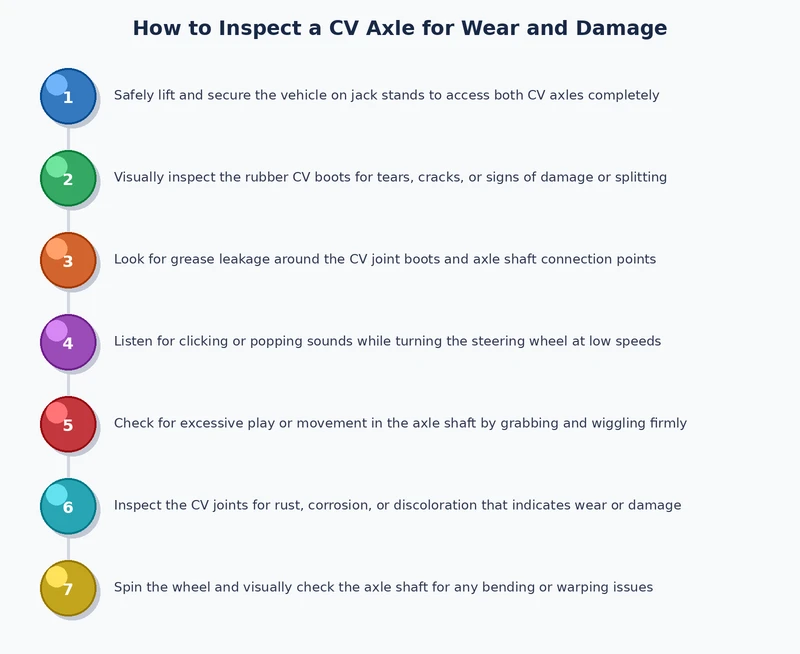
The inspection divides into three phases. Each phase targets a different failure mode. Completing all three produces a reliable diagnosis without requiring professional tools or a lift bay.
Raise the vehicle on jack stands. Turn the steering wheel to full lock to expose the outer CV boot fully. Inspect the entire boot surface — inner and outer — for the following conditions:
A boot in good condition appears pliable, uniformly black, and fully sealed at both clamps. Any deviation warrants replacement or further investigation of the joint itself.
With the vehicle still elevated, grasp the axle shaft near the outer joint and apply firm force in multiple directions — up, down, and laterally. There should be no perceptible play. Excessive movement indicates worn joint internals even when the boot appears intact. A small amount of rotational play at the spline interface with the wheel hub is normal. Lateral or radial play at the joint is not. Repeat the test at the inner joint near the transmission output shaft.
Warning: Do not confuse inner CV joint axial plunge movement — which is by design — with radial looseness. The inner joint slides in and out along the shaft axis intentionally; side-to-side slop is the diagnostic concern.
A structured road test completes the diagnosis. Drive through three scenarios in sequence:
Drivers who notice delayed gear engagement or rough transmission behavior alongside axle symptoms should review fluid service intervals. The guide on how often to change transmission fluid provides direct context on service schedules for adjacent drivetrain components.
A side-by-side comparison of inspection findings helps drivers calibrate what normal looks like against what requires action. The table below reflects typical findings across each major inspection point.
| Inspection Point | Healthy CV Axle | Worn / Failing CV Axle |
|---|---|---|
| Boot condition | Pliable, fully sealed, no cracks | Cracked, torn, or missing clamps |
| Grease presence | Contained fully inside boot | Visible on wheel well or suspension arms |
| Lateral play at joint | None — firm and tight | Perceptible side-to-side movement |
| Turning noise | Silent at full steering lock | Clicking or popping at full lock |
| Acceleration feel | Smooth, consistent torque transfer | Shudder between 45–65 mph |
| Shaft surface | Clean, undamaged splines | Corrosion, wear grooves, or spline damage |
Several common mistakes cause drivers to miss CV axle problems or arrive at incorrect conclusions:
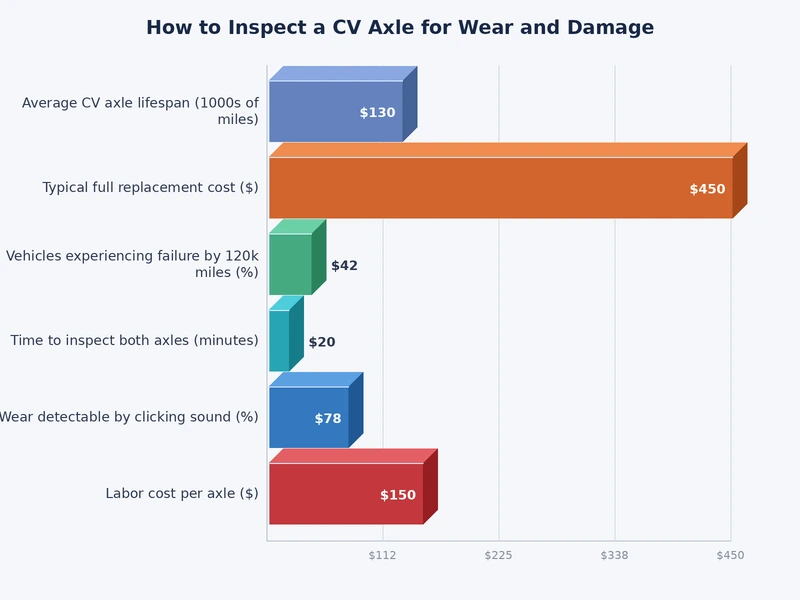
A cracked boot with no grease loss justifies a boot replacement alone — a two-hour job on most vehicles and significantly cheaper than an axle assembly. Any confirmed grease escape means contamination has entered the joint. At that stage, axle replacement is the cost-effective choice over a reboot. A confirmed clicking noise at full lock indicates outer joint failure; replacement is required regardless of boot condition. Average CV axle assembly replacement costs range from $150 to $400 per side including labor, depending on vehicle make and access complexity.
Most CV axles last between 70,000 and 130,000 miles under normal driving conditions. Boot integrity is the primary factor — a sealed, intact boot keeps the joint lubricated and protected indefinitely. Once the boot tears and grease escapes, joint service life drops to weeks or months depending on driving frequency and road conditions.
Short-distance driving is possible during early-stage symptoms, but continued use accelerates joint failure rapidly. A fully seized outer joint can cause the axle to separate from the hub at speed — a scenario that results in immediate loss of vehicle control. A clicking noise during turns warrants prompt repair, not deferred maintenance.
A partial inspection from above can identify visible grease splatter on the wheel well and obvious boot damage on the outer joint. However, inner joint boots and the underside of the outer boot are inaccessible without elevation. A floor jack and jack stands remain the minimum requirement for a complete and reliable inspection.
The terms are used interchangeably in most service contexts. A half shaft refers to the complete assembly — shaft, inner joint, and outer joint. The CV joint refers specifically to either constant-velocity joint at each end of that assembly. Replacing a "CV axle" typically means replacing the entire half-shaft assembly rather than rebuilding individual joints.
 |
 |
 |
 |

About Diego Ramirez
Diego Ramirez is a maintenance and care specialist who has been wrenching on cars since he was sixteen. He focuses on fluid changes, preventive care routines, paint protection, and the small habits that turn a five-year-old car into a fifteen-year-old car.
Get some FREE car parts & gear.. Or check out the latest free automotive manuals and build guides here.
Disable your ad blocker to unlock all the hidden deals. Hit the button below 🚗
| | | |