by Joshua Thomas
A clean, fresh cabin transforms every drive. If you've been wondering how to make car interior look new without spending a fortune at a detail shop, the answer is a methodical approach and the right products. Whether you're dealing with stained seats, a grimy dashboard, or musty carpets, each problem has a straightforward fix you can tackle at home in an afternoon. This guide covers every step from prep to final polish — and for a full professional-level framework, start with our complete car interior detailing guide.
Car interiors accumulate grime faster than most owners realize. Dust settles into vents, food oils soak into upholstery, and UV exposure dulls plastic trim over time. A systematic cleaning session addresses all of it at once, leaving results that rival a professional detail at a fraction of the cost.

Contents
Gathering your tools before you start saves time and ensures you don't stop midway through a wet seat. Here's what you need:
Remove everything from the cabin — floor mats, loose items, seat-back organizers, and anything stored under seats. Open all four doors to maximize airflow. Shake out floor mats outside. Pre-treating dried-on stains before vacuuming loosens debris and makes the vacuum pass more effective.
Seats collect skin oils, food residue, and dust mites. The cleaning method depends entirely on your upholstery material. Mixing up the approach — using a fabric scrub on leather, for instance — can cause permanent damage.
Spray upholstery cleaner evenly across the seat surface and let it dwell for 60 seconds. Work it in with a soft-bristle brush using small circular motions. Wipe away loosened residue with a damp microfiber cloth, then blot dry with a clean dry cloth. For stubborn food residue, our guide on removing food stains from car upholstery covers targeted techniques for common culprits like grease, ketchup, and sugary drinks.
Allow fabric seats to dry fully before sitting on them — at least two hours with doors open, or one hour in direct sunlight. Damp seats trap odors and can develop mildew.
Leather requires a pH-neutral cleaner specifically formulated for automotive leather. Apply a small amount to a microfiber cloth and wipe in straight lines — never circles, which can grind particles into the grain. Follow immediately with a leather conditioner to prevent drying and cracking. Conditioning restores suppleness and gives leather that rich, just-purchased appearance. Avoid silicone-based products that leave a greasy film.
Plastic surfaces fade and dull from UV exposure and finger oils. Restoring them is one of the highest-impact steps when figuring out how to make car interior look new — a clean, matte dashboard reads as "new" to the eye immediately.
Spray all-purpose cleaner onto a microfiber cloth (not directly onto the surface) and wipe down every plastic panel. Use a detailing brush to clean air vents, button edges, and trim gaps where a cloth can't reach. Compressed air blown through vents before wiping prevents pushing debris deeper into the ductwork. For cracked or damaged plastic, see our detailed guide on fixing a cracked car dashboard — many hairline cracks can be filled and blended at home.
After cleaning, apply a plastic restorer or trim dressing rated for interior use. These products contain UV inhibitors that slow future fading. Apply with an applicator pad in thin, even coats. Wipe away any excess to avoid a shiny, greasy look — matte finishes look far more OEM. According to the Wikipedia overview of automotive detailing, interior plastic treatment is among the most effective single steps for extending interior lifespan and maintaining resale value.
Carpets absorb spills, trap odors, and hide ground-in dirt that regular vacuuming misses. A proper carpet clean involves multiple steps and is worth the extra time.
Vacuum the entire carpet with the crevice tool along seat rails and the brush attachment for open areas. Move front seats fully forward, then fully back, to reach the full range underneath them. Vacuum at least two passes in different directions — perpendicular passes lift fibers and pull debris that a single directional pass misses. Don't forget the trunk liner if it's carpeted.
Apply carpet foam or spray shampoo and agitate with a stiff-bristle brush. Work in small sections, about two square feet at a time, so the cleaner doesn't dry before you can extract it. Blot with microfiber cloths and repeat for heavily soiled patches. For floor mats, scrub outdoors with a brush and hose, then lay flat to dry completely before reinstalling — damp mats breed mold under the carpet.
Pre-treating with an enzyme cleaner before shampooing breaks down organic compounds that cause persistent odors — particularly effective for pet hair and food spills that have been ground in over time.
A car that looks clean but smells stale doesn't feel new. Odor elimination is the final structural step before cosmetic finishing touches.
Baking soda sprinkled over carpets and seats, left for 15–20 minutes, then vacuumed up neutralizes mild odors. For stronger smells, an ozone generator run in the sealed cabin for 30–60 minutes eliminates odor molecules rather than masking them. Avoid heavy air fresheners as a substitute — they layer scents rather than solving the source. Check for hidden moisture under mats or in the trunk, as trapped dampness is the most common cause of persistent musty smells.
Interior glass is often the most overlooked surface. Film from outgassing plastics and cigarette smoke builds up on windows, reducing visibility and making the cabin look grimy. Spray ammonia-free glass cleaner on a microfiber cloth and wipe in a single direction, then buff with a second dry cloth. Ammonia-based cleaners can damage window tints and degrade plastic trim near the glass edges.
Seat belts also accumulate grime and should be included in any thorough interior refresh. Our guide on how to clean car seat belts covers the right technique — belts need to be cleaned extended and air-dried fully before retraction to prevent mildew in the retractor housing.
Not all interior cleaners perform equally across every surface. This table summarizes the most common product types, their best use cases, and key limitations.
| Product Type | Best For | Avoid On | Dwell Time | Finish |
|---|---|---|---|---|
| All-Purpose Interior Cleaner | Hard plastics, consoles, door panels | Bare leather, suede | 30–60 sec | Matte |
| Upholstery Foam Cleaner | Fabric seats, carpet | Leather, vinyl | 60–90 sec | N/A (extract) |
| Leather Cleaner | Genuine and synthetic leather | Fabric, rubber | Immediate wipe | Satin |
| Leather Conditioner | Leather after cleaning | Fabric, plastic | 5 min absorption | Low sheen |
| Plastic Trim Restorer | Faded plastic, rubber trim | Glass, painted surfaces | 2–3 min cure | Matte/satin |
| Ammonia-Free Glass Cleaner | Windshield, windows, mirrors | Tinted windows (ammonia-based) | Immediate buff | Clear streak-free |
| Enzyme Odor Eliminator | Organic stains, pet odors | Silk, delicate fabrics | 10–15 min | N/A |
A thorough deep clean two to four times per year is enough for most drivers. Quick wipe-downs between sessions — wiping the dashboard and vacuuming crumbs weekly — prevent buildup that makes deep cleaning harder.
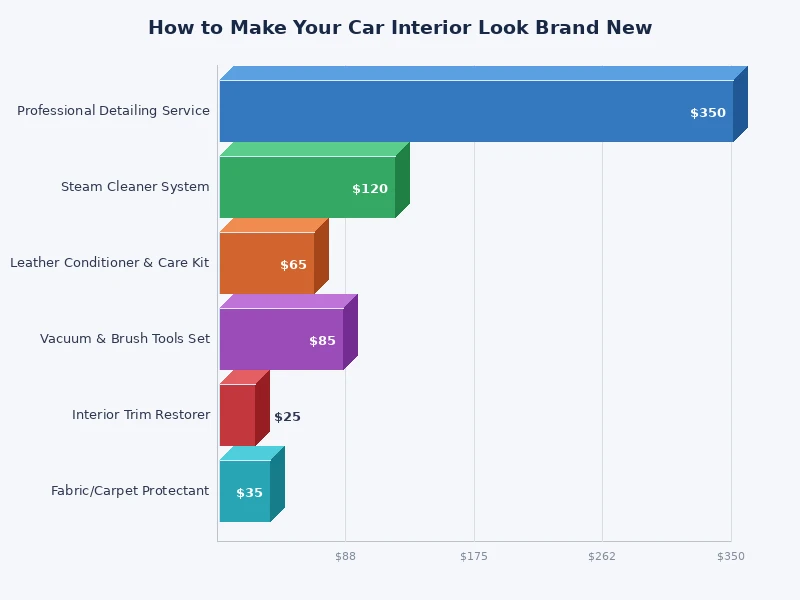
A diluted all-purpose cleaner, microfiber cloths, and a basic upholstery foam cover most surfaces for under $20. You don't need separate branded products for every material — one quality APC handles most hard surfaces effectively.
A very diluted dish soap solution works in a pinch on fabric, but it strips protective coatings from leather and can leave residue on fabric that attracts future dirt faster. A purpose-made upholstery cleaner is a better investment.
First locate the moisture source — check under mats, in the trunk, and around door seals. Remove the moisture, then use an enzyme cleaner on affected surfaces. An ozone treatment in a sealed cabin for 30–60 minutes eliminates residual odor molecules that surface cleaners can't reach.
Trim restorer significantly improves moderately faded plastic. Severely bleached or textured dashboards may need multiple applications over several days for best results. Badly cracked surfaces need repair before any restorer will look correct — see our guide on fixing a cracked dashboard.
Steam cleaners work well on fabric seats, carpets, and hard plastic surfaces. Keep the nozzle moving — holding steam in one spot on leather or vinyl can cause damage. Avoid directing steam into electronic components, screens, or button assemblies.
 |
 |
 |
 |
About Joshua Thomas
Joshua Thomas just simply loves cars and willing to work on them whenever there's chance... sometimes for free.
He started CarCareTotal back in 2017 from the advices of total strangers who witnessed his amazing skills in car repairs here and there.
His goal with this creation is to help car owners better learn how to maintain and repair their cars; as such, the site would cover alot of areas: troubleshooting, product recommendations, tips & tricks.
Joshua received Bachelor of Science in Mechanical Engineering at San Diego State University.
Get some FREE car parts & gear.. Or check out the latest free automotive manuals and build guides here.
Disable your ad blocker to unlock all the hidden deals. Hit the button below 🚗
| | | |