by Joshua Thomas
Learning how to polish a car by hand is one of the most rewarding skills a car owner can develop. Hand polishing restores clarity and depth to dull, scratched, or oxidized paint without the cost of a professional detail. Whether your car has light swirl marks from washing or faded paint from sun exposure, the right technique and product will make a dramatic difference. Before you wax, you polish — and this guide walks you through every step. If you've already dealt with heavy surface contamination, check out our guide on how to clay bar your car before you begin.
Contents
Car polish is an abrasive compound that removes a microscopic layer of clear coat, leveling out scratches, swirl marks, and oxidation. Unlike wax or sealant, which sit on top of the paint and protect it, polish actually corrects the surface. The result is a smoother, shinier, more reflective finish. Abrasives in the polish cut away imperfections and leave a uniform surface behind.
Many drivers confuse polishing with waxing. They serve different purposes. Polish corrects; wax protects. You should always polish before waxing — applying wax over scratched paint just seals in the damage. Read our dedicated breakdown on polish vs. wax if you want a deeper comparison of both products and when to use each.
Polish your car when you notice swirl marks under direct light, dull or hazy paint, light scratches, or faded color. Cars with heavy oxidation need more aggressive correction — see our guide on how to remove oxidation from car paint for those cases. Polish once or twice per year for most daily drivers.
You don't need expensive equipment to hand polish a car effectively. Having the right products makes all the difference in results and effort.
Polish ranges from heavy-cut compound to ultra-fine finishing polish. Heavy-cut removes deep scratches but leaves haze — it requires a follow-up with finer polish. A medium or fine polish works for most hand polishing jobs. For hand work specifically, choose a product labeled "hand polish" or "all-in-one," as these are formulated to work without machine heat and pressure.
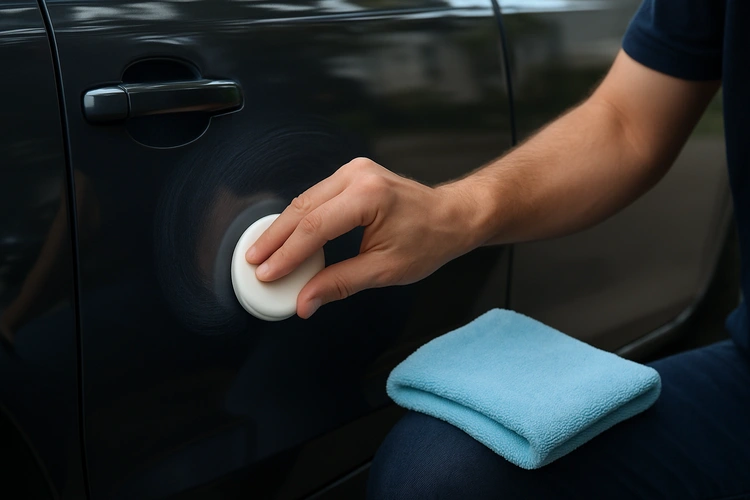
Use a foam applicator pad for applying polish. These provide even pressure and hold product well. For buffing off residue, use a high-quality microfiber cloth — 300 GSM or higher. Have at least three or four microfiber cloths on hand so you're always working with a clean surface.
Preparation is half the job. Polishing over a dirty or contaminated surface will cause more scratches, not fewer.
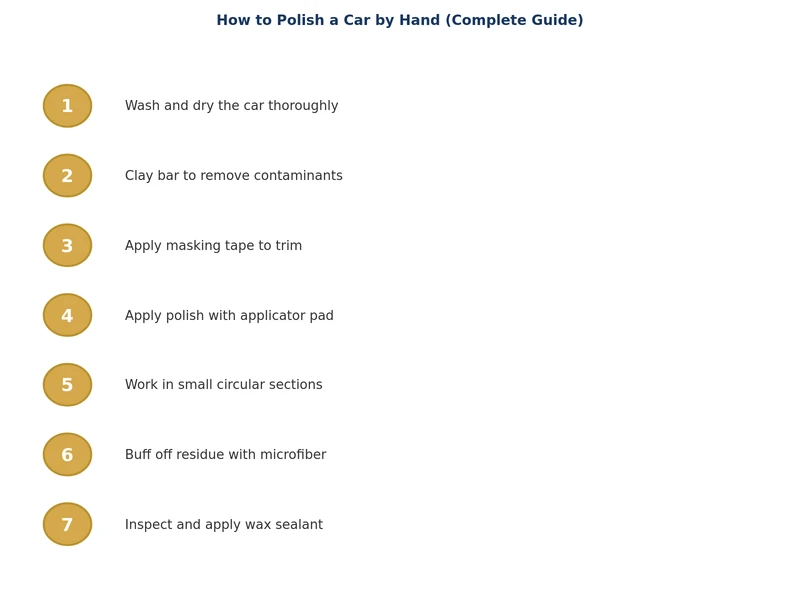
Wash the car thoroughly using the two-bucket method. Rinse from top to bottom, then hand dry with a clean microfiber drying towel. Never polish in direct sunlight or on a hot panel — heat causes polish to dry too fast and become difficult to remove. Work in shade or a garage with good lighting.
After washing, run your fingers across the paint. If it feels rough or gritty, the surface has bonded contamination — tar, iron deposits, or industrial fallout. Clay bar the car first. If the paint feels smooth but looks dull or hazy, you're ready to polish. Use a swirl-finder light or direct sunlight at a low angle to reveal the full extent of the scratches.
Follow this sequence exactly for the best results when you polish a car by hand.
Work one section at a time — typically a 2×2 foot area. Apply four or five pea-sized dots of polish to your foam applicator pad. Spread the polish across the panel using light pressure before you begin working it in. This prevents product from flinging off and ensures even coverage.
Use firm, overlapping circular strokes or a crosshatch pattern (horizontal passes followed by vertical passes). Apply consistent pressure. The goal is to keep the polish working until it begins to break down and become slightly transparent. This typically takes 30–60 seconds per small section. You'll notice the polish change in appearance — going from white or cloudy to nearly clear. That's when the abrasives have done their work.
Before the polish fully dries, wipe it off with a clean microfiber cloth using light, straight strokes. Flip the cloth frequently. If residue has dried and is hard to remove, a light mist of quick detailer spray will loosen it. Inspect under a bright light after removing — if scratches remain, repeat the process. Once satisfied, move to the next section.
| Polish Type | Abrasiveness | Best For | Hand Use | Follow-Up Needed |
|---|---|---|---|---|
| Heavy Cut Compound | Very High | Deep scratches, heavy oxidation | Difficult | Yes — fine polish required |
| Medium Cut Polish | Medium | Swirl marks, light scratches | Good | Optional |
| Fine Polish | Low | Light swirls, haze, dull paint | Excellent | No — ready for wax |
| All-in-One Polish | Very Low | Light correction + protection | Excellent | No |
| Finishing Polish | Minimal | Final gloss enhancement | Excellent | No — wax directly after |
Polishing removes the existing wax or sealant layer, leaving paint temporarily unprotected. Always follow polishing with a coat of wax or paint sealant within 24 hours. Our guide on how to wax a car by hand covers the complete waxing process. For maximum long-term protection, consider a ceramic coating or paint protection film after polishing.
After waxing, maintain the finish by washing carefully, avoiding automated car washes with brushes, and promptly removing bird droppings and tree sap, which can etch through clear coat quickly.
Yes. Hand polishing works well for light swirl marks, minor scratches, and dull paint. It takes more time and effort than machine polishing, but the results are excellent when you use the right product and technique. Heavy scratch removal is better suited to a machine polisher.
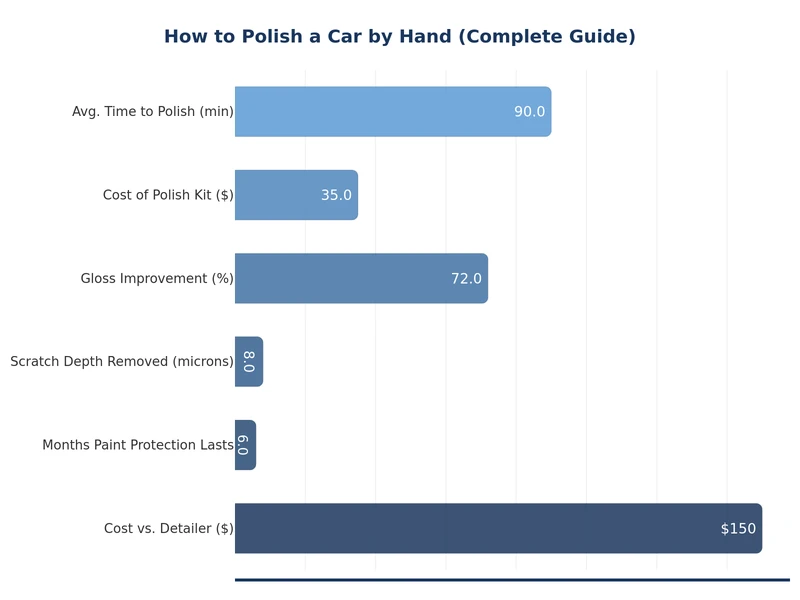
A full car typically takes two to four hours by hand, depending on the car's size and the severity of the paint defects. Working methodically in small sections and using a quality fine or medium polish keeps the process efficient.
Most daily drivers benefit from polishing once or twice a year. Over-polishing removes more clear coat than necessary. If your paint is protected with wax or sealant and you wash carefully, annual polishing is usually sufficient.
Yes. Polishing strips off existing wax and leaves the clear coat unprotected. Always apply a coat of wax, sealant, or ceramic coating within 24 hours of polishing to protect the corrected surface from UV, moisture, and contamination.
Compound is a more aggressive version of polish with larger abrasive particles. It removes deeper scratches faster but leaves haze that requires follow-up with a finer polish. Standard car polish is less aggressive and used for light correction and surface refinement.
Hand polishing is much safer than machine polishing in terms of paint damage risk. Applying too much pressure or using an excessively aggressive compound can thin the clear coat over time, but normal hand polishing with a fine or medium product on a clean surface carries minimal risk.
 |
 |
 |
 |
About Joshua Thomas
Joshua Thomas just simply loves cars and willing to work on them whenever there's chance... sometimes for free.
He started CarCareTotal back in 2017 from the advices of total strangers who witnessed his amazing skills in car repairs here and there.
His goal with this creation is to help car owners better learn how to maintain and repair their cars; as such, the site would cover alot of areas: troubleshooting, product recommendations, tips & tricks.
Joshua received Bachelor of Science in Mechanical Engineering at San Diego State University.
Get some FREE car parts & gear.. Or check out the latest free automotive manuals and build guides here.
Disable your ad blocker to unlock all the hidden deals. Hit the button below 🚗
| | | |