by Diego Ramirez
Last summer, our team tested a vehicle that had spent two hours in a Phoenix parking lot at peak heat. The interior temperature exceeded 130°F. The driver switched on the AC — and only warm air came out. The refrigerant was depleted, and learning how to recharge car ac systems immediately became the priority.
Most vehicles lose a small amount of refrigerant (the chemical compound that cools cabin air) over time through microscopic seals and connections. A recharge restores that refrigerant to the correct operating level, allowing the AC to function as designed. For anyone dealing with warm air from the vents, understanding the recharge process is essential. Our team recommends pairing this knowledge with a broader review of how to make ac colder in car for a complete picture of AC performance.
Our team at CarCareTotal has walked through this procedure on dozens of vehicles across multiple makes and models. This guide covers everything — from identifying when a recharge is necessary, to avoiding the errors that can turn a straightforward job into a costly repair.
Contents
The air conditioning system in most modern vehicles operates using a refrigerant called R-134a. Many newer models use R-1234yf, a refrigerant with a significantly lower environmental impact. According to the U.S. Environmental Protection Agency, both compounds are regulated substances requiring careful handling and proper disposal procedures.
Refrigerant works by cycling between liquid and gas states inside a closed loop. This cycle absorbs heat from the cabin air and releases it outside the vehicle. The process does not consume refrigerant — it simply moves heat from inside to outside. However, the system is not perfectly sealed. Microscopic leaks at hose connections, O-rings (small rubber seals at fittings), and the compressor shaft allow refrigerant to escape gradually over months and years of normal use.
A small amount of refrigerant loss over several years is considered normal. A vehicle that loses a significant amount within a single season almost certainly has an active leak. Recharging a leaking system without sealing the leak is a temporary fix at best — and a waste of refrigerant at worst.
Mixing refrigerant types is not safe and can cause serious compressor damage. The vehicle's owner manual and the label under the hood near the AC service ports will confirm the correct refrigerant type. Our team always verifies this before purchasing any recharge kit.
Some older vehicles were originally designed around R-12 (commonly sold as Freon), which is no longer legal to produce in the United States. These vehicles require a professional retrofit to a compatible modern refrigerant before any recharge can proceed. Consumer recharge kits are not compatible with R-12 systems and should not be used on them.
Understanding the right moment to perform a how to recharge car ac procedure prevents unnecessary work and protects the system from damage. Not every AC problem originates from low refrigerant. Diagnosing the root cause correctly before reaching for a recharge kit saves both time and money.
The most obvious indicator is warm or only slightly cool air from the vents, even when the AC is set to maximum cooling. Other signs include the system taking longer than usual to reduce cabin temperature, or the compressor cycling on and off more frequently than normal. In some cases, ice forms on the evaporator (the component inside the dashboard that chills the air), which can completely block airflow and give the false impression of a blower motor failure.
Our team also pays close attention to how the engine behaves when the AC engages. If the engine stumbles or hesitates at the moment the AC switches on, the issue may relate to compressor load rather than refrigerant level. The guide on car hesitates when AC is turned on covers that specific scenario in useful detail.
Before adding refrigerant, confirming that the compressor is actually running is essential. When refrigerant drops below a safe threshold, the AC system's low-pressure switch shuts the compressor off automatically as a protective measure. A compressor that is not cycling has no visible clutch engagement and produces no cooling — this can appear identical to simple refrigerant depletion, but the root cause may be electrical or mechanical.
Our team recommends reviewing the detailed guide on AC compressor clutch not engaging before adding any refrigerant. If the clutch mechanism is faulty, a recharge will not restore cooling regardless of how much refrigerant is added.
The how to recharge car ac process is straightforward on most vehicles. It requires a basic level of mechanical comfort, the correct refrigerant type for the vehicle, and a recharge kit with a built-in pressure gauge. Safety glasses and nitrile gloves are essential — refrigerant under pressure can cause severe frostbite on contact with skin, and eye protection is non-negotiable.
Our team prefers kits that include a clear PSI (pounds per square inch) gauge over simple color-coded dial indicators. Accurate pressure readings matter more than convenience features when the goal is avoiding overcharge damage.
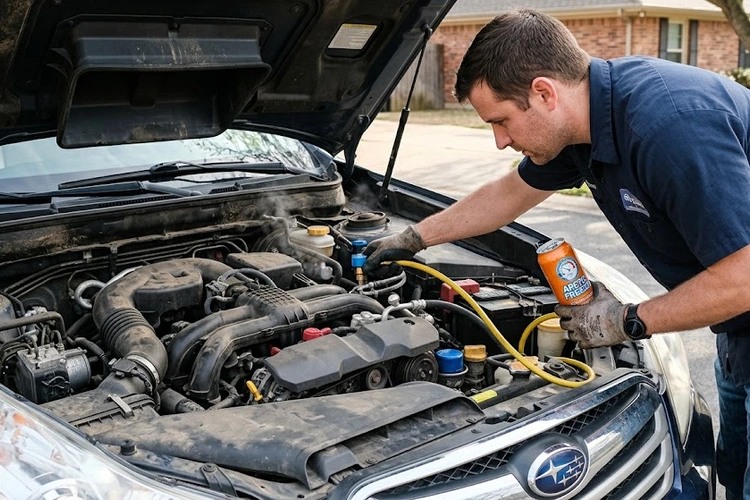
First, locate the low-pressure service port on the AC system. This port sits on the larger-diameter hose running from the compressor toward the firewall. It carries a blue or black cap marked with the letter "L." The high-pressure port, marked "H," is not used during a standard recharge. The low-pressure port uses a specific fitting diameter that prevents accidental connection to the high-pressure side — a built-in safety design.
Start the vehicle and set the AC to maximum cooling with the blower fan at full speed. This ensures the compressor is running throughout the recharge procedure. Connect the recharge hose to the low-pressure port — the fitting clips on with firm, even pressure. Shake the refrigerant canister briefly to mix any additives, then hold it upright while dispensing refrigerant in short bursts of five to ten seconds each. Pause between bursts and allow the pressure gauge to stabilize before adding more.
The correct operating range on the low side for R-134a systems is typically between 25 and 45 PSI, though this varies with ambient temperature and the specific vehicle. At higher ambient temperatures, acceptable low-side pressure runs toward the upper portion of that range. Once the gauge reads within the correct range, disconnect the hose by pulling the collar back while removing the fitting, and replace the port cap securely. Our team recommends checking the center vent temperature with a thermometer — a properly charged system typically delivers air between 38°F and 52°F at the center vent on a warm day.
Several errors during the recharge process can cause lasting damage that far exceeds the cost of the original service. Our team has documented these through direct observation and post-repair analysis across many service visits.
Too much refrigerant is more damaging than too little. An overcharged system forces the compressor to work against excessive pressure on every cycle. This accelerates wear on internal components and can lead to compressor failure — a repair ranging from several hundred to well over a thousand dollars depending on the vehicle. Most consumer DIY kits do not alert the user to an overcharge condition, which makes slow, measured additions essential rather than optional.
Our team has observed more compressor failures attributed to overcharging than to simple refrigerant depletion. Patience during the addition phase is the single most effective preventive step anyone can take.
Adding R-134a to an R-1234yf system — or the reverse — contaminates the entire refrigerant charge. Service ports on R-1234yf systems use a different fitting diameter specifically designed to prevent cross-contamination, but aftermarket adaptors exist and their misuse is a documented problem. A contaminated refrigerant charge requires professional recovery using specialized equipment before the system can be properly recharged. This converts a minor maintenance task into a significant service bill.
A related concern involves the use of stop-leak additives included in some consumer recharge kits. These compounds can clog the expansion valve (the small metering device that regulates refrigerant flow into the evaporator) and permanently contaminate the recovery equipment used at professional shops. Our team does not recommend any kit that contains stop-leak additives, regardless of price or convenience.
Recharging a system without identifying a leak source means the refrigerant will escape again on the same timeline as before. A UV dye kit or an electronic leak detector identifies the source quickly and inexpensively. Common leak points include the condenser (the component mounted at the front of the vehicle behind the grille), O-ring seals at refrigerant line connections, and the compressor shaft seal. Addressing the leak source before recharging produces lasting results. Anyone uncertain about locating or repairing a leak should consult a professional before adding any refrigerant.
The choice between handling a how to recharge car ac job independently or delegating it to a professional shop depends on several variables: the vehicle's refrigerant type, the extent of refrigerant loss, and the mechanical confidence of the person performing the work. Our team has evaluated both approaches across a range of vehicle types and AC system conditions.
One consideration that is frequently overlooked is the state of the vehicle's electrical system. A weak or failing battery can cause the AC system to behave erratically during pressure testing, producing misleading readings. Our team recommends reviewing the process for how to test a car battery at home as part of any comprehensive AC diagnosis before investing in a recharge kit.
| Factor | DIY Recharge | Professional Service |
|---|---|---|
| Typical Cost | $20–$60 (kit + refrigerant) | $150–$350 (full service) |
| Refrigerant Recovery | Not available | Included (EPA-required) |
| Leak Detection | Not included in standard kit | Usually included |
| Pressure Accuracy | Moderate (consumer gauge) | High (manifold gauge set) |
| R-1234yf Compatibility | Limited (expensive specialty kits) | Full compatibility |
| System Vacuum Pull | Not available | Included in full service |
| Time Required | 15–30 minutes | 1–2 hours (with diagnostics) |
| Risk of Overcharge | Moderate without care | Low (precise equipment) |
The DIY approach works well on vehicles using R-134a that have experienced gradual, predictable refrigerant loss over multiple years with no obvious signs of active leakage. A slow top-off on a system that has been inspected and shows no leak indicators is a reasonable, cost-effective procedure. Our team considers the DIY method appropriate when the pressure gauge reading confirms the system is simply low — not empty — and when the compressor is confirmed to be engaging normally.
Professional service is the more reliable path for vehicles using R-1234yf refrigerant, for any system showing signs of a significant or rapid leak, or for any situation where the compressor is not engaging. A professional shop can perform a complete evacuation and vacuum pull (removing moisture and air from the system) before adding fresh refrigerant — a procedure not possible with consumer kits. Moisture trapped in the AC system accelerates corrosion and can cause the expansion valve to freeze, creating a blockage that stops cooling entirely.
Understanding the full cost structure helps set realistic expectations before beginning. Total expense varies considerably depending on the method chosen, the refrigerant type involved, and whether additional repairs are identified during the process.
A standard R-134a recharge kit — including the recharge hose, pressure gauge, and one 12-ounce canister of refrigerant — typically costs between $20 and $45 at major auto parts retailers. Additional refrigerant canisters run $8 to $15 each. Our team recommends spending slightly more for a kit featuring a clear analog gauge rather than a simple color-band indicator. The accuracy difference between these gauge types is meaningful when trying to avoid overcharging.
For R-1234yf systems, consumer-grade DIY kits are available but cost considerably more — typically $60 to $120 for a single canister with the compatible fitting. The price difference reflects both the higher market cost of the refrigerant itself and the specialized connector design required for that system type.
A professional AC recharge at an independent shop typically runs between $150 and $250. Dealership service departments often charge $200 to $350 for the same procedure. These prices generally include refrigerant recovery, leak testing, and a system vacuum pull before the recharge begins. The vacuum pull step removes moisture and non-condensable gases — a meaningful quality difference compared to simply topping off with a consumer kit.
If a leak is identified during the service, repair costs add to the base price. An O-ring replacement is a minor repair, often $50 to $100 in labor at an independent shop. A condenser replacement runs $300 to $600 depending on vehicle complexity. Compressor replacement — the most serious scenario — can reach $800 to $1,500. Our team emphasizes that early diagnosis of gradual refrigerant loss keeps these costs manageable. A system caught with a slow developing leak costs far less to address than one that has been operated on a failed or struggling compressor for an extended period.
Seasonal timing also influences price and availability. Shops are busiest in late spring and early summer, when demand for AC service reaches its annual peak. Scheduling service in early spring or during autumn typically results in faster turnaround and, at many independent shops, more competitive pricing.
Most vehicles do not require a recharge on any fixed schedule. A well-sealed system can operate for several years without needing additional refrigerant. When a system requires recharging every season, an active leak is present and should be diagnosed by a professional before the next recharge is performed.
A proper recharge requires at minimum a recharge hose with a functional pressure gauge and a compatible refrigerant canister matched to the vehicle's specification. Attempting to add refrigerant without a pressure gauge creates a significant risk of overcharging, which can cause compressor damage. Proper equipment is not optional for this procedure.
Yes — and the engine must be running with the AC set to maximum cooling for the recharge to work correctly. The compressor must be actively cycling to circulate refrigerant through the system during the addition process. Our team always confirms that the compressor clutch is engaged before beginning any recharge procedure.
An overcharged system operates under excessive pressure on every compressor cycle, accelerating internal wear and potentially triggering the high-pressure safety cutoff, which causes the AC to shut off entirely. In severe cases, overcharging can rupture a hose or damage compressor seals. Correcting an overcharge requires professional refrigerant recovery using EPA-compliant equipment.
No. A recharge addresses only low refrigerant levels. Problems such as a faulty compressor clutch, a clogged expansion valve, a failed blower motor, or a blocked condenser require separate diagnosis and repair. Our team treats a recharge as one diagnostic step in a broader AC evaluation, not a universal solution for any warm air complaint.
Knowing how to recharge car ac systems is one of the more practical skills available to any vehicle owner willing to invest an afternoon and a modest amount in the right kit. The process is accessible, the tools are affordable, and a successful recharge delivers immediate, measurable results. Our team recommends starting with a thorough visual inspection for leaks, confirming the correct refrigerant type from the underhood label, and selecting a recharge kit with an accurate analog pressure gauge — then proceeding carefully in small, measured additions. Anyone who discovers an underlying mechanical issue during the process — a non-engaging compressor clutch, persistent low pressure despite adding refrigerant, or unusual hissing sounds — will be better served by scheduling a professional diagnostic appointment before investing further in a DIY recharge.
 |
 |
 |
 |

About Diego Ramirez
Diego Ramirez is a maintenance and care specialist who has been wrenching on cars since he was sixteen. He focuses on fluid changes, preventive care routines, paint protection, and the small habits that turn a five-year-old car into a fifteen-year-old car.
Get some FREE car parts & gear.. Or check out the latest free automotive manuals and build guides here.
Disable your ad blocker to unlock all the hidden deals. Hit the button below 🚗
| | | |