by Joshua Thomas
Knowing how to remove a bumper sticker from car surfaces without ruining the paint underneath is a skill every car owner should have. Whether you're clearing off an old political slogan, a faded dealership decal, or a sticker your kid slapped on years ago, the wrong technique can strip clear coat or leave a ghostly patch of adhesive. Done right, the job takes less than 30 minutes and leaves your paint looking as good as new.
The key is patience and heat. Rushing the peel or reaching straight for a razor blade are the two most common mistakes. This guide walks you through every step — from softening the sticker to polishing out any residue — so you protect your paint the entire time. If you're dealing with stubborn leftover glue, our detailed guide on how to remove adhesive from car paint covers every product and method in depth.
Contents
Modern car paint is a layered system: primer, base coat, then a thin clear coat on top. That clear coat is what gives your car its shine and protects the color underneath. Bumper stickers bond directly to the clear coat, and aggressive removal techniques — scraping dry, using harsh solvents, or using a metal blade — can scratch or dissolve it.
Clear coat is typically only 35–50 microns thick, roughly the width of a human hair. Once it's scratched or chemically etched, you'll see a dull patch, swirl marks, or discoloration. Repairing that damage requires machine polishing and sometimes wet sanding — far more work than the original sticker removal. Our guide on how to paint correct a car explains how to address paint damage if you end up needing to fix scratches afterward.
Stickers applied years ago can fuse to the clear coat as UV rays degrade the adhesive. In hot climates, the glue softens and seeps deeper into any micro-texture on the paint surface. Cold weather does the opposite — the sticker becomes brittle and tears instead of peeling cleanly. Either way, a controlled heat source is your best first move.
Work in a shaded area when the car's surface is cool. Direct sunlight heats the panel unevenly and can cause solvents to evaporate too quickly. Wash and dry the area first so no grit sits between your tool and the paint.
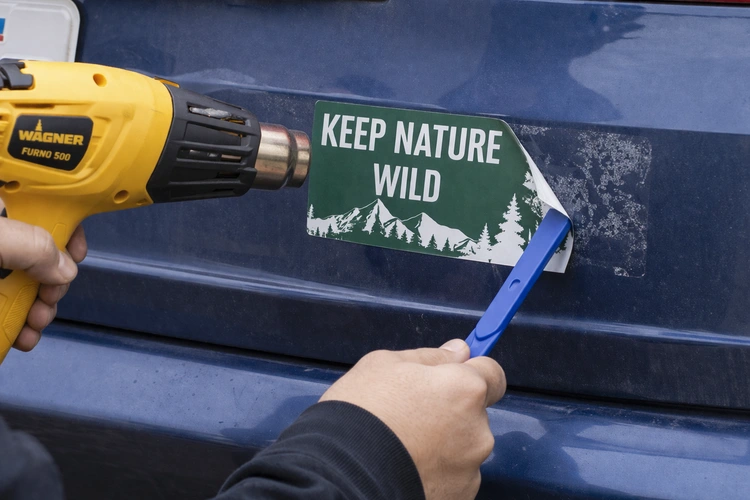
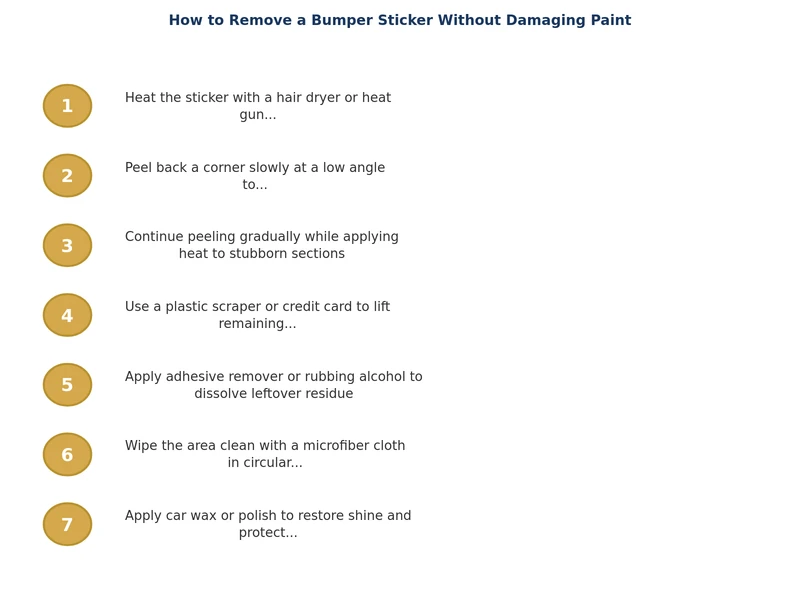
Hold your heat gun or hair dryer 3–4 inches from the sticker surface. Move it slowly in small circles for 30–45 seconds. The goal is to warm the adhesive to around 120–140°F — hot to the touch but not scorching. You should see the edges of the sticker begin to lift or the surface wrinkle slightly. Avoid holding the heat in one spot for more than 10 seconds at a time to prevent paint blistering.
Start at a corner using your fingernail or a plastic trim tool. Peel at a low angle — around 15–20 degrees from the surface — rather than pulling straight up. Low-angle peeling keeps tension on the adhesive layer rather than the clear coat. If you feel resistance, stop and apply more heat. Never force it.
For large stickers or decals, heat and peel a 2–3 inch section at a time. Reheat as needed. If the sticker tears, work your plastic tool under the torn edge carefully. The adhesive will still be warm and cooperative if you keep reapplying heat. Once the vinyl or paper is fully off, you'll typically be left with a haze of sticky residue — that's normal and expected.
Adhesive residue is the layer most people struggle with. It appears as a slightly sticky, hazy rectangle exactly where the sticker was. Do not try to scrub it off dry — that creates swirl marks. You need a solvent or adhesive remover to break down the glue chemistry first.
Dampen a folded microfiber towel with isopropyl alcohol and lay it on the residue for 30–60 seconds. Then wipe gently in a single direction — not circular scrubbing. For tougher residue, apply an automotive adhesive remover and let it dwell for the time listed on the product label. For more in-depth treatment of stubborn adhesive, see our dedicated page on removing adhesive from car paint.
According to the EPA Safer Choice program, many consumer adhesive removers now use bio-based solvents that are less harsh than older petroleum-based formulas — a good option if you're concerned about paint safety.
Once all residue is gone, wash the area with car wash soap and rinse thoroughly. Dry with a clean microfiber. At this point, inspect under good lighting. You may notice:
Light swirls can be removed with a hand polish and a foam applicator pad. Apply a quarter-sized amount, work in small circles, then buff off with a clean microfiber. Follow up with a coat of car wax or paint sealant to restore protection to the now-bare clear coat. If the swirls are deeper, you may need a machine polisher — our guide on how to buff a car by hand covers manual polishing techniques in detail.
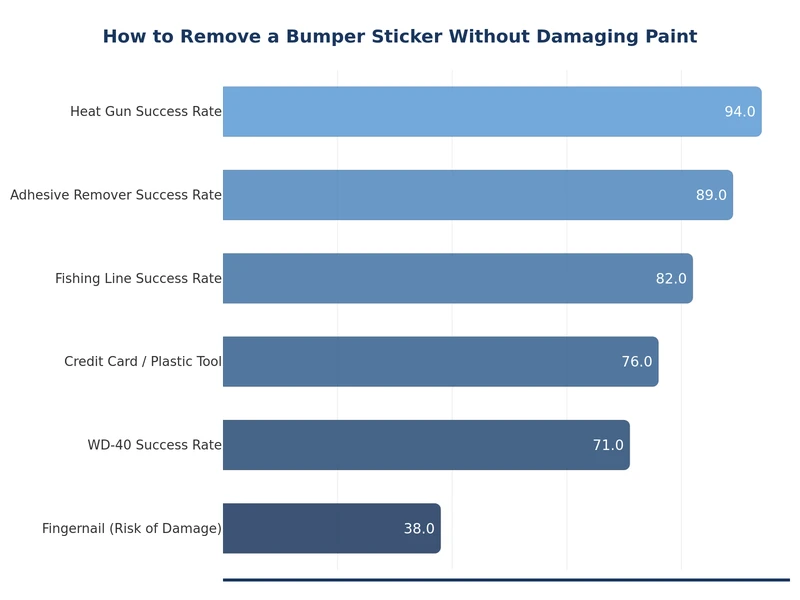
Not all removal scenarios are equal. The table below compares common techniques so you can choose the right approach for your situation.
| Method | Best For | Paint Safety | Effectiveness | Cost |
|---|---|---|---|---|
| Heat gun + plastic tool | All sticker types | Excellent | High | Low ($20–$40) |
| Hair dryer + fingernail | Small or thin stickers | Excellent | Moderate | Free (if owned) |
| Isopropyl alcohol | Residue removal | Good | High | Very low |
| Goo Gone Automotive | Heavy adhesive residue | Good | Very high | Low ($8–$12) |
| WD-40 | Light residue in a pinch | Fair (requires full wash after) | Moderate | Very low |
| Metal scraper / razor | Not recommended on paint | Poor (scratches clear coat) | High | Low |
Pro tips:
It can if done incorrectly. Dry scraping, using metal tools, or applying harsh solvents can scratch or etch the clear coat. Using a heat gun and a plastic trim tool, followed by an automotive adhesive remover, virtually eliminates the risk of paint damage.
Heat the sticker with a heat gun for 30–45 seconds, then peel slowly from a corner at a low angle. This is the fastest method that is also safe for paint. Using isopropyl alcohol or an adhesive remover immediately after clears any remaining residue quickly.
Yes, WD-40 can loosen adhesive residue and is generally safe on automotive paint. However, it leaves an oily film that must be thoroughly washed off with car soap afterward. Isopropyl alcohol or a dedicated automotive adhesive remover is a cleaner option.
Goo Gone Automotive is formulated specifically to be safe on car paint. The standard household Goo Gone (orange label) can be used in a pinch but should be rinsed off quickly. Always follow up with a car wash and apply wax after using any solvent on your paint.
Old stickers require more heat and patience. Apply heat for longer intervals and peel in very small sections, reheating frequently. Stubborn adhesive may need to soak in an adhesive remover for several minutes before wiping away. Avoid forcing the peel, as aged stickers tear easily and leave more residue.
Yes, waxing or applying a paint sealant after removal is strongly recommended. The area under the sticker has been protected differently from the surrounding paint, and the removal process strips away any existing wax layer. A fresh coat of wax restores protection and helps blend the appearance of the treated area.
 |
 |
 |
 |
About Joshua Thomas
Joshua Thomas just simply loves cars and willing to work on them whenever there's chance... sometimes for free.
He started CarCareTotal back in 2017 from the advices of total strangers who witnessed his amazing skills in car repairs here and there.
His goal with this creation is to help car owners better learn how to maintain and repair their cars; as such, the site would cover alot of areas: troubleshooting, product recommendations, tips & tricks.
Joshua received Bachelor of Science in Mechanical Engineering at San Diego State University.
Get some FREE car parts & gear.. Or check out the latest free automotive manuals and build guides here.
Disable your ad blocker to unlock all the hidden deals. Hit the button below 🚗
| | | |