by Diego Ramirez
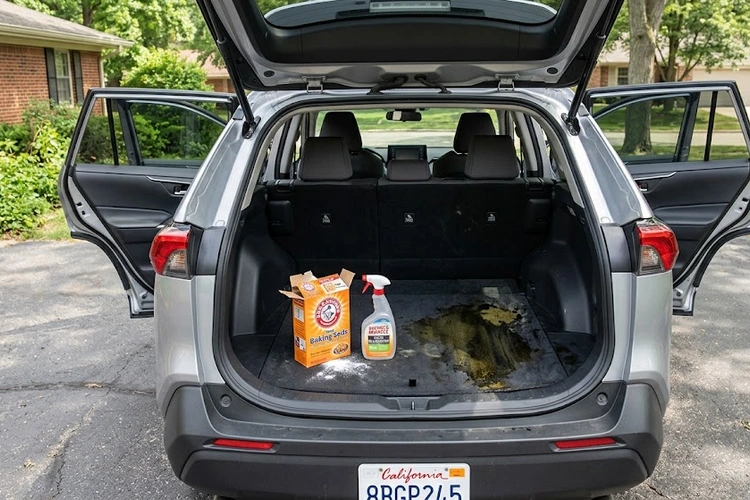
A quick stop at a rural gas station turned into a week-long ordeal when a misfiring diesel nozzle soaked through the rear carpet of a work pickup. By the next morning, the smell had migrated to every surface in the cabin. Diesel fuel is notoriously difficult to remove — it bonds to fabric fibers, seeps into foam padding, and resists most common cleaners. For anyone trying to remove diesel smell from car interiors, masking the odor simply does not work.
The problem extends beyond comfort. Diesel fumes contain hydrocarbons that can cause headaches and nausea with prolonged exposure, according to the U.S. Environmental Protection Agency. Addressing the smell quickly is both a comfort and a health issue. Drivers dealing with smoke odors face a similar challenge — a related guide on how to remove smoke smell from car interiors covers comparable techniques that apply here.
Contents
Diesel fuel is a complex mixture of hydrocarbons, and its odor compounds — particularly aromatic hydrocarbons like naphthalene and polycyclic components — have a high molecular weight. That means they evaporate slowly. Unlike gasoline, which volatilizes within hours, diesel clings to porous surfaces for days or weeks without intervention.
Car interiors are almost entirely porous. Carpet fibers, seat foam, headliners, door panel fabric, and rubber floor mats all absorb diesel on contact. The fuel also penetrates beneath the carpet underlayer and into subfloor padding, which is why surface cleaning alone rarely eliminates the smell. Air circulation helps, but it cannot extract compounds that have already bonded chemically to the material.
Diesel's odor is driven largely by sulfur compounds and polycyclic aromatic hydrocarbons. These molecules are lipophilic — they bind to oils and fats rather than water. This explains why water-based cleaners fail to cut the smell on their own. Effective removal requires either a surfactant-based degreaser to break the lipid bond or an enzymatic cleaner that digests the organic compounds at the molecular level.
Pro tip: Enzymatic cleaners work best when the treatment area is slightly damp during application — pre-moisten the surface lightly before applying, then allow the full contact time listed on the label before extracting.
The removal process depends on how much fuel spilled, where it landed, and how long it sat before treatment. A fresh spill on hard plastic responds to a simple wipe-down. A soaked carpet that sat overnight requires a multi-stage approach. The steps below address moderate-to-severe contamination — the most common scenario mechanics and detailers encounter.
Speed matters. The first priority is absorbing as much liquid diesel as possible before it spreads deeper into the material. Paper towels, old rags, or cat litter should be used to blot — never rub — the affected area. Rubbing forces fuel deeper into the fiber structure. Floor mats should be removed immediately and set outside to air out.
All doors and windows should be opened to ventilate the cabin. A quality car vacuum with a wet/dry attachment can extract loose liquid from carpet before it fully penetrates the padding. Standard household vacuums are not suitable — diesel residue can damage their motors.
Once surface diesel is removed, the next step is chemical cleaning. An automotive-grade enzyme cleaner or a commercial fabric degreaser should be worked into the carpet or upholstery with a stiff-bristle brush using circular motions to open the fibers. The product should dwell for the full contact time listed on the label — typically 10 to 15 minutes.
For leather seats affected by splash contamination, a pH-balanced leather cleaner is the appropriate choice rather than a degreaser, which can dry and crack the material. A full guide on fixing cracked leather car seats explains how prior damage affects how leather responds to chemical cleaners — relevant if the upholstery was already compromised before the spill.
Hard plastic trim can be wiped down with isopropyl alcohol or a mild all-purpose cleaner. The guide on how to clean exterior car plastic trim covers compatible product choices that apply equally well to interior trim surfaces. After all cleaning, residue should be extracted using a wet-dry vacuum or carpet extractor.
After cleaning, a faint diesel smell often persists for days as volatile compounds continue to off-gas from foam and padding. Activated charcoal bags placed inside the car overnight absorb airborne odor molecules effectively. Baking soda sprinkled onto dry carpet and left for several hours before vacuuming provides a low-cost neutralizing step. Ozone generators — available at auto parts stores or offered by detailers — are the most aggressive option, oxidizing odor-causing molecules directly.
Vehicles that have sat unused for extended periods present a particular challenge because odors become more deeply embedded over time. The guide on maintaining a car that sits unused for months addresses related moisture and odor issues that often compound diesel smell in stored vehicles.
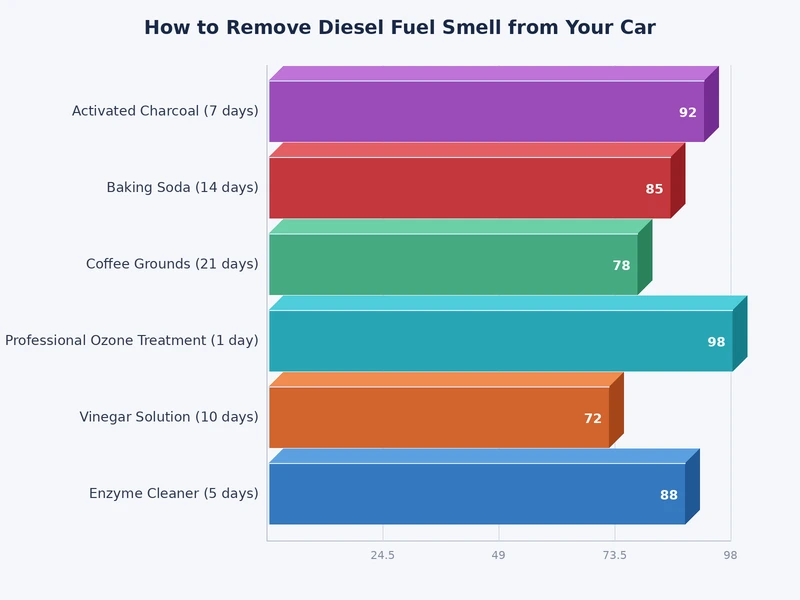
The market for automotive odor eliminators is crowded, and product claims vary widely. The table below compares the most commonly used product types based on mechanism, best use case, and typical effectiveness for diesel odor specifically.
| Product Type | Mechanism | Best For | Diesel Effectiveness | Avg. Cost |
|---|---|---|---|---|
| Enzyme cleaner | Digests organic compounds | Carpet, upholstery | High | $12–$25 |
| Ozone generator | Oxidizes odor molecules | Severe contamination | Very High | $40–$150 (rental/purchase) |
| Activated charcoal bags | Adsorbs airborne compounds | Ambient cabin odor | Medium | $8–$18 |
| Baking soda | Absorbs and neutralizes | Light odor, dry carpet | Low–Medium | Under $3 |
| White vinegar solution | Acid neutralization | Hard surfaces only | Low | Under $2 |
| Commercial odor bomb | Masking + light neutralization | Mild lingering smell | Low | $5–$15 |
Enzyme cleaners consistently outperform other DIY options for diesel specifically because of the lipophilic nature of the fuel compounds. Ozone treatment is the professional standard for severe cases but requires the vehicle to remain unoccupied during treatment and thoroughly ventilated for several hours afterward.
The cost of eliminating diesel smell varies significantly depending on spill severity and the approach taken. A minor spill caught within minutes can be resolved with $20 to $30 in cleaning products. A moderate spill that soaked into carpet will typically require $50 to $100 in supplies and several hours of labor. Severe contamination — a significant fuel leak or a large spill left untreated overnight — can push professional detailing costs to $200 to $500 or more.
For a standard carpet-and-upholstery cleanup, a realistic DIY supply list includes enzyme cleaner ($15–$25), activated charcoal bags ($10–$18), a stiff-bristle brush ($5–$10), and baking soda ($2–$3). Total investment typically falls between $32 and $56 for a moderate case. Renting an ozone generator from an auto parts store adds roughly $30 to $50 per day if the odor persists beyond the initial treatment.
Truck and SUV owners often face higher costs due to larger interior volume and more carpet surface area. A full diesel odor cleanup shares many steps with a complete truck interior detail, so combining the two tasks in a single session can be cost-efficient.
Most detailers charge by vehicle size and contamination level. Basic odor treatment for a sedan ranges from $75 to $150. Ozone treatment adds $50 to $100 on top of standard cleaning fees. For severe spills requiring carpet removal and underlayer treatment, costs can reach $300 to $600 at a full-service shop. Professionals also typically apply sealants after cleaning that help prevent residual odors from reactivating in hot weather — a step that is difficult to replicate with off-the-shelf products.
Diesel spills in passenger vehicles follow a few recurring patterns. Fleet drivers — particularly those operating pickups or work trucks — are most frequently affected, typically when filling auxiliary fuel cans stored in the bed that later tip over during transit. Trunk spills from portable jerricans are the second most common scenario, followed by accidental contamination at self-serve diesel pumps where nozzle misfires splash onto shoes and transfer residue to floor mats.
Warning: Never use gasoline or solvent-based products to clean a diesel spill — both are flammable, and residue trapped in warm upholstery padding can create a fire hazard.
In one widely cited case among professional detailing forums, a contractor's work truck required complete carpet removal after a five-gallon diesel can tipped over and sat unnoticed for two days. The underlayer padding had fully absorbed the fuel, and the truck required three rounds of enzyme treatment plus 48 hours of ozone exposure before the odor resolved. Surface-only cleaning had produced no measurable improvement. The lesson: the longer diesel sits untreated, the deeper it migrates — and the more labor-intensive the solution becomes.
The shoe-transfer scenario, by contrast, is typically addressable with a single cleaning session and resolves within 24 to 48 hours with proper ventilation. Removing and treating the affected floor mat separately from the main carpet often accelerates results in this case.

Both approaches have clear merit depending on the situation. DIY treatment works well for fresh, contained spills and gives vehicle owners direct control over product selection and timing. Professional detailing is more practical for severe contamination, cases where carpet removal is necessary, or when ozone equipment is needed but not owned.
Handling the cleanup independently keeps costs low, allows immediate response — which significantly improves outcomes — and does not require scheduling a shop visit. Most required products are available at auto parts stores or online. Drivers comfortable with general maintenance tasks, such as those familiar with checking and changing differential fluid or routine upkeep procedures, will find the process manageable with a few hours of focused work. DIY also allows repeated treatments over consecutive days without additional cost.
Professional detailers bring commercial-grade carpet extractors, industrial enzyme solutions, and ozone equipment that most households do not own. For contamination that has reached the underlayer or subfloor, carpet removal is typically required — a task that is time-consuming and risks damage to trim pieces if done without experience. The guide on cleaning cup holders and center consoles illustrates how professionals approach embedded odors in confined, layered spaces — the same methodical approach applies at the scale of full carpet treatment.
Several common responses to diesel spills actually compound the problem. Understanding what not to do is as important as knowing the correct procedure to remove diesel smell from car interiors effectively.
Air fresheners mask odors temporarily but do not neutralize the diesel compounds embedded in fabric. Within hours of application, the diesel smell typically breaks through. Worse, some air fresheners interact chemically with diesel residue, producing a combined odor that is harder to tolerate than either alone. Lasting results require physically extracting the contaminant from the material — there is no shortcut that bypasses that step.
Applying excessive water or cleaning solution without adequate extraction traps moisture under the carpet, promoting mold and mildew growth. The resulting mold odor compounds the diesel smell and creates a secondary problem entirely. Cleaning products should be applied sparingly — enough to penetrate the fiber without saturating the padding — and always followed by thorough wet-vacuum extraction.
Even after successful chemical treatment, residual volatile compounds continue to off-gas from carpet and foam for days. Without ventilation, these compounds redeposit on cabin surfaces and the odor returns. Parking with windows cracked in a well-ventilated outdoor area — not a closed garage — for two to three days after treatment accelerates the final off-gassing phase. This step is consistently skipped by drivers who declare the treatment unsuccessful after a single day, when the process was simply incomplete.
 |
 |
 |
 |

About Diego Ramirez
Diego Ramirez is a maintenance and care specialist who has been wrenching on cars since he was sixteen. He focuses on fluid changes, preventive care routines, paint protection, and the small habits that turn a five-year-old car into a fifteen-year-old car.
Get some FREE car parts & gear.. Or check out the latest free automotive manuals and build guides here.
Disable your ad blocker to unlock all the hidden deals. Hit the button below 🚗
| | | |