by Diego Ramirez
A neighbor's car sat under a highway overpass for six months. By spring, the silver hood was covered in tiny orange-brown specks — not mud, not bird droppings, just hundreds of rust-colored pinpricks that refused to wash off no matter how hard the scrubbing. Those specks are iron fallout, and the same thing happens to vehicles parked near roads, rail lines, and industrial areas every single day. Knowing how to remove iron fallout from car paint correctly protects the clear coat from long-term corrosion and keeps the finish looking showroom-sharp. The process is well within reach for any car owner — no professional equipment required.
Iron fallout (also called ferrous contamination) consists of microscopic metal particles — mostly from brake dust and rail dust — that embed into paint, clear coat, and even plastic trim, then oxidize over time. Left untreated, they corrode deeper into the surface and become much harder to extract. Full paint decontamination covering every stage of the process is explained at the car paint decontamination guide on CarCareTotal. This post focuses specifically on the iron removal step: what products work, how to apply them safely, and how to keep fallout from coming back.
Contents
Two products dominate iron decontamination: liquid iron fallout remover and detailing clay. They work in entirely different ways. A liquid iron remover uses a chemical reaction — the active ingredient (usually ammonium thioglycolate or sodium thioglycolate) bonds with iron particles and converts them into a water-soluble compound that rinses away. Clay bars work mechanically, physically shearing contamination off the surface through friction with a lubricant.
Both tools have their place, and the most thorough decontamination uses them in sequence: chemical remover first to dissolve embedded iron, then clay to lift anything that remains. Detailing clay bars are widely available and safe on modern clear coat finishes when used with proper lubricant. Neither method alone covers every type of contamination — but together they leave the surface genuinely clean.
| Feature | Liquid Iron Remover | Clay Bar |
|---|---|---|
| How it works | Chemical reaction dissolves iron | Mechanical abrasion lifts particles |
| Effort required | Low — spray, wait, rinse | Moderate — repeated passes needed |
| Best for | Fresh or moderate iron buildup | Stubborn embedded contamination |
| Paint safety | Very safe if rinsed promptly | Safe with adequate lubricant |
| Time per vehicle | 10–20 minutes | 30–60 minutes |
| Typical cost | $12–$25 per bottle | $10–$30 per clay kit |
| Reusability | Until bottle is empty | Until clay is too contaminated |
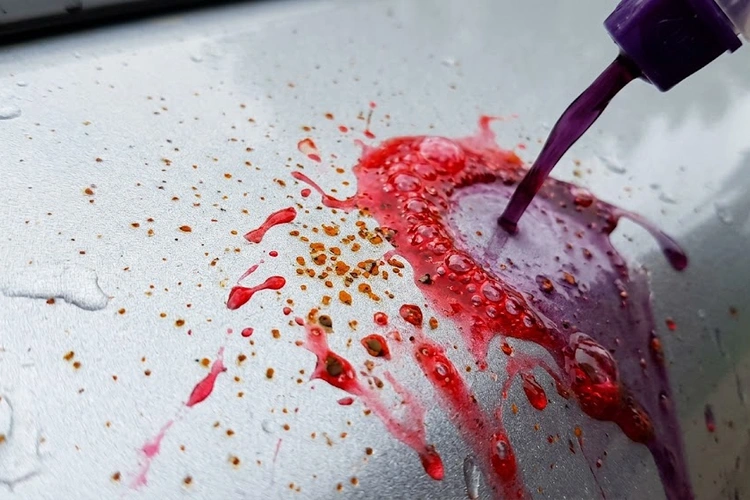
Before starting, gather everything in one place. The core requirement is a quality iron fallout remover — popular options include Gyeon Iron, Koch-Chemie Ferro, and CarPro Iron X. Any of these turns purple or deep red on contact with iron particles, making it easy to see where contamination is heaviest. Beyond the remover, a garden hose or pressure washer handles rinsing, and two clean microfiber towels take care of drying afterward. Completing a proper two-bucket car wash before applying iron remover is strongly recommended — the product works best on a clean surface free of loose dirt and road film.
A spray bottle makes product application more controlled, especially on vertical panels. A detailing clay bar and dedicated clay lubricant round out the kit for a complete decontamination session. For vehicles with significant buildup around wheel arches and body panel gaps, a soft detailing brush helps work product into areas a spray alone may not saturate. After decontamination, paint is completely bare and porous — a round of wax or paint sealant is the logical finishing step. The comparison at liquid wax vs. paste wax helps narrow down the right protection layer for each situation and budget.
Pro tip: Never apply iron fallout remover in direct sunlight or on a hot surface — the product dries before it can react fully, leaving streaks that require another full wash cycle to correct.
For most daily drivers with light to moderate iron buildup, the basic method is fully effective. Start by washing the car thoroughly to remove loose dirt and grime. Once the paint is clean and still damp, spray iron remover generously across all painted panels — work one section at a time rather than the whole car at once. Allow the product to dwell for three to five minutes; the purple or red bleeding reaction signals active chemistry at work. Rinse thoroughly with a strong stream of water, making sure no product remains on the surface beyond the recommended dwell time. Dry with a clean microfiber towel and inspect the paint in good lighting from multiple angles.
Professional detailers add a clay bar pass after the chemical step, then inspect paint with a plastic bag stretched over the hand — a technique called the "bag test" that reveals surface texture invisible to the naked eye. Any roughness means contamination still remains. Professionals also decontaminate wheel arches, plastic trim, and glass, not just the painted body panels. Iron fallout settles across every exterior surface. After claying, a light paint polish removes any marring left by the clay bar, and fresh sealant locks in the clean result. Anyone preparing a vehicle for resale will find this full sequence covered in the guide to detailing a car before sale — iron decontamination is a step that raises perceived value noticeably.

Iron fallout remover is the right tool when orange or brown specks appear on light-colored paint, when the surface feels rough after washing, or before any polishing or paint correction session. It should also be applied before laying down fresh wax or ceramic coating — applying protection over contamination traps the particles and accelerates paint degradation. Stripping away old wax buildup before decontamination helps the iron remover reach the paint surface more effectively, especially on vehicles that have gone multiple seasons without a full detail.
There are times to hold off, though. Do not use iron remover on freshly painted or wrapped surfaces without checking with the paint shop first — some fresh clear coats and vinyl wraps are sensitive to strong chemical decontaminants. Also avoid application on extremely hot days unless working in a shaded area, and never apply it near exposed bare metal or deep paint chips, as the chemical reacts with unprotected steel in ways that are difficult to neutralize cleanly. In those cases, address the paint damage first. The process for handling paint bubbling covers situations where the clear coat has already begun lifting and needs attention before any decontamination step.
Warning: Iron fallout remover produces a strong sulfur smell when active — always work outdoors with good airflow, and avoid breathing the mist directly during application.
Work in sections rather than spraying the whole vehicle at once. Large cars take time to cover fully, and product applied to the roof may begin drying by the time the lower panels are reached. Spraying one panel at a time keeps the chemistry active for the full dwell window.
Temperature matters more than most guides acknowledge. The ideal working range is between 50°F and 75°F (10°C to 24°C). Cold temperatures slow the chemical reaction, requiring longer dwell times to achieve the same result. Hot conditions cause rapid evaporation, which leads to streaking. During colder months, storing the car in a heated garage before decontamination makes a meaningful difference — the same seasonal awareness that applies to winter car maintenance applies to winter detailing as well.
After rinsing, do not skip the drying step. Water spots left to air-dry on freshly decontaminated paint — which carries no wax protection at this point — are surprisingly stubborn to remove. The technique in the guide to drying without water spots applies directly here: use a clean, plush microfiber towel and blot rather than drag across the surface.
The advantages of liquid iron fallout remover are difficult to argue with. The product does the heavy lifting with minimal physical effort, reaching into body panel gaps, wheel arches, and textured surfaces where a clay bar simply cannot follow. The color-change reaction doubles as a useful diagnostic tool — deeper purple bleeding indicates heavier iron loading, which helps identify problem areas on the vehicle. Products in the $15–$25 range last through multiple full decontamination sessions, making the cost-per-use genuinely low.
The downsides are mainly practical. The smell is unpleasant and lingers in enclosed spaces. Misuse — leaving product on too long, applying in heat, or missing a rinse spot — causes streaking that requires another full wash cycle to correct. Chemical decontamination also does not remove non-ferrous contamination like tar, sap, or industrial road film; those contaminants require a separate tar remover or clay bar pass. Iron remover is not a substitute for regular washing either. Vehicles that go long periods without a wash accumulate heavy contamination faster, turning iron removal into a frequent necessity rather than a routine maintenance step. The guide to maintaining paint gloss between washes explains practical habits that slow contamination buildup considerably.
Prevention is more effective than repeated decontamination. Paint protection film (PPF) and ceramic coatings create a barrier that prevents iron particles from bonding directly to the clear coat. Coated vehicles still collect fallout on the surface layer, but it rinses away far more easily — often with a standard wash and no chemical treatment required. Even a quality carnauba wax applied every eight to twelve weeks provides meaningful resistance compared to bare, unprotected paint.
Parking habits matter too. Vehicles parked near rail lines, construction sites, or busy intersections accumulate iron fallout at a much faster rate than those stored in garages or kept away from heavy traffic. When garage storage is not an option, a quality car cover provides a practical physical barrier. In areas with heavy road salt use, iron contamination and salt damage tend to compound each other — the process for removing salt stains from car paint is often needed alongside decontamination in late winter and early spring, when both types of damage peak together.
Scheduling iron decontamination as part of a regular maintenance calendar — twice a year for most vehicles, quarterly for those exposed to heavy fallout — keeps the process manageable and prevents buildup from becoming a serious problem. Combined with protecting the car underbody from rust, consistent iron fallout removal adds up to real long-term paint preservation that holds value over time.
For most vehicles, decontaminating twice a year — once in spring after winter salt and brake dust exposure, and once in autumn before winter — keeps iron buildup under control. Cars parked near rail lines, highways, or industrial areas benefit from quarterly treatment.
Yes, chemical iron removers are safe on factory clear coats in all colors when used as directed. The product must be rinsed off within the recommended dwell time — typically three to five minutes — and never allowed to dry on the surface. Avoid use on matte or satin finishes without confirming compatibility with the specific product manufacturer first.
Iron particles left untreated corrode through the clear coat and eventually into the base coat below. Over time this produces permanent rust staining and surface pitting that requires wet sanding or a full respray to correct. Removing iron fallout regularly prevents this damage entirely.
Clay bars remove some surface iron mechanically, but they cannot dissolve particles that have chemically bonded into the clear coat. Using a liquid iron remover first dissolves those embedded particles, then a clay bar pass lifts anything that remains. Together, the two steps produce a fully decontaminated surface that neither method achieves alone.
The active ingredient in most iron removers reacts with ferrous (iron-containing) particles to form a visible compound — typically a purple or deep red iron-thioglycolate complex. The intensity of the color directly indicates how much iron contamination is present on that area of the surface.
 |
 |
 |
 |

About Diego Ramirez
Diego Ramirez is a maintenance and care specialist who has been wrenching on cars since he was sixteen. He focuses on fluid changes, preventive care routines, paint protection, and the small habits that turn a five-year-old car into a fifteen-year-old car.
Get some FREE car parts & gear.. Or check out the latest free automotive manuals and build guides here.
Disable your ad blocker to unlock all the hidden deals. Hit the button below 🚗
| | | |